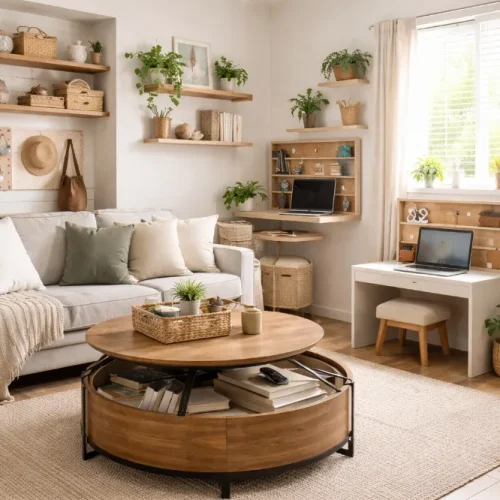
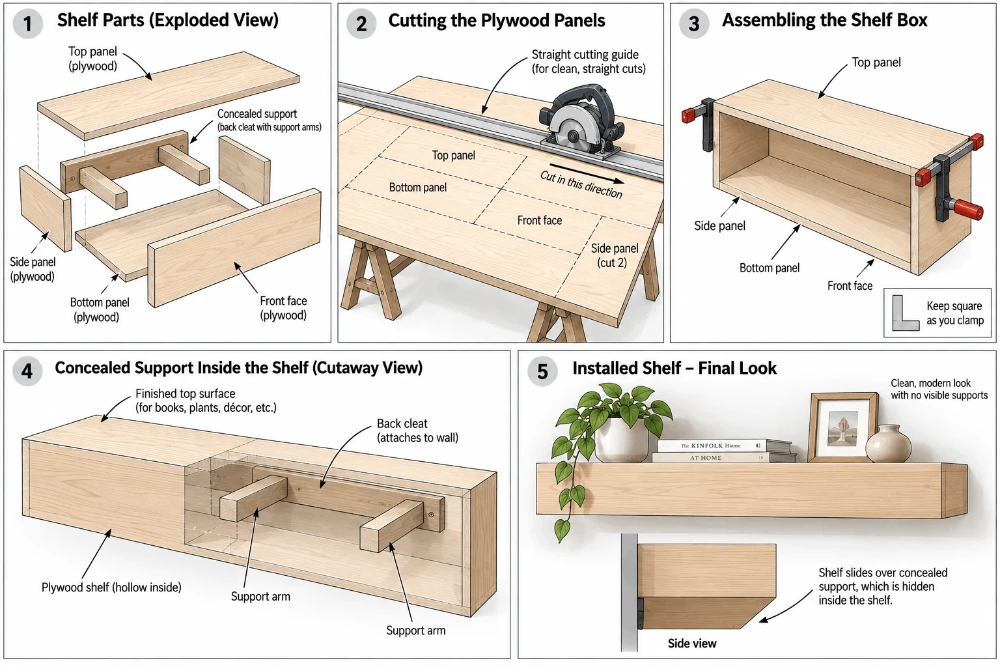
Floating shelves add useful storage without filling a room with bulky furniture. They work above desks, in kitchens, beside beds, in bathrooms, and anywhere an empty wall could earn its keep.
Building your own gives you more control than buying ready-made. You choose the exact length and depth, match the finish to your room, and can make several shelves for less than many store-bought options.
Plywood suits this project well. It’s easy to find, comes in large sheets, and cuts into custom-sized panels. With careful cuts and a concealed support, you can turn it into a clean floating shelf with no visible brackets. Here’s the process, from planning through installation.
What You’ll Need to Build Plywood Floating Shelves
The exact materials depend on your shelf dimensions and the look you want. Start with this list and adjust it to your project.
Materials:
- Plywood
- A straight length of lumber for the concealed support
- Wood glue
- Wood screws
- Appropriate wall fasteners
- Wood filler
- Edge banding or thin solid wood for exposed edges
- Paint, stain, or clear finish
Tools:
- Circular saw
- Straight-cutting guide
- Drill/driver
- Stud finder
- Tape measure
- Carpenter’s square
- Level
- Clamps
- Sander or sanding block
You don’t need a workshop full of stationary tools. A circular saw handles the main plywood cuts when you pair it with a reliable straightedge or guide system. Before you start, think about where you’ll cut the sheet: the plywood needs to be supported so it can’t shift, sag, or drop mid-cut.
Step 1: Plan the Shelf Dimensions and Location
Don’t start cutting the moment you bring the plywood home. A few minutes of planning prevents wasted material later.
Decide where the shelf will go, then measure the available wall space and settle on the finished length, depth, and thickness. If you’re installing several shelves, decide how much vertical space to leave between them. Think about what will sit on the shelf too, because a shallow shelf holding framed photos has very different requirements from a deep one holding books or kitchen items.
Next, inspect the wall. Use a stud finder to locate framing where relevant and mark the positions lightly in pencil. Knowing where the strongest mounting points are helps you plan the shelf and its concealed support before you build them. Your floating shelf is really two parts: a hollow outer shell, and a support fixed to the wall that the shell slides over and hides.
Account for Plywood Thickness
An easy mistake is designing the outside dimensions without accounting for the thickness of the plywood itself. The size of the front face, for example, depends on how the top and bottom panels meet it, and your measurements change depending on whether pieces overlap, butt together, or join another way.
Sketch the shelf from the front and the side, and write the dimensions beside each piece before you make your cut list. It’s much easier to change a number on paper than to remake a mis-sized panel.
Step 2: Cut the Plywood into Shelf Panels
Straight cuts matter here. A slightly uneven edge can leave a visible gap where two panels meet, and an out-of-square cut makes assembly harder and can leave the finished shelf looking twisted.
Start by marking your top and bottom panels, using the same reference edge wherever possible rather than measuring each part from a different point. You don’t need a table saw for this. A circular saw paired with TrueTrac gives you a guided setup for the long, straight cuts that break plywood down into shelf-sized panels.
Whatever method you use, support the plywood across the cutting area so the offcut can’t drop and tear material away as the blade reaches the end.
For cleaner results:
- Use a sharp blade suitable for plywood.
- Check your measurements twice.
- Confirm which side of the line is the finished piece.
- Position the guide carefully before you start the saw.
- Keep a steady feed rate rather than forcing the blade.
- Let the blade stop before you set the saw down.
- Label similar-looking panels as you cut them.
Cut the top, bottom, and front pieces to your plan. If you’re building several identical shelves, cut the matching pieces together so their dimensions stay consistent.
Step 3: Build the Hollow Floating Shelf Box
With the plywood cut, start turning the flat panels into a shelf. Begin with a dry fit: set the top, bottom, and front pieces together without glue, check that the edges line up, and confirm the overall dimensions match your plan. Check the internal opening at the same time, because the finished shelf has to slide over the concealed support. If that opening is too small, the shelf won’t seat.
Once you’re happy with the fit, assemble the shell with the joinery method your design calls for. Apply wood glue evenly along the mating surfaces, position the pieces, clamp them, and check for square before the glue sets. Fasteners add reinforcement where you need it, but plan their positions if you want a clean exterior. You can fill and sand any visible holes before finishing.
Wipe away excess glue while it’s still soft. Dried glue is hard to remove and can stop stain from absorbing evenly. Let the assembly cure per the adhesive manufacturer’s instructions before you put it under any stress.
Step 4: Finish the Exposed Plywood Edges
Plywood edges give you several design options. You can hide them for a furniture-like look or leave the layers visible as part of the design. Neither is automatically better; it depends on the room and the effect you want.
| Edge treatmentFinished lookDifficulty | ||
| Exposed plywood | Modern and casual | Easy |
| Edge banding | Clean and minimal | Easy |
| Solid wood face | Traditional furniture look | Moderate |
| Filled and painted | Smooth painted finish | Easy to moderate |
Using Edge Banding
Edge banding is one of the easiest ways to cover plywood layers. It comes in different finishes and applies over the exposed edge, using either a heat-activated adhesive or another method depending on the product. Once it’s on, trim the excess carefully and lightly sand the transition between the banding and the plywood. Go easy: thin veneer damages quickly.
Adding a Solid Wood Face
Another option is a narrow piece of solid wood across the front. It makes the shelf look thicker and gives you a solid edge you can shape or lightly round over. If you’re staining or clear-coating, choose wood that works with your plywood. If everything will be painted, a smooth joint matters more than matching the species.
Leaving the Layers Visible
You don’t have to hide plywood at all. A neat plywood edge suits modern, Scandinavian, workshop, and minimalist rooms. Sand it carefully and apply the same clear finish you used on the rest of the shelf. Making the material part of the design also saves you a finishing step.
Step 5: Build the Concealed Wall Support
The hidden support is what creates the floating effect. Its design depends on your shelf dimensions, the wall construction, and what you plan to put on it. A common approach uses a horizontal wood cleat with support arms projecting out into the hollow shelf.
Measure the inside of your shelf rather than relying on the original plan. Build the support so the shelf slides over it without much play: too large and the shelf won’t go on, too small and it feels loose. Keep the support arms square to the rear cleat.
Before you mount anything, test-fit the support inside the shelf. The shelf should slide over it smoothly while still sitting closely on it. Make your adjustments now, while everything is on the workbench.
Step 6: Sand and Finish Your Shelves
Finishing is easier before the shelf goes on the wall. Start by sanding the plywood and any edge treatment, paying extra attention to joints, filled fastener holes, and the front edge, since those areas are easy to see once installed.
A simple sequence:
- Sand the shelf.
- Remove all sanding dust.
- Fill small holes or imperfections.
- Let the filler dry.
- Sand those areas smooth.
- Apply primer if needed.
- Paint, stain, or clear-coat.
- Let the finish cure as directed.
The finish sets the character of a plain plywood shelf. A clear finish keeps the natural grain. White or neutral paint helps the shelf blend into the wall. A darker stain adds contrast in a living room, and a bold painted color works well in a kid’s room or a home office. If you’re building several shelves, finish them together so the color and sheen stay consistent.
Step 7: Mount the Floating Shelf Securely
Mark the shelf height on the wall, position the concealed support, and use a level to check that it’s horizontal.
Find the right fixing points for your wall. Where the design allows, mounting into structural framing gives a strong attachment, but walls vary, and the correct fasteners depend on the wall material, the shelf design, the expected load, and the conditions of the install. Don’t assume a generic wall anchor is suitable just because it fits the screw. Follow the fastener manufacturer’s specifications and any applicable instructions, and if you’re unsure whether a wall or method can carry the load, get professional advice.
Once the support is secure, check it with the level again. Slide the shelf over the support slowly, and don’t force it. If it stops partway, take it off and find the interference rather than hammering it into place. Depending on your design, you can add discreet screws to lock the shell to the internal support. Step back and check the final position from several angles.
Common DIY Floating Shelf Mistakes to Avoid
Floating shelves are simple to build, but small errors get surprisingly obvious once they’re on a wall.
Cutting before checking the wall: Your intended dimensions may not suit the available mounting points or the surrounding furniture.
Forgetting material thickness: The outside and inside dimensions aren’t the same. Account for every layer of plywood in your cut list.
Making every measurement independently: Small differences add up. Work from consistent reference edges.
Ignoring cut quality: A rough cut can look acceptable during construction and then stand out along the front of the finished shelf.
Building the support from the planned dimensions: Build it to fit the actual finished shelf, since minor differences creep in during cutting and assembly.
Mounting the support out of level: Even a well-built shelf looks wrong if its concealed support isn’t level.
Choosing fasteners without considering the load: A few decorative objects and a row of heavy books make very different demands.
Rushing the finish: Glue marks, scratches, gaps, and poorly filled holes all get easier to see once stain or paint goes on.
Easy Ways to Customize Your Floating Shelves
Once you’ve got the basic construction, you can adapt it throughout the house. In a small kitchen, build shallow shelves for spices, mugs, or everyday items. In a bathroom, compact shelves use up otherwise empty wall space. A short shelf beside a bed can replace a bedside table in a tight room, holding a lamp, phone, or book without taking floor space. Above a desk, a set of matching shelves adds vertical storage for books and supplies, and longer shelves turn an empty living room wall into display space for plants, photos, and decor.
You can also change the look without changing the build. Natural plywood with a clear finish reads completely differently from the same shelf painted to match the wall, and a solid wood front can make inexpensive plywood look like traditional furniture. That’s a real benefit of building them yourself: you’re not stuck with the standard sizes and finishes in stores.
FAQs About DIY Plywood Floating Shelves
No single thickness works for every shelf. The right material depends on the shelf dimensions, internal support, span, construction method, and expected load. Design the shelf and support together rather than picking a plywood thickness on its own.
Yes. A circular saw cuts the main plywood panels. What matters is straight, accurately positioned cuts, and a suitable guide helps control the saw’s path on longer cuts across sheet material.
Edge banding is one of the simplest options. You can also attach a thin solid wood face, or fill and paint the exposed edge. Or sand the edge carefully and leave the layers visible as a deliberate design feature.
It depends on the wall construction, shelf design, expected load, and fasteners. Structural framing gives strong mounting points where it’s available, but assess each install on its own and follow the specifications for your hardware and wall type.
Start with a shelf and support designed for the intended span and load. Secure mounting, suitable materials, correctly placed internal supports, and sensible weight distribution all play a part. Don’t treat a decorative floating shelf as heavy-duty storage unless it was designed and mounted for it.
Wrap-Up
Plywood floating shelves turn a plain wall into storage without a big workshop or complicated joinery. The finished quality comes down to the basics: measure the space before you cut, keep the panels straight and square, take your time on the visible edges, test-fit the concealed support, and choose a mounting method suited to the wall and the load. Once you’ve built one, the same design stretches to almost any room. Change the dimensions, the edge treatment, or the finish, and a single sheet of plywood becomes anything from a compact bedside shelf to a wall of custom storage.