Every kitchen has that one cabinet. You open the door, a spray bottle tips over, a wad of plastic grocery bags slides out, and you shove it all back and close the door fast. The space under the sink works harder than almost any other storage spot in the house, yet it rarely gets the love we give to open shelves, a styled countertop, or a pretty pantry.
It deserves better. With one afternoon, a few budget-friendly bins, and a little creativity, you can turn it into a cabinet you actually enjoy opening. Think matching labels, a fresh liner, and a spot for everything. There is a practical bonus, too. While the cabinet is empty, you get a rare, clear look at your pipes, so you can catch slow leaks that might otherwise hide for months.
This guide walks you through the whole makeover, from clearing it out to styling it, plus a few easy DIY upgrades and a quick monthly routine that keeps it looking good long after the first weekend.
Why This Cabinet Deserves a Second Look
The cabinet under your sink does two jobs at once. It stores your everyday cleaning supplies, and it hides your plumbing. Drain pipes, supply lines, shutoff valves, and often a garbage disposal all share the same cramped box. When clutter piles up in front of them, small problems stay out of sight.
Those small problems add up. The EPA estimates that the average household’s leaks waste more than 9,300 gallons of water every year, and a faucet that drips once per second can waste more than 3,000 gallons a year. You can find those numbers, along with simple ways to check your home, in the EPA’s guide to fixing household leaks. An organized cabinet makes a leak much easier to notice, which is why tidying up and checking the pipes go hand in hand.
What You’ll Need
You don’t need a big budget for this project. Most of the supplies are things you already own or can pick up at a dollar store, a home improvement store, or online.
- Cleaning basics: A damp cloth, a mild all-purpose cleaner, and an old towel or tray to set everything on.
- A flashlight: Your phone light works fine for the leak check.
- Paper towels: These are the easiest way to test pipe connections for moisture.
- A waterproof liner or mat: You’ll find a comparison of options in Step 3.
- Organizers: Bins, a caddy, a turntable, or a sliding organizer sized to your cabinet.
- Labels: Printed, handwritten on kraft tags, or made with a label maker.
- A measuring tape: This is the one tool you really can’t skip.
Before you shop, measure the width, depth, and height of the cabinet, then measure the open space on each side of the drain pipe. Save those numbers in your phone. Plenty of under-sink organizers look perfect in the store and then bump straight into the pipes once you get them home.
Step 1: Empty the Cabinet Completely
Take everything out. Set it all on a towel or tray on the counter so you can see exactly what you own. Then wipe down the floor and walls of the cabinet with a damp cloth and let it dry fully. Leaving the door open for an hour or so helps.
Sort as you go:
- Keep: Things you use every week, like dish soap, a scrub brush, sponges, and dishwasher tablets.
- Move: Items that belong somewhere else, like paint, light bulbs, pet supplies, or extra paper towels.
- Toss: Dried-out sponges, empty bottles, leaking containers, and that third bottle of a cleaner you never use.
- Share: Unopened products you’ll never get to. A neighbor, friend, or local shelter may be happy to have them.
Use up half-empty bottles before you open new ones. Most people end up with far more room than they expected, which makes the styling part much easier.
Step 2: Check for Leaks While It Is Empty
This step makes the whole project worth it. With the cabinet bare, grab a flashlight and look closely.
- Check the cabinet floor for water stains, warping, or soft spots.
- Run a dry paper towel along each pipe and connection. Even a tiny bit of moisture shows up right away.
- Look around the faucet connections and shutoff valves for drips or crusty mineral buildup.
- Sniff for a musty smell, which can point to hidden moisture.
- Run the water for a minute, then check the connections again.
Use this quick table to make sense of what you find:
| What You Notice | What It Could Mean | What to Do |
|---|---|---|
| Water stains or a warped, swollen cabinet floor | A slow, ongoing drip from a drain joint or supply line | Dry the area, tuck a paper towel under the joints, and recheck in 24 hours |
| Moisture on a drain connection | A loose slip nut or worn washer | Gently hand-tighten the nut; call a plumber if it keeps weeping |
| White or green crust on a valve or fitting | Mineral buildup from a small, steady drip | Have the valve or fitting inspected |
| A musty or damp smell | Hidden moisture or early mold growth | Find the source before you put anything back |
| Drips only while water is running | A leak in the drain line or dishwasher hose | Run the water and watch each joint with a flashlight |
Plumbers list the same warning signs for leaks: damp surfaces, drips or puddles near pipes, staining, musty odors, and higher water bills with no change in use. If you spot any of them, it helps to know the plumbing issues that demand immediate attention so you can tell what can wait a few days and what can’t.
Found something? Do not stack pretty bins in front of it and hope for the best. A small leak rarely stays small, and constant moisture can lead to mold and a rotting cabinet floor. Plan to have a plumber handle the leak repair before you finish organizing.
Step 3: Protect (and Prettify) the Cabinet Floor
Add a liner. A good one catches drips and spills, turns cleanup into a quick wipe, and gives the cabinet a finished look. Here is how the most common options compare:
| Liner Type | Why People Like It | Watch Out For |
|---|---|---|
| Silicone under-sink mat with raised edges | Holds a spill, wipes clean, and flexes around pipes | Measure carefully so it fits the cabinet floor |
| Rubber or vinyl shelf liner | Inexpensive, easy to cut, and comes in many patterns | Won’t contain a larger spill |
| Peel-and-stick contact paper | Adds color or pattern for very little money | Water can creep under the edges, so pair it with a mat |
| Plastic boot tray | Cheap and has a built-in lip | Looks more utility than style |
For the best of both worlds, line the cabinet floor and walls with a pretty contact paper, then set a waterproof mat with a raised edge on top. The paper gives you the style, and the mat does the hard work. A light color helps too, because a new drip is easy to spot on a pale surface.
Want a bigger refresh? Paint the inside of the cabinet with a moisture-resistant kitchen and bath paint in a soft white or a cheerful accent color. Make sure any leaks are fixed and the wood is completely dry first. Then lift the liner and check beneath it every month or so. It takes about a minute.
Step 4: Organize Around the Plumbing
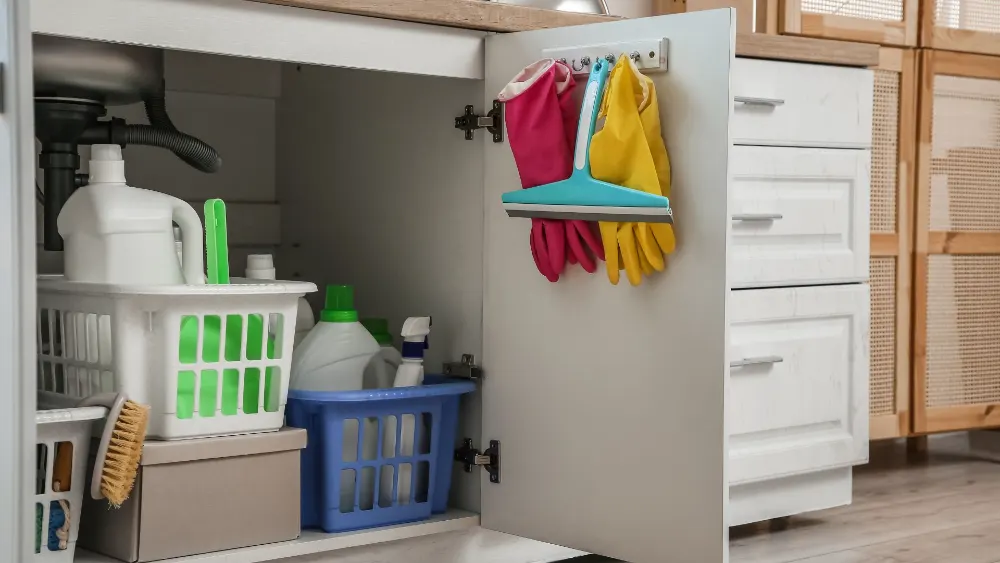
The pipes take up the middle of the cabinet, so work around them instead of fighting them. Start by creating zones, such as dishwashing, surface cleaning, and trash and recycling, so every item has an obvious home. Then pick organizers that fit each zone:
| Organizer | Budget | Best For |
|---|---|---|
| Two-tier sliding organizer with a pipe cutout | $$ | Deep cabinets and everyday cleaners |
| Tension rod mounted near the top | $ | Hanging spray bottles by their necks |
| Adhesive door hooks or an over-door rack | $ | Gloves, a dish brush, or a towel |
| Clear bins with handles | $ to $$ | Grouping items by task |
| Turntable (lazy Susan) | $ | Corners and small bottles |
| Stackable mini drawers | $$ | Sponges, refills, and small items |
Keep the things you grab daily in a small caddy up front so you can reach them without crouching. Store backups and refills toward the back.
Most important, keep a clear path to your shutoff valves. If a supply line fails, you want to reach those valves in seconds. You do not want to pull out three bins first. If nobody in the house knows which valve does what, add a small label to each one.
Step 5: Style It Like the Rest of Your Kitchen
Once the cabinet works, make it look good. A few small touches can make it feel like part of your kitchen design instead of a hiding spot.
- Stick to a simple palette. White, clear, or soft neutral bins look calm and cohesive, even in a tight space.
- Label everything. Chalkboard labels, kraft paper tags, or printed labels that match your pantry give the cabinet a pulled-together look and help everyone put things back.
- Upgrade your soap. Pour dish soap and hand soap into glass or ceramic pump bottles for the counter. Keep refills under the sink.
- Corral the small stuff. A woven basket or small crock holds sponges, brushes, and scrubbers so they don’t roll around.
- Tame the trash bags. A slim wall-mounted dispenser on the inside of the door keeps rolls flat and out of the way.
One rule to remember: soap is the only thing worth decanting. Keep cleaners, sprays, and chemicals in their original, labeled bottles. You’ll see why in the next step.
Step 6: Store Cleaning Products Safely
The space under the sink is a popular spot for cleaners. It is also within easy reach of curious kids and pets. KidsHealth offers safe storage tips for household products. It recommends keeping cleaning products and aerosol sprays in a high cabinet far from reach, using safety latches on cabinets that hold chemicals, and leaving products in their original bottles.
If you have little ones at home, move the cleaners up high. Use the cabinet under the sink for things like trash bags, sponges, and a bucket. Keep bleach and ammonia-based cleaners on separate shelves, and save the Poison Help number, 1-800-222-1222, in your phone.
Step 7: Give the Garbage Disposal Some Space
If you have a garbage disposal, it takes up a big chunk of the cabinet. Keep bins and bottles from pressing against the unit and its wiring. Leave enough room to see the seals and connections when you do your monthly check.
Disposals jam from time to time. The reset button on the bottom of the unit is the first thing to try. If it still won’t run, it is time to call for garbage disposal repair. Also keep in mind that a slow-draining sink often starts with a clog in the drain pipe, not in the disposal itself.
Weekend DIY Upgrades for Under the Sink
If you love a project, these simple builds can make the cabinet work even harder:
- A U-shaped shelf. Cut a piece of plywood with a notch for the drain and set it on two short supports. It adds a second level right where the pipes would normally waste space.
- A pull-out tray. Mount a shallow plywood tray on drawer slides so you can roll supplies out instead of digging for them.
- A door rack from a curtain rod. A short café rod mounted on the inside of the door makes a perfect spot for a towel or rubber gloves.
Seal any wood you add with a water-resistant finish so it holds up to the occasional drip.
When the Layout Is the Problem
Sometimes organizers cannot fix a cabinet that was cramped from the start. A deep sink basin, an old drain setup, or extra lines for a dishwasher or ice maker can eat up space. If you are planning a kitchen refresh, ask a plumber about kitchen plumbing updates that open up the room, like rerouting pipes or changing the sink. It is a smart time to do it, since the cabinets and counters may already be coming out.
Keep It Up With a Five-Minute Monthly Check
Once the cabinet is set, a short routine keeps it tidy and leak-free:
- Pull out the front bin and shine a light at the pipes.
- Run a paper towel along the connections.
- Wipe the liner and check beneath it.
- Toss anything empty, expired, or leaking.
- Make sure the path to the shutoff valves is still clear.
Pair it with something you already do each month, like changing the sponge or restocking dish soap, and it quickly becomes a habit.
Final Thoughts
Organizing the cabinet under your sink is a small, budget-friendly project with a real payoff. You gain space, you cut the clutter, and you end up with a cabinet that looks as good as the rest of your kitchen. Best of all, you get a regular look at pipes that normally hide in the dark. Spend one afternoon on it, add a quick monthly check, and you will catch trouble early and keep your kitchen running smoothly.