This post contains affiliate links. As an Amazon Associate, I earn from qualifying purchases, at no extra cost to you. See our disclosure policy.
The demolition part is usually the satisfying part.
You pry off the old chair rail, remove the dated backsplash, finally take down that oversized mirror, or dismantle the built-in that has been dominating the room for years. Suddenly, the space feels bigger and full of possibilities.
Then you look at the wall.
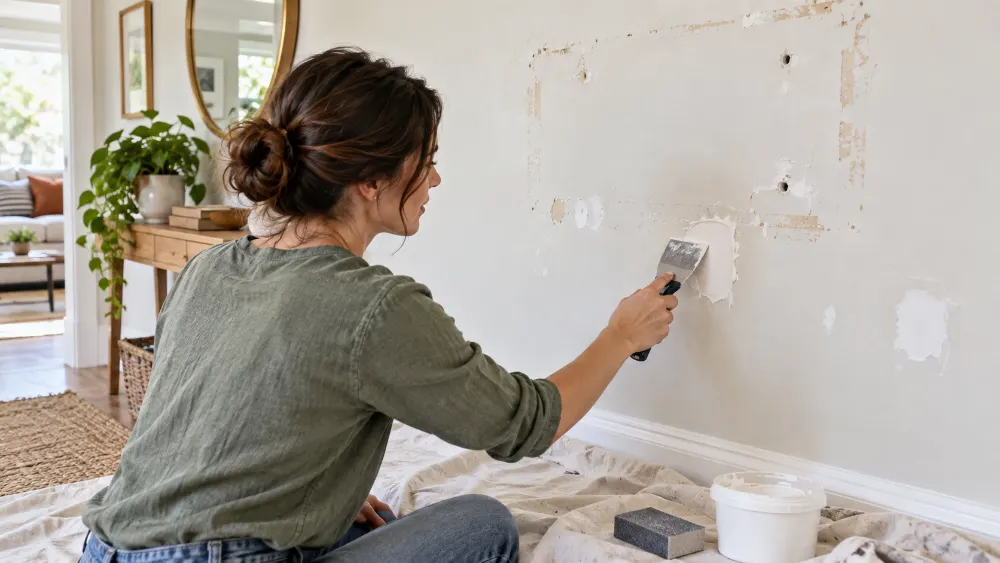
There are adhesive blobs, torn drywall paper, anchor holes, old paint lines, rough patches, and one suspicious rectangle that appears to be an entirely different color from the rest of the room.
It can look terrible. Fortunately, that doesn’t necessarily mean the wall is ruined.
Most walls after demolition aren’t seriously damaged. They’re simply uneven. Different portions of the surface have different textures, heights, porosity, and paint finishes, and those differences become especially noticeable once light moves across the wall.
That’s also why simply filling the holes and rolling on fresh paint doesn’t always work. Paint changes color and sheen. It doesn’t make an uneven surface flat.
If you’re refreshing a room yourself, learning how to assess the wall before reaching for the joint compound can save hours of sanding, repainting, and wondering why the old repair is still visible.
What’s Inside
- What removing trim, tile, wallpaper, and fixtures actually does to drywall
- How to repair different types of wall damage
- When to patch versus skim coat
- The basic tools worth having before you start
- Why primer matters almost as much as joint compound
- How to make patches disappear after painting
- When replacing drywall makes more sense than repairing it
- Simple demolition habits that prevent wall damage in the first place
- Frequently asked questions
First, Figure Out What You’re Actually Repairing
Don’t begin by automatically spreading compound over everything that looks ugly.
Take a few minutes to inspect the wall instead.
A wall exposed after demolition may have several different problems at once, and each needs a slightly different approach.
Torn Drywall Paper
Drywall consists of a gypsum core covered by paper. When wallpaper, tile adhesive, construction adhesive, or caulk bonds strongly to the surface, removing it can pull that outer paper away.
You may see fuzzy brown or gray areas, rough fibers, or exposed white gypsum underneath.
This damage can look minor, but it deserves attention before applying regular joint compound. Exposed drywall paper absorbs moisture much differently than an intact painted surface, which can cause bubbling or lifting if you immediately cover it with a water-based product.
Adhesive Left Behind
Tile mastic, construction adhesive, mirror adhesive, and similar products often leave hard ridges or blobs behind.
This is different from a hole.
Instead of material being missing, you have excess material sitting above the wall’s finished plane. Covering those raised spots with more compound can make the problem worse because you’re adding thickness rather than reducing it.
The goal is usually to remove the highest points first and then blend the remaining irregularities into the surrounding wall.
Fastener and Anchor Holes
Removing floating shelves, televisions, cabinets, curtain hardware, and artwork can leave everything from tiny screw holes to large openings from toggle bolts.
Look beyond the center of the hole.
If the surrounding drywall paper is crushed or raised, scrape or carefully press back anything loose before filling it. Otherwise, the repair can create a little mound that remains visible after painting.
Paint and Caulk Ridges
This is especially common after removing chair rails, baseboards, picture-frame molding, or other decorative trim.
Years of paint may have accumulated against the trim, creating a noticeable edge. Caulk can leave another ridge directly beside it.
Filling the newly exposed strip without addressing those ridges can leave a long horizontal bump running across the wall.
Different Paint Beneath a Built-In
Remove a large bookcase, mirror, television panel, headboard, or cabinet and you may discover what looks like a perfectly preserved section of wall.
Unfortunately, “perfectly preserved” isn’t always the same as “ready to paint.”
The covered area may have an older paint color, different sheen, smoother texture, or no paint at all. Meanwhile, the surrounding wall may have accumulated several coats of paint and years of normal wear.
Even after repainting, that outline can sometimes remain visible unless the surface is blended first.
Quick Guide: What Did You Remove?
| What You Removed | What You May Find | Typical Repair |
|---|---|---|
| Wallpaper | Paste residue and torn drywall paper | Remove residue, seal damaged paper, skim as needed |
| Tile backsplash | Mastic or thinset ridges and torn drywall face | Reduce high spots, seal damage, then skim the area flat |
| Large mirror | Adhesive blobs and paper damage | Carefully remove high adhesive spots, seal, and skim |
| Built-in shelves or mantel | Screw holes, anchor holes, paint differences | Fill holes, feather repairs, prime, and repaint the wall |
| Chair rail or molding | Paint ridge, caulk line, smoother strip | Remove ridges and feather the transition |
| TV mount | Large fastener holes and compressed drywall | Fill appropriately and feather with several thin coats |
| Cabinets | Fastener holes, caulk, uneven paint, possible wall damage | Clean, patch, skim as required, then prime |
Gather the Right Supplies Before You Start
You don’t need a contractor’s truck full of tools to repair a wall successfully. For many small-to-medium DIY repairs, a basic kit is enough.
Depending on the project, useful supplies include:
- A utility knife with a fresh blade
- A 4- to 6-inch taping knife
- A wider 10- to 12-inch drywall knife for feathering
- Joint compound
- Setting-type compound for deeper repairs
- Fine sanding sponge
- Primer appropriate for the surface
- Drop cloths
- Dust mask or suitable respiratory protection when sanding
- Bright portable light
That final item is surprisingly useful.
Place a work light near the wall so it shines sideways across the surface. This “raking light” exaggerates ridges, dips, and edges that normal overhead lighting may hide. Finding them before you paint is much easier than discovering them after you’ve finished the room.
After Removing Wallpaper: Don’t Rush Straight to Joint Compound
Wallpaper removal can create one of the trickiest drywall surfaces because adhesive and drywall paper often become part of the same problem.
Start by removing as much wallpaper paste as possible without aggressively damaging the drywall underneath. Let the wall dry completely before deciding what needs additional repair.
If the drywall’s outer paper has torn, avoid immediately spreading standard joint compound directly over loose, fuzzy fibers.
A better sequence is:
- Remove remaining wallpaper and adhesive residue.
- Allow the wall to dry thoroughly.
- Trim or scrape away loose paper fibers without digging into solid drywall.
- Seal exposed or damaged drywall paper with an appropriate problem-surface sealer or compatible oil- or shellac-based primer.
- Allow the sealer to dry according to its directions.
- Apply thin skim coats where necessary.
- Sand lightly and prime before painting.
This extra preparation may feel unnecessary when you’re eager to choose a new paint color, but repairing the surface correctly now can prevent bubbles and visible patches later.
After Removing Tile: Think Flatness, Not Just Holes
A backsplash renovation often reveals a wall that looks far worse than expected.
There may be adhesive covering most of the surface, along with areas where the drywall paper came away with the tile.
The first goal isn’t to make the wall pretty. It’s to bring the surface back toward a consistent plane.
Carefully scrape down obvious high spots using a stiff putty knife or scraper held at a low angle. Avoid aggressively grinding through adhesive if doing so will severely damage the drywall underneath.
Once the major ridges are removed, inspect the remaining surface.
If there are scattered low spots, a skim coat may restore the wall efficiently. If most of the drywall paper has been destroyed across a large backsplash area, replacing that section of drywall may actually be easier than spending hours trying to reconstruct the surface with compound.
This is especially worth considering if another backsplash will eventually cover the area anyway.
After Removing Trim: Fix the Transition, Not Just the Strip
Removing chair rail, picture molding, or decorative trim often leaves a surprisingly clean section of wall behind.
That’s exactly what makes it visible.
The exposed band may have less paint buildup and a different texture from everything around it. There may also be a sharp paint or caulk ridge along the old trim line.
Start by carefully cutting or scraping away raised caulk and paint.
Then feather the transition well beyond the narrow strip. A repair that extends several inches above and below the old trim line usually blends more naturally than one confined exactly to the area where the trim used to sit.
The goal is not to create a perfectly straight strip of joint compound.
It’s to make the strip disappear into the wall.
Patch It or Skim It?
This is where many DIY repairs become unnecessarily frustrating.
It’s tempting to repair every imperfection separately. Sometimes that’s exactly right. Other times, covering the entire damaged field with a very thin skim coat is faster and creates a much better finished surface.
Patch Individual Areas When:
- You have only a few isolated holes or dents
- The surrounding wall is already relatively flat
- Most of the drywall paper is intact
- The existing texture is easy to reproduce
- The repaired areas are small and widely separated
A handful of nail holes, one television mount, or several shelf anchors generally doesn’t justify resurfacing an entire wall.
Consider Skim Coating When:
- Dozens of small repairs are concentrated on one wall
- A large section has damaged drywall paper
- You’re trying to eliminate an old texture
- Adhesive damage covers much of the surface
- Several earlier repairs have left visible humps and depressions
- A long strip from removed molding needs to blend into the surrounding wall
A skim coat is simply a very thin layer of joint compound spread over a larger area to create a more consistent surface rather than treating every imperfection independently.
For particularly demanding finishes, full-surface skim coating is also associated with the highest drywall finishing category described by the Gypsum Association’s GA-214 finish-level guidance.
For the average DIY project, though, you don’t need to become an expert in finish specifications. The practical question is simpler: will repairing ten tiny areas independently create more visible transitions than smoothing one larger area?
Why Thin Coats Work Better Than One Thick Coat
When a hole needs filling, the natural instinct is to load up the knife, fill everything in one pass, and move on.
Resist that temptation.
Joint compound contains moisture and shrinks as it dries. Thick applications can shrink unevenly, take much longer to dry, and leave a depressed center or cracked surface.
Several thin coats are usually easier to control.
First Coat: Fill
The first coat’s main job is correcting the defect. It doesn’t need to look beautiful.
Second Coat: Widen
The next coat extends farther onto the surrounding wall, beginning the transition between the repair and the original surface.
Third Coat: Feather
The final coat can be wider and thinner again, with the outer edges pulled almost to nothing.
That’s the secret many first-time drywall repairers miss.
A good patch often becomes much larger than the original damage.
If a hole is four inches wide, an effective feathered repair may eventually extend many inches beyond it. The wider transition looks less dramatic when light travels across the wall.
Don’t Sand More Than Necessary
Drywall dust has a remarkable ability to migrate into every nearby room.
Fortunately, good knife work can dramatically reduce how much sanding you need.
After each coat dries, use your drywall knife to gently knock off obvious ridges or crumbs before applying the next coat. The smoother each application begins, the less material you’ll need to remove later.
For the final sanding, use light pressure.
You’re trying to remove faint tool marks and blend edges, not grind the entire patch back down.
Keep the work area ventilated appropriately, control dust, protect nearby furnishings, and use suitable respiratory protection when sanding.
Primer Is What Helps the Repair Disappear
You finish sanding. The wall feels perfectly smooth. You roll on the new paint.
Then, once everything dries, you can still see every patch.
This often happens because joint compound absorbs paint differently from the painted wall around it.
Fresh compound is porous. Existing paint is much less porous. Apply finish paint directly over both and they may dry with slightly different sheens, producing visible dull areas commonly called flashing.
Primer helps create a more uniform surface before the finish coats go on.
For a few tiny repairs, spot priming may be sufficient. If you’ve repaired a large portion of the wall, however, priming the entire wall can create a more consistent final appearance.
This becomes particularly helpful with darker paint colors or higher-sheen finishes, both of which can make surface inconsistencies more noticeable.
Should You Paint Just the Patch or the Whole Wall?
If you have leftover paint from the original job and the wall was painted recently, touching up a small area may work.
But don’t assume it will.
Paint on the wall changes gradually due to cleaning, sunlight, age, and normal wear. Even paint from the original can may not blend perfectly years later.
For larger repairs, the cleanest approach is often to repaint from corner to corner rather than trying to hide a newly painted rectangle in the middle of an older wall.
The extra paint may take another hour. Repainting the same patch three times because the edges keep showing takes longer.
Check Your Texture Before You Start Painting
A wall can be perfectly flat and still have an obvious repair if the texture doesn’t match.
Before priming, look at the surrounding surface closely.
Is it completely smooth? Light orange peel? Heavy orange peel? Knockdown? A subtle texture created simply by years of roller applications?
Matching a light texture on a small area can be manageable for a careful DIYer. Practice on scrap drywall or cardboard first rather than experimenting directly on your finished wall.
Larger texture repairs become harder because pattern, thickness, drying time, and application technique all affect the result.
When Replacing Drywall Is Actually the Easier DIY Choice
Cutting out drywall sounds drastic, so homeowners sometimes spend hours trying to rescue a section that would have been easier to replace.
Replacement may make more sense when:
- The drywall face has been destroyed across a large area
- The gypsum itself is crumbling
- Previous water damage has weakened the material
- The surface contains deep adhesive ridges and widespread gouges
- You would need several heavy skim coats just to approach a flat surface
- The damaged area can easily be cut back to framing
New drywall gives you a clean, consistent paper face immediately. You’ll still need to tape, finish, prime, and paint the seams, but sometimes that’s less work than rescuing a badly damaged panel.
Know When a Wall Problem Is Bigger Than a Cosmetic Repair
Most post-demolition wall problems are cosmetic.
But occasionally removing something reveals an issue you shouldn’t simply cover with compound.
Pause the project if you discover signs of ongoing moisture, significant mold growth, badly deteriorated drywall, damaged electrical wiring, plumbing leaks, or movement that suggests a larger structural problem.
Older homes can require additional caution as well. Before sanding or scraping unfamiliar coatings or old textured materials, consider whether testing for hazardous materials such as lead or asbestos may be appropriate based on the home’s age and materials.
Those are situations where identifying the underlying problem matters more than making the wall look smooth.
When Calling a Drywall Professional Makes Sense
Plenty of drywall repairs are realistic weekend DIY projects.
Small screw holes, minor dents, isolated anchor damage, and narrow trim lines can all be good projects for learning how joint compound behaves.
There are also situations where professional finishing can save a considerable amount of frustration:
- A large wall needs to be skimmed completely smooth
- An existing texture must be matched across a highly visible surface
- The repair is overhead on a ceiling
- Large portions of drywall need replacement
- The wall is plaster rather than drywall
- The damage involves moisture or deterioration that hasn’t been fully diagnosed
Finish work is deceptively simple. Spreading compound isn’t particularly complicated; spreading just enough compound across a wide area while leaving almost nothing to sand is where experience becomes valuable.
Homeowners dealing with significant damage after a renovation may decide that a local St. Louis drywall repair professional or another qualified drywall contractor in their area makes sense, particularly when a large visible wall needs to match the surrounding finish.
Five Minutes Before Demolition Can Save Hours of Repair
The best drywall patch is the one you never have to make.
If you haven’t started removing the old fixture or trim yet, a few simple precautions can keep much more of the wall intact.
Score Caulk and Paint Lines First
Run a sharp utility knife along the joint where trim meets the wall. Otherwise, paint and drywall paper may pull away with the molding when it comes off.
Protect the Wall While Prying
Place a wide putty knife or thin scrap of wood between your pry bar and the wall. This spreads the pressure across a larger area instead of concentrating it into one small section of drywall.
Don’t Yank Hardware Straight Out
Take a moment to identify how an anchor works before removing it. Some should be unscrewed, some can be collapsed, and others may be better handled differently depending on their design.
Give Wallpaper Removal Products Time to Work
Scraping harder isn’t always faster. If the paper isn’t releasing easily, additional soaking or scoring may reduce damage to the drywall underneath.
Photograph What’s Behind Built-Ins
If demolition exposes framing, blocking, wiring routes, pipes, or other useful details, take clear photos before closing everything back up.
Months or years from now, knowing exactly where that blocking sits could be surprisingly useful.
A Simple Repair Order That Works for Most Walls
When a wall has several different kinds of damage, tackle them in the right sequence rather than jumping between patches.
| Step | What to Do | Why It Matters |
|---|---|---|
| 1 | Remove hardware, caulk, adhesive peaks, and loose material | You need a stable surface before adding anything |
| 2 | Clean the wall | Dust and adhesive residue can interfere with adhesion |
| 3 | Seal damaged drywall paper if necessary | Prevents exposed paper from reacting badly to wet compound |
| 4 | Fill deep holes | Establishes the basic wall plane |
| 5 | Apply wider finishing coats | Blends repairs gradually into the existing wall |
| 6 | Sand lightly and inspect with side lighting | Reveals remaining edges before paint does |
| 7 | Match the existing texture | Texture differences remain visible even on a flat repair |
| 8 | Prime | Balances porosity and prepares the surface for paint |
| 9 | Paint the repaired wall | Creates the final continuous finish |
The Wall Doesn’t Have to Be Perfect—It Has to Be Consistent
This may be the most useful way to think about drywall repair.
You’re not trying to make the wall mathematically perfect.
You’re trying to prevent the eye from finding a sudden change.
A shallow depression spread gradually across 18 inches may disappear completely once painted. A tiny raised ridge that’s only two inches wide can remain visible forever because it creates a sharp transition for light to catch.
That’s why experienced finishers work wider than beginners expect.
They aren’t necessarily filling a larger damaged area. They’re creating a gentler transition between the repair and everything around it.
FAQs About Repairing a Wall After Removing Something
Do I have to seal torn drywall paper before applying joint compound?
It’s a good idea. Exposed or torn drywall paper can absorb moisture and bubble when covered directly with water-based joint compound. Remove loose fibers and use an appropriate sealer or compatible primer before finishing the damaged area.
Should I use spackle or joint compound?
Spackle works well for very small nail holes and minor dents. Joint compound is generally more useful for larger repairs that need to be feathered gradually into the surrounding wall.
Why can I still see my drywall patch after painting?
The repair may not have been feathered widely enough, its texture may differ from the surrounding wall, or the joint compound may not have been primed properly before painting. Inspect the area with a light shining sideways across the wall to identify the problem.
Can I paint directly over joint compound?
You can physically put paint on it, but priming first usually produces a more uniform result. Unprimed compound can absorb paint differently and leave a noticeable change in sheen.
How long should joint compound dry before sanding?
Follow the manufacturer’s instructions because drying time varies with the compound, thickness, temperature, and humidity. The material should be thoroughly dry rather than merely dry on the surface.
How smooth does drywall need to be before painting?
Run your hand over the repair and inspect it under strong side lighting. You shouldn’t feel or see a distinct ridge where the repaired area meets the original wall.
Can I repair drywall after removing a backsplash?
Usually, yes. Minor adhesive and paper damage can often be scraped, sealed, and skim coated. When most of a large section is badly damaged, replacing that drywall may be faster.
Can I match wall texture myself?
Small areas of light texture can be reasonable DIY projects, especially if you practice first. Large areas, knockdown textures, and highly visible walls can be much more difficult to blend convincingly.
Should I repaint the entire wall after patching?
For one tiny repair on relatively new paint, a touch-up may blend. After larger repairs or on older paint, repainting from corner to corner often produces a cleaner result.
When should I replace drywall instead of repairing it?
Consider replacement when the gypsum is deteriorated, extensive water damage is present, most of the paper face has been destroyed, or the wall would require extensive buildup simply to become flat again.
Make the Repair Part of the Room Refresh
Removing something from a wall is often the beginning of a much more interesting room.
Maybe you’re taking down old molding before painting everything a brighter color. Maybe a bulky built-in is coming out so you can rearrange the furniture. Maybe you’re trading an outdated backsplash for something cleaner and more your style.
Whatever started the project, don’t let an ugly wall immediately after demolition convince you that you’ve created a disaster.
Slow down and identify what you’re looking at. Remove high spots before filling low ones. Seal damaged drywall paper when necessary. Work in thin coats. Feather farther than seems necessary. Match the texture, prime the repair, and inspect everything before the final paint goes on.
The wall may look rough when the old feature first comes off.
That’s normal.
With thoughtful prep and a little patience, that scarred-up surface can become exactly what you wanted when you started the project: a clean backdrop for whatever comes next.