A framed hiking photo has been on your bookshelf for months. You still like it, but two upright books cover one corner, and the little figurine beside it is squeezed against a ceramic bowl. When you walk past, you mostly see book spines.
It happens in almost every home. Shelves fill up a little at a time, with a new paperback here and a souvenir there, until the things that mean the most to you are hidden behind the things you just haven’t put away yet. You don’t need new furniture, a stack of store-bought decor, or a designer’s eye to fix it. A bookshelf styled around your own keepsakes costs next to nothing, and it makes a room feel like yours in a way no matching set of vases ever could.
Start by giving the objects you want to notice a clear spot. Move the frame toward the back, set the figurine slightly forward and to one side, and use the books to create a lower group at the other end. You can try this with the things already on the shelf. The changes are small enough to make in a few minutes, and you can check each one from across the room.
What You’ll Need
Most of this project is “shop your home” styling, so the list is short:
- Your keepsakes: framed photos, souvenirs, small heirlooms, handmade pieces
- Books you already own, for stacking, propping, and adding height
- A tape measure
- Scrap paper and scissors for quick templates
- A soft cloth or duster so you start with a clean shelf
- Optional: small plate stands, museum putty, or felt pads (usually just a few dollars)
| Time | Cost | Skill Level |
|---|---|---|
| 20–45 minutes | $0–$15 | Beginner |
Start With One Memory
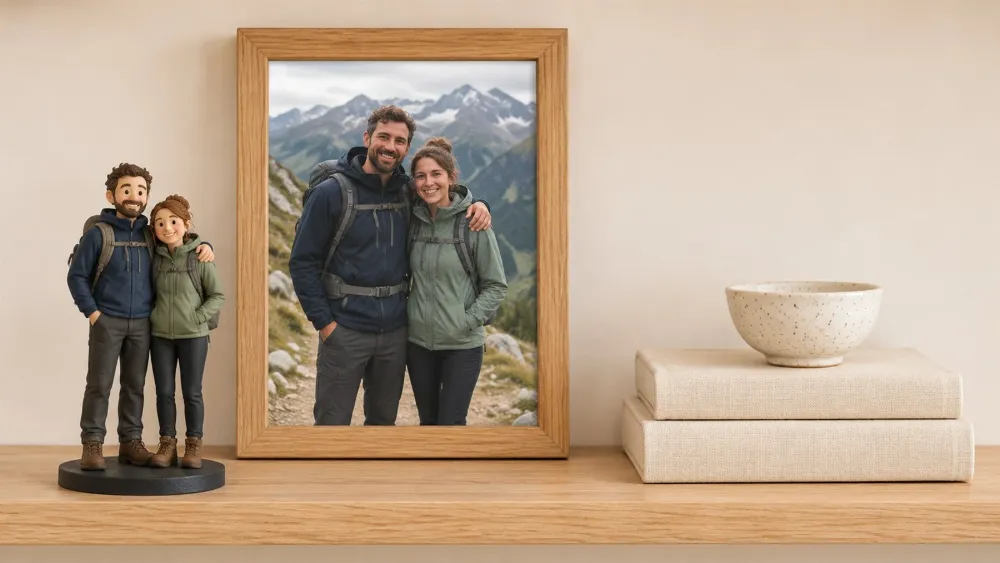
Take everything off the shelf for a moment and put back the piece you most want to see. Here, it’s a framed photo from a hike you took together. The picture shows the trail bending into the mountains, with the two of you just far enough into the frame that you can still see where you were going.
While the shelf is empty, give it a quick wipe. Bookshelves collect more dust than almost any other surface in the house, and starting clean makes it easier to judge what you’re looking at.
A small figurine of the two hikers belongs beside that photo because it brings part of the same memory into view. The frame gives you the place. The figurine gives you the two people and details you can see up close, like their backpacks. If you’re trying this with your own keepsakes, give each piece a reason to be there. You might put a framed photo from a beach trip beside a shell you brought home, or a family recipe beside a little bowl you remember seeing in the kitchen.
This pairing idea is the heart of a shelf that tells a story. Here are a few more combinations to get you thinking:
| Main Keepsake | Companion Piece | Why It Works |
|---|---|---|
| Framed hiking or travel photo | Figurine, trail map, or a smooth stone from the path | The photo shows the place; the object brings it close enough to touch |
| Wedding or anniversary photo | Dried bouquet stem, ring dish, or invitation in a small frame | Mixes flat and three-dimensional pieces from the same day |
| Handwritten family recipe card | Grandma’s small bowl, a wooden spoon, or a vintage measuring cup | Turns an everyday kitchen memory into a display |
| Child’s first drawing | A baby shoe or a favorite tiny toy | Keeps the scale small and sweet |
| Beach vacation snapshot | A shell, a jar of sand, or a piece of sea glass | Adds natural texture and soft color |
| Concert or game ticket | Mini frame plus a guitar pick or team pin | Gives a flat paper item some depth |
Set those pieces down first. You can add the books and the bowl once you know how much space the keepsakes need.
Give the Keepsake a Spot of Its Own
Measure the usable depth of the shelf with the frame already in place. A frame that leans back or has a folding stand can take up more room than you’d expect. If you’re thinking of adding a figurine, cut a paper template the size of its base and try it on either side of the frame. Leave enough room for the base to sit fully on the shelf and for you to lift the figurine when you dust.
Paper templates are one of the easiest DIY decorating tricks out there. They cost nothing, and they let you test a layout before you buy, move, or hang anything. The same habit works for wall art, rugs, and furniture.
If you have a photo you’d like to build a display around, SnapFig offers a custom 3D figurine made from a photo, with options for two people posed together and a choice of sizes and stylized designs. For a shelf like this one, compare the available heights with the frame and check the base dimensions for the option you’re considering. SnapFig provides a digital preview before production. For a hiking keepsake, use that preview to check whether details such as the backpacks and the way you stood together come through.
Try the paper template from your usual viewing distance, too. On a shelf across the room, the figurine’s outline may be what you notice first. On a shelf next to your favorite chair, you’ll be close enough to see the smaller details.
A Quick Guide to Scale
Getting the proportions right is what makes a shelf look styled instead of crowded. Use these as starting points, not hard rules:
| Element | Rule of Thumb |
|---|---|
| Companion object height | About one-half to two-thirds the height of the frame beside it |
| Space above the tallest item | At least 2–3 inches, so the shelf doesn’t feel packed |
| Front-to-back layering | Tallest at the back, smallest at the front |
| Gap between groupings | Roughly the width of your hand |
| Shelf “fill” | Aim to leave about one-third of the shelf open |
Arrange the Shelf in Layers
Put the framed photo toward the back and bring the figurine forward, a little to the left or right. Look for enough separation that you can see both people in the photograph while still getting a clear view of the figurine. In this example, the figurine moves to the left edge of the frame, leaving the hikers and the trail visible.
Next, move the two books that were standing in front of the photo to the other end of the shelf. Lay them flat and set the little bowl on top. That lowers the books and lifts the bowl out of the cluster at the front. Leave a gap between the photo group and the stack. If you reach for one of those books regularly, put it on top and leave enough room to lift the bowl easily.
That empty space between groups is doing real work. Designers call it “breathing room,” and it’s the fastest way to make a shelf look calm and intentional. If you’re tempted to fill the gap, try living with it for a few days first.
Simple Styling Principles That Always Help
- Think in triangles. A tall frame, a mid-height figurine, and a low stack form an easy visual triangle that leads the eye across the shelf.
- Group in odd numbers. Clusters of one, three, or five objects tend to feel more natural than even pairs.
- Mix vertical and horizontal books. Upright rows read as storage, and flat stacks read as decor. Using both adds rhythm.
- Repeat a color or material. If the figurine has a warm wood base, echo it with a wooden bowl or a book spine in a similar tone on another shelf.
- Zigzag across multiple shelves. On a full bookcase, don’t stack all your keepsakes in one column. Put the photo group on the left of one shelf, then shift the next feature to the right on the shelf below.
- Turn some books spine-in or wrap them. For a softer, more neutral look, flip a few or cover them in kraft paper, a classic budget DIY move.
Light It Up
A keepsake display looks completely different at night. If your bookshelf sits in a dim corner, a little light makes a big difference:
- Battery-operated puck lights stuck under the shelf above can wash light down onto your photo group, with no wiring needed.
- A small table lamp set on a nearby surface, or on a lower shelf, adds warmth in the evening.
- Warm-white bulbs (around 2700K) flatter photos and natural materials far more than cool, bluish light.
Watch for glare on glass frames, too. That leads right into the next step.
Check It From Where You Normally See It
Walk past the shelf the way you usually do. If the figurine covers part of the photo from that angle, slide it an inch or two to the side. Then sit down wherever you’re most likely to look at the shelf. A frame that looks clear when you’re standing beside it can catch a window reflection from the couch. Turn it slightly and check again from your seat.
Try this at a couple of different times of day. Morning sun and evening lamplight can change what you see. If the glare won’t go away, swapping the frame’s glass for non-glare acrylic is an inexpensive fix.
Finally, take out one of the books and put it back. If you have to move the figurine every time, give the books a little more room or move the one you use most to the top of the stack. That quick check tells you whether the arrangement will work on an ordinary day.
Keep Keepsakes Safe and Dust-Free
The pieces on this shelf are the ones you can’t replace, so a little protection goes a long way:
- Use museum putty under figurines and small objects if you have kids, pets, or a shelf near a busy doorway.
- Add felt pads under ceramic or metal pieces to prevent scratches on wood shelves.
- Anchor tall bookcases to the wall with an anti-tip kit. It’s an easy weekend safety upgrade.
- Keep photos out of direct sunlight when you can, since UV light fades prints over time.
- Dust weekly with a soft brush or microfiber cloth. Lifting each piece is easier when you’ve left room around it, which is one more reason not to overcrowd.
Common Mistakes to Avoid
| Mistake | Quick Fix |
|---|---|
| Every shelf filled edge to edge | Remove a third of the items and store or rotate them |
| Keepsakes hidden behind books | Move books to the ends; bring meaningful pieces forward |
| Everything the same height | Use book stacks as risers to create high and low points |
| Too many unrelated souvenirs | Choose one story per grouping and pair pieces with purpose |
| Display blocks books you actually use | Keep everyday reads on top of stacks or on easy-reach shelves |
| Styled only from up close | Check from the doorway and your favorite seat |
Refresh It With the Seasons
Once you have a layout that works, it’s easy to update without starting over. Keep the anchor pieces, like the hiking photo and figurine, in place, and swap the smaller accents:
- Spring: a bud vase with a single fresh stem or a sprig of greenery
- Summer: sea glass, shells, or a small woven basket
- Fall: a mini pumpkin, a pinecone, or a candle in a warm amber jar
- Winter: a sprig of evergreen, a tiny string of fairy lights, or a holiday card from someone you love
Rotating a few keepsakes in and out also lets you enjoy more of the things you’ve saved, instead of leaving them packed away in a closet box.
Your Shelf, Your Story
Styling a bookshelf with personal keepsakes isn’t about following a trend or buying the perfect decor. It’s about making room for the moments that matter to you, and arranging them so you actually notice them on a regular day.
The next time you pass the bookshelf, you might notice the two small hikers first. When you step closer, you can see the bend in the trail behind them. The books are still where you need them, and the photo has room to bring you back to the walk.