If you’re dreaming of a new backyard retreat without draining your wallet, a gravel patio might be your answer. Forget the heavy lifting of concrete or the precise placement of pavers—gravel offers a natural, affordable, and flexible way to upgrade your outdoor living space. It’s low-maintenance, drains beautifully after rain, and fits nearly any design style. Whether you want a cozy nook with a fire pit, a chic dining area, or a rustic garden retreat, a gravel patio has you covered.
In this guide, I’ll walk you through the benefits, types of gravel, installation steps, design ideas, costs, and maintenance tips—everything you need to create a gravel patio that lasts for years and looks stunning while doing it.
Benefits of a Gravel Patio
Why are homeowners flocking to gravel patios? Simple: they combine style, function, and affordability.
- Cost-Effective: Gravel patios usually cost between $5–$10 per square foot, while pavers can run $10–$30, and concrete slabs $6–$15. That’s big savings, especially for large yards.
- DIY-Friendly: Unlike stonework, gravel patios don’t demand masonry skills. A shovel, rake, and tamper are your best friends. Most DIYers finish a small gravel patio in a weekend.
- Excellent Drainage: Rain passes through gravel, preventing puddles and erosion. It’s one of the most eco-friendly patio materials you can choose.
- Low Maintenance: Occasional raking and a little extra gravel each year is usually all you’ll need.
- Versatility: Gravel patios suit modern, rustic, Mediterranean, desert, and even minimalist landscapes. They adapt to almost any style.
- Flexibility: Unlike rigid concrete, a gravel patio moves with the soil beneath it. This makes it especially durable in areas with freeze-thaw cycles or shifting ground.
Types of Gravel for Patios
Not all gravel is created equal. Choosing the right type of stone is crucial for stability, comfort, and aesthetics.
- Pea Gravel
Small, smooth, rounded stones (about ¼–⅜ inch). Comfortable under bare feet and budget-friendly. Perfect for relaxed sitting areas, walkways, and kids’ play zones. However, it can shift under heavy furniture. - Crushed Stone
Angular, sharp-edged pieces that lock together. Provides excellent stability for dining sets, outdoor kitchens, or high-traffic patios. Less comfortable barefoot but great for sturdiness. - Decomposed Granite (DG)
Finely crushed granite that compacts into a firm surface. Mud-free, versatile, and great for driveways, walkways, and patios. Often used when you want something that feels more solid than loose gravel. - River Rock
Larger, polished stones that look beautiful around water features or as accents. More decorative than functional, so not ideal for furniture-heavy patios.
Tip: If your gravel patio will host dining sets or fire pits, go with crushed stone or DG for stability. For barefoot-friendly, casual areas, pea gravel works best.
Planning Your Gravel Patio
Before you grab a shovel, step back and plan.
- Choose the Location
Pick a flat, well-drained area. A slight slope (¼ inch per foot) away from the house prevents water pooling. - Think About Sun & Shade
Morning coffee? Go sunny. Afternoon grilling? Opt for shade. Match the patio’s location to how you’ll use it. - Design the Shape
Use stakes and string—or even a garden hose—to outline curves, squares, or circles. Keep furniture in mind: allow space for chairs to slide out and for people to walk around. - Measure Accurately
Example: a 12×12 ft patio, 2.5 inches deep, needs about 1 cubic yard of gravel. Always order 10–15% extra for topping off later.
Tools and Materials Needed
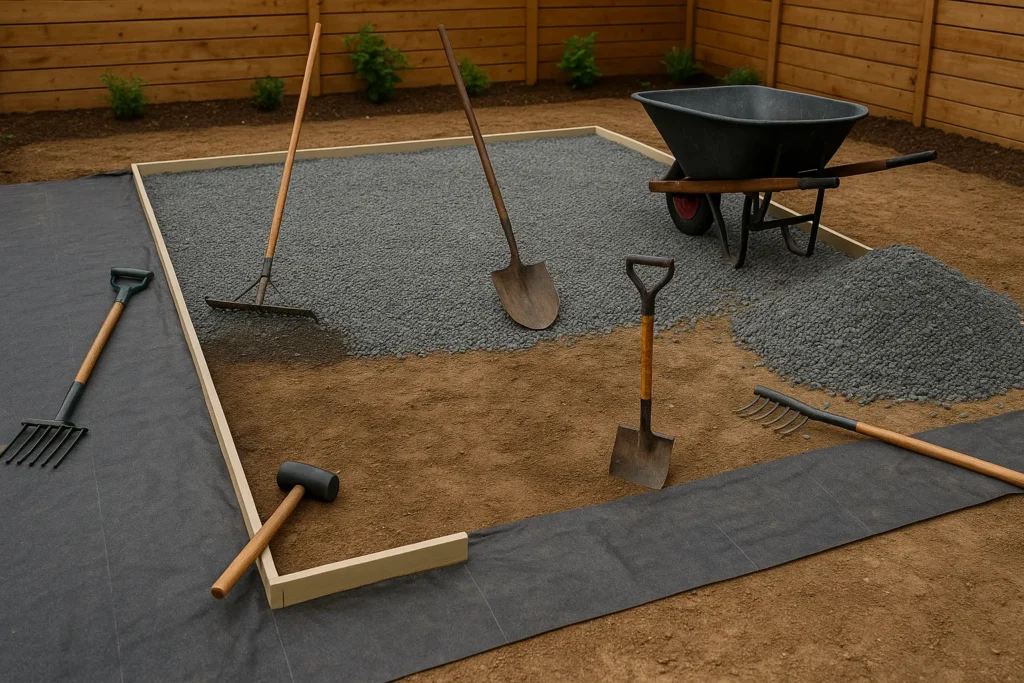
Tools
- Shovel
- Rake
- Wheelbarrow
- Tamper or plate compactor
- Level
- Tape measure
- Stakes and string
Materials
- Base gravel (¾ inch crushed stone)
- Decorative gravel (pea gravel, crushed stone, or DG)
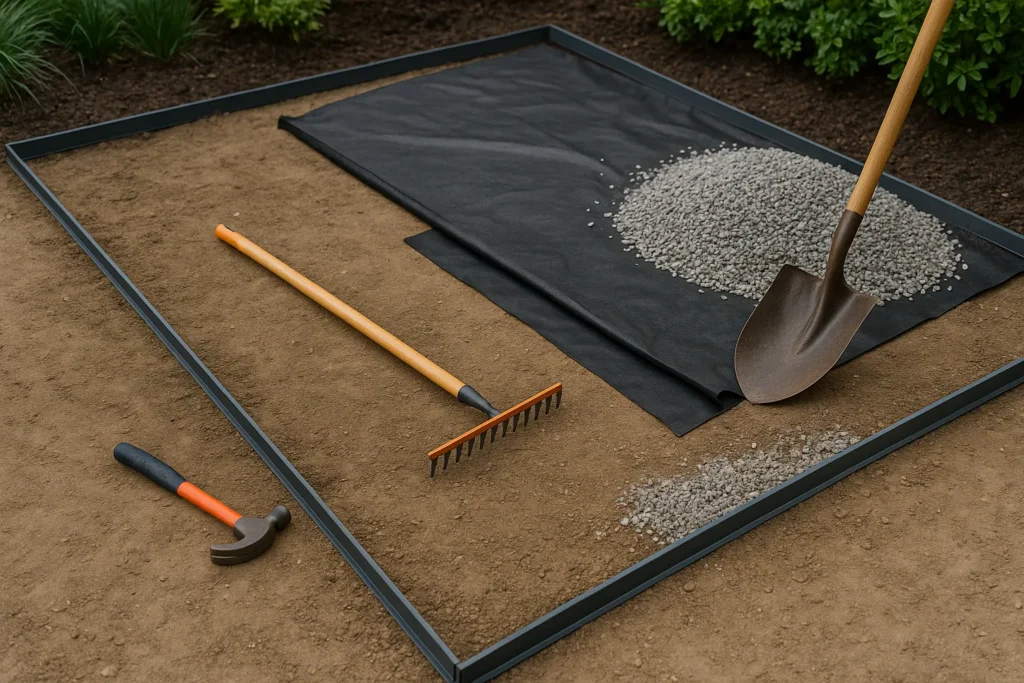
- Landscape fabric (weed barrier)
- Edging (timber, stone, brick, or metal)
- Stakes or pins to secure fabric
Step-by-Step Gravel Patio Installation
Building a gravel patio is straightforward if you follow the right steps.
- Excavate the Area
Remove grass, topsoil, and roots. Dig about 5–6 inches deep. Ensure the bottom slopes slightly for drainage. - Install Edging
Use wood, stone, or metal edging to define the shape and keep gravel contained. Secure firmly. - Lay Landscape Fabric
Roll out fabric across the excavated area, overlapping seams by 6 inches. Pin in place. This prevents weeds and keeps gravel layers separate. - Add the Base Layer
Spread 3–4 inches of crushed stone or DG. Rake level, then compact thoroughly with a tamper or plate compactor. - Pour Decorative Gravel
Add 2–3 inches of your chosen gravel. Rake it evenly across the surface. - Compact and Finish
Lightly compact again. Walk over the area to test stability. Add stepping stones or pavers if you want solid furniture footing.
Design Ideas for Gravel Patios
A gravel patio doesn’t have to be plain. Here are some stylish directions:
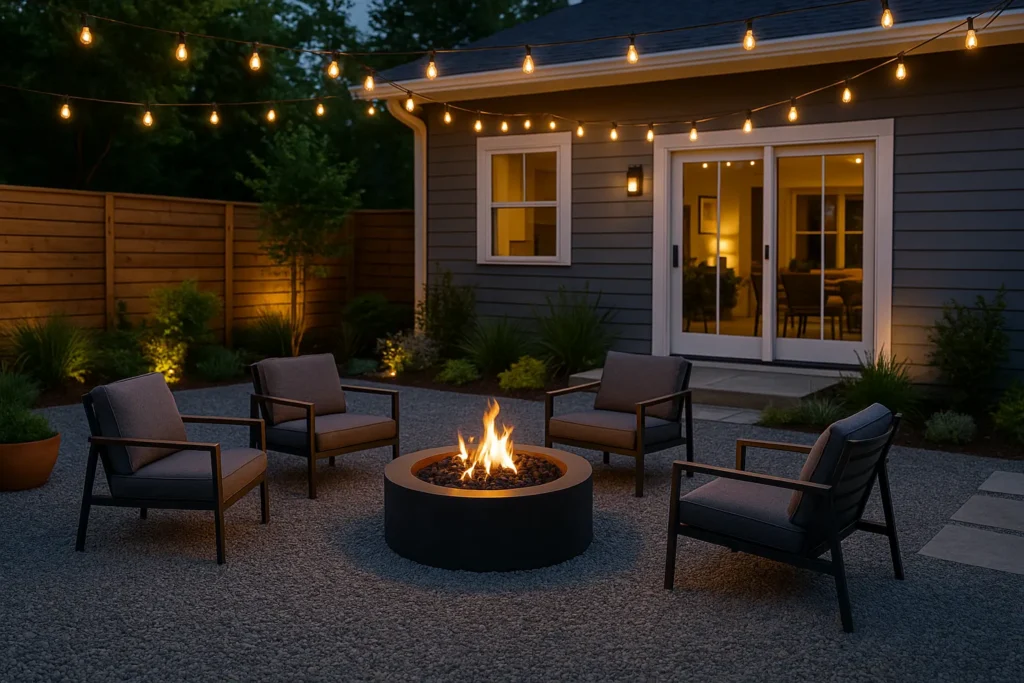
- Gravel Patio with Fire Pit – Cozy seating around a fire feature, surrounded by gravel for safety and drainage.
- Hybrid Patio – Mix gravel with pavers, bricks, or concrete slabs for patterns and stable zones.
- Circular Gravel Patio – A round patio bordered with brick or stone for a unique look.
- Side Yard Patio – Perfect for narrow spaces—combine gravel with plants for charm.
- Raised Planter Integration – Surround raised garden beds with gravel for a clean, modern finish.
- Modern Minimalist – Use crushed stone and sleek metal edging for sharp, contemporary lines.
Maintenance Tips for Longevity
The beauty of a gravel patio is how little care it needs.
- Rake Regularly – Smooth the surface and redistribute gravel after rain or heavy use.
- Top Up Gravel – Add a half-inch of gravel every year or two to keep it fresh.
- Control Weeds – Even with fabric, weeds can appear. Remove manually or spot-treat with vinegar.
- Seasonal Care – In winter, avoid salt for de-icing. Instead, use sand or eco-friendly alternatives.
Cost of a Gravel Patio
Here’s a quick comparison:
| Patio Material | Cost per Sq Ft | DIY Difficulty | Maintenance |
|---|---|---|---|
| Gravel Patio | $5–$10 | Easy | Low |
| Concrete Slab | $6–$15 | Medium | Medium |
| Pavers | $10–$30 | Hard | Low |
| Wood Deck | $15–$35 | Hard | High |
DIY gravel patios cost mainly labor and materials. Hiring a professional may double the cost but ensures proper grading and compaction.
Common Mistakes to Avoid
- Installing directly on soil without a base
- Skipping compaction of layers
- Using pea gravel for dining sets (furniture will wobble)
- Forgetting to slope for drainage
- Poor edging that allows gravel to scatter
Conclusion
A gravel patio isn’t just budget-friendly—it’s stylish, practical, and surprisingly durable. With proper planning, the right gravel type, and careful installation, you’ll have an outdoor retreat that stands the test of time. Whether it’s a rustic fire pit area, a sleek dining zone, or a cozy side-yard hideaway, gravel gives you endless design flexibility.
So grab your shovel, order some gravel, and turn that patch of yard into a welcoming outdoor escape. Your future self—coffee mug or wine glass in hand—will thank you.


