Do you own a piece of furniture with damaged or missing caning and are wondering whether you can fix it yourself? If you’re debating whether furniture re-caning is a DIY task or something best left to a professional, this article will help you decide.

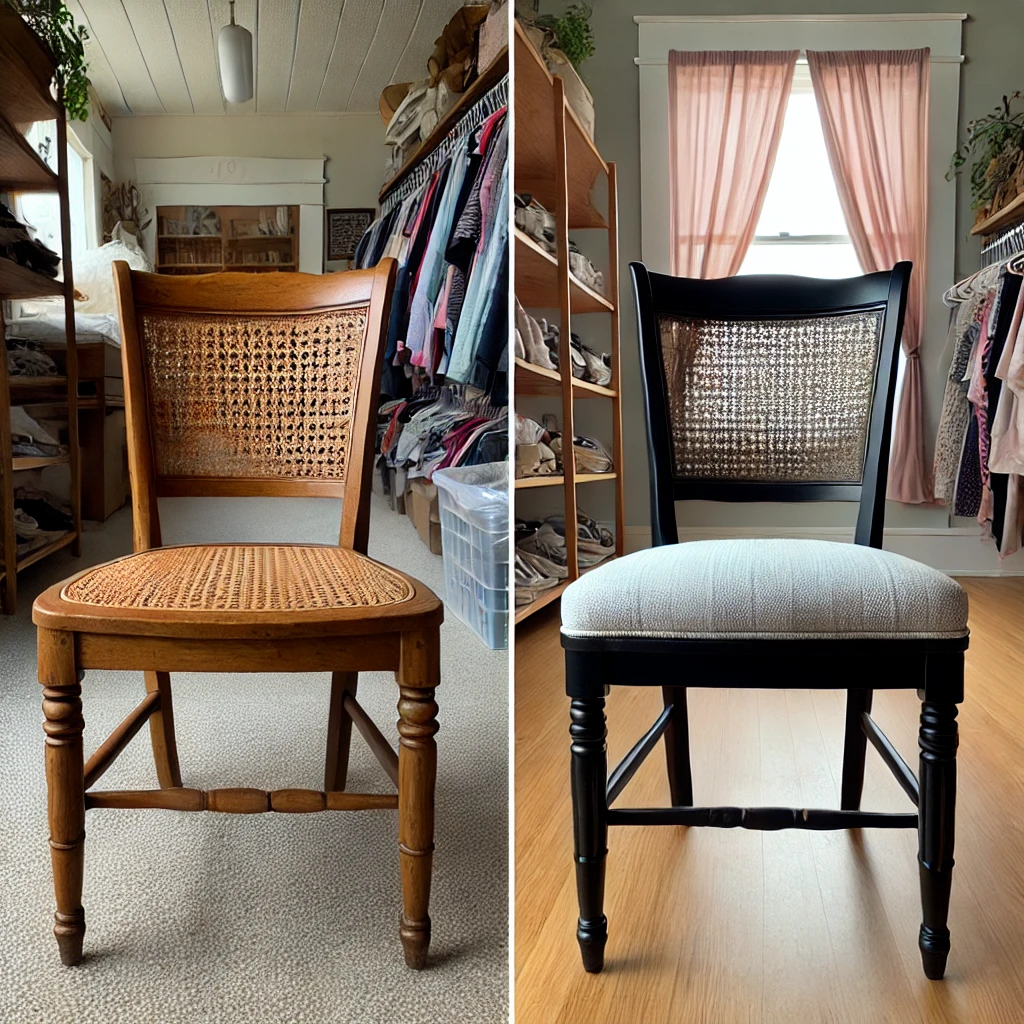
One of my most rewarding thrift store finds was a set of cane-back chairs I discovered at the Salvation Army. My husband was convinced I had lost my mind when I arrived home with six outdated chairs—especially since one had a huge hole in the cane! Despite his skepticism, I saw their potential.
Initially, I planned to hire a professional to replace the caning. However, after coming across a detailed re-caning tutorial on Miss Mustard Seed, written by Suesan of Frou FruGal, I decided to try it myself. Following her step-by-step guide, I re-caned the chair. While it wasn’t flawless, I was thrilled with my first attempt!
This project took place in 2014, as reflected in the chevron fabric and dark-stained dining set seen in some of the photos. Over the years, my home decor has evolved—I’ve since stripped and limed our dining table—but this DIY project remains one of my favorites.
After successfully replacing the caning, I repainted all six chairs and reupholstered the seats. These transformed chairs served us well for years! Remarkably, the re-caned chair blended seamlessly with the others after being painted and refreshed.

Much like these chairs, I also took on the challenge of revamping a Craigslist dining table. The outdated finish was replaced with a beautiful walnut-stained top and bold black pedestal bases. DIY furniture transformations like these can completely rejuvenate a space without breaking the bank.
Suesan’s tutorial guided me through the entire process, starting with the removal of the old caning. The most challenging part was carefully extracting the damaged cane without harming the chair’s frame.
Installing the new cane wasn’t necessarily difficult, but it was a meticulous and time-consuming task. If I had to compare, I’d say it was easier than cutting angled stairwell boards or getting precise miter cuts for crown molding—but it still required patience.
Here’s a breakdown of the process:
- Soaking the Cane – The new cane must be soaked in water until it becomes pliable.
- Inserting the Cane – Once softened, the caning is carefully pressed into a groove on the chair using a wooden shim.
- Securing the Cane – The caning is held in place using wood glue and a reed called a spline.
One lesson I learned the hard way was the importance of checking alignment throughout the process. I was so focused on pulling the cane tight that I didn’t notice it had shifted slightly off-center until I had completed the entire installation. While the slight misalignment wasn’t too noticeable, I’d advise constantly checking to ensure the cane remains straight. Starting over after tightening everything can be frustrating, so save yourself the trouble by verifying alignment as you go!
This entire project only cost me $16.80 in supplies. Based on what friends have paid to have chairs re-caned professionally, I estimate that I saved between $80 to $100 by doing it myself. I purchased my materials from a reputable supplier, ensuring quality materials at a fraction of the cost of professional services.
If you’re considering re-caning furniture, I highly recommend giving it a try! With patience and the right tutorial, anyone can accomplish this project. It’s a fantastic way to extend the life of your furniture while adding a personal touch to your home decor.
If I could do it as a first-time DIYer, you can too!
Happy DIYing!
")


")
")
")
")

")


")


