Every holiday season, there’s something magical about pulling out boxes of decorations and unwrapping delicate treasures that sparkle under the tree lights. Among the most enchanting of all are mercury glass ornaments. With their silvery sheen, vintage charm, and intricate details, these ornaments have been a favorite for generations. Whether you’re a seasoned collector, a nostalgic decorator, or a DIY enthusiast looking to create your own, mercury glass ornaments offer both beauty and history worth celebrating.
The Fascinating History of Mercury Glass
Mercury glass has a story that stretches back to the 19th century. Originating in Europe around 1840, this special form of glass was created by coating the inside of double-walled glass with silver nitrate, giving it a reflective, mirror-like finish. Contrary to the name, real mercury was rarely used—though the term stuck.
By the mid-1800s, mercury glass ornaments became a festive addition to European Christmas trees. Germany, Poland, and the Czech Republic led the way in producing them. These early pieces often had slender necks and small metal caps, sometimes stamped with “Poland” or “Germany.” Hand-painted details—like Santas, stars, or pastel-colored florals—gave them unique personality.
In the United States, production ramped up when the Corning Glass Company adapted its lightbulb machinery to make glass ornaments in the 1930s. Soon after, Max Eckhardt, a German immigrant, founded the famous Shiny Brite company, introducing mercury glass ornaments to households across America. Affordable, accessible, and beautiful, Shiny Brite ornaments became an iconic part of mid-century holiday décor.
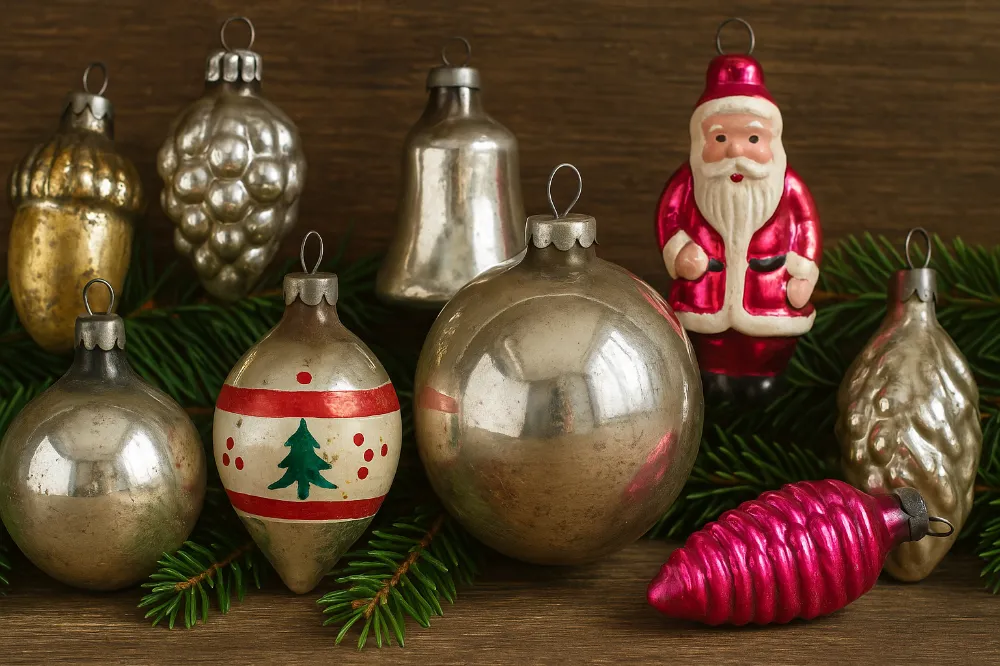
Types of Mercury Glass Ornaments
Mercury glass ornaments aren’t just one style—they come in a dazzling array of forms that appeal to collectors and decorators alike.
Vintage vs. Antique
- Antique ornaments are over 100 years old, typically pre-1920, and often feature delicate hand-painted details.
- Vintage ornaments usually refer to pieces made between the 1920s and 1970s. These include mid-century Shiny Brite collections that remain highly collectible today.
European Mercury Glass Ornaments
Germany and Poland are especially well known for their early creations. Many carry stamps on their caps or boxes, which help with identification. Their shapes range from classic round balls to whimsical hand-painted designs.
Figural Ornaments
These are some of the most charming pieces. Shaped like birds, grapes, pinecones, horns, or Santas, figural mercury glass ornaments were often clipped to tree branches. Bird ornaments with spun glass tails are particularly prized, sometimes fetching $25 or more each.
Mid-Century Designs
The mid-20th century brought bold colors, frosted finishes, and indented styles. Shiny Brite ornaments are especially easy to identify thanks to their scalloped metal caps stamped with “Shiny Brite Made in the USA.” Other brands like Coby, Delta, and Fantasia also produced variations, making this period rich for collectors.
How to Identify Authentic Mercury Glass Ornaments
With so many reproductions available today, knowing how to spot genuine mercury glass ornaments is key. Here are a few tips:
- Check the material: True mercury glass ornaments are fragile. They are not plastic or shatterproof.
- Look at the cap: European ornaments often have skinny necks with small toppers, while Shiny Brite caps feature ribbed sides and scalloped edges.
- Inspect the paint: Authentic vintage and antique pieces often show some fading, pastel tones, or hand-painted scenes.
- Feel the weight: Older ornaments tend to be lighter due to the thinness of the glass.
Collecting Mercury Glass Ornaments
Collectors value ornaments based on several factors:
- Age: The older the piece, the more desirable it typically is.
- Condition: Ornaments free of chips, cracks, or heavy paint loss are worth more.
- Size and shape: Larger ornaments and unique shapes (like torpedoes or indented designs) fetch higher prices.
- Rarity: Certain European figural designs or complete sets in original boxes can command premium prices.
For serious collectors, antique shops, estate sales, and flea markets are often the best hunting grounds. Online marketplaces like eBay and Etsy also offer an extensive selection, though expect to pay more.
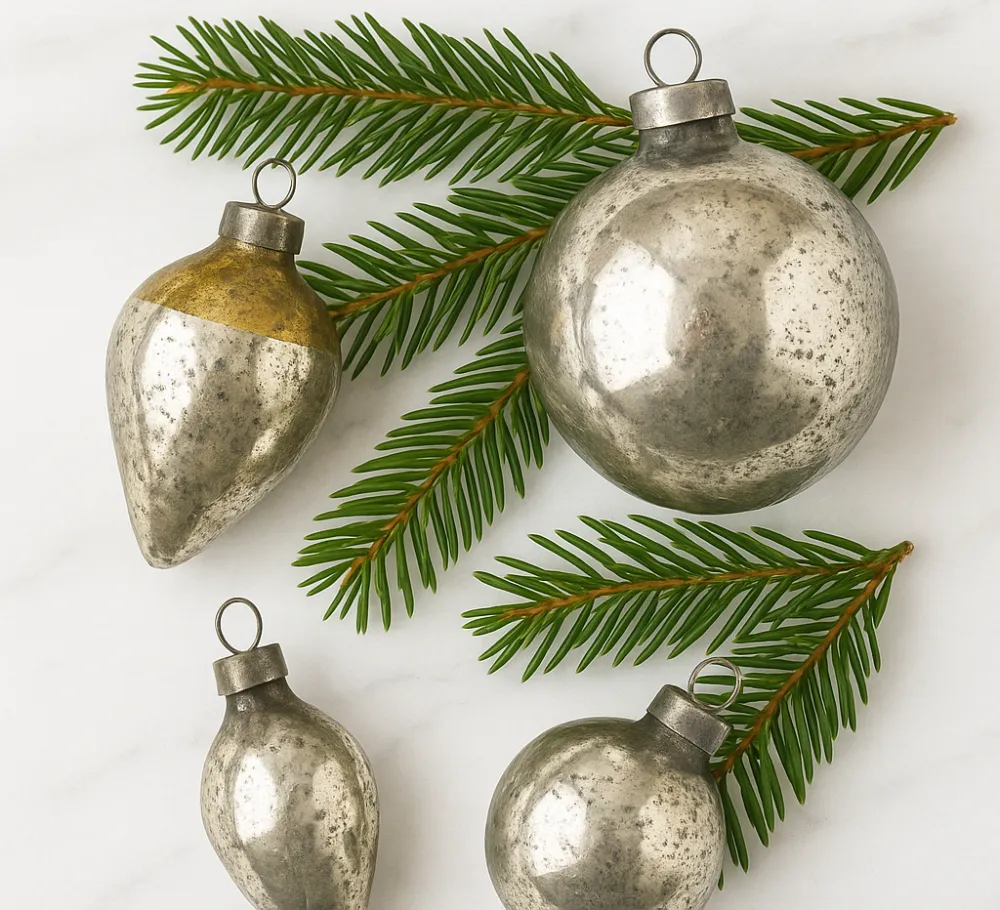
Where to Find Mercury Glass Ornaments Today
If you’re not chasing rare antiques, don’t worry—you can still enjoy the beauty of mercury glass ornaments. Modern reproductions are widely available and surprisingly affordable. Stores like Target, Michaels, Hobby Lobby, and TJ Maxx regularly carry new mercury glass ornaments that mimic the vintage look. Even high-end retailers like West Elm have introduced retro-inspired Shiny Brite collections.
For budget-friendly finds, shop estate sales, flea markets, or antique malls during off-seasons. Spring and summer often yield better deals than the holiday rush.
DIY Mercury Glass Ornaments
If you’ve ever admired mercury glass in high-end catalogs but balked at the price, here’s the good news—you can make your own at home! DIY mercury glass ornaments are not only affordable but also a fun holiday project that allows you to customize your decorations with endless variations.
Supplies You’ll Need
- Clear glass or plastic ornaments (round, teardrop, or any shape you prefer)
- Krylon Looking Glass Spray Paint or Rustoleum Mirror Effect Spray
- Small spray bottle filled with a 50/50 mix of water and white vinegar
- Disposable gloves and paper towels
- Hairdryer (on a low to medium setting)
- Optional: acrylic paints (gold, black, or metallic tones) for accents
- Protective surface (cardboard, old sheet, or tarp to catch drips)
Step-by-Step Guide
Step 1: Prep Your Ornaments
Remove the metal caps from the clear ornaments and set them aside. Make sure the inside of each ornament is clean and free of dust or fingerprints, as these can affect how the paint adheres.
Step 2: Apply the Looking Glass Paint
Hold the ornament so the opening faces upward. Spray 4–5 short bursts of the looking glass paint inside. Quickly rotate and tilt the ornament so the paint coats the entire interior. The paint dries fast, so work quickly to get even coverage.
Step 3: Create the Distressed Look
Immediately after coating the inside, spray 2–3 mists of the vinegar-water solution inside the ornament. The liquid reacts with the paint, breaking it up in places to create that mottled, antique mercury effect. Gently swirl the ornament to let the solution spread without fully rinsing off the paint.
Step 4: Dry the Ornament
Turn a hairdryer onto low or medium heat and aim it into the opening of the ornament. This speeds up the drying process and helps “set” the mercury effect. Rotate the ornament as you dry it so that all sides are evenly treated.
Step 5: Layer and Repeat
If the finish looks too faint, repeat the process: add another light coat of paint, spritz with vinegar solution, and dry again. Multiple thin layers will create depth and dimension, mimicking the look of antique mercury glass.
Step 6: Add Accent Colors (Optional)
For variation, add a small squirt of acrylic paint—gold for a warm antique glow, black for a dramatic aged effect, or even bright metallics for a modern twist. Cover the opening with your thumb, swirl the ornament gently, and then dry again with the hairdryer.
Step 7: Replace the Cap and Display
Once the inside is completely dry, reattach the ornament cap. At this point, you can even spray-paint the metal topper a darker metallic shade for a more authentic vintage look.
Creative Variations to Try
- Frosted Snow Look: Add a light dusting of mica flakes or fine glitter before the paint fully dries for a frosty shimmer.
- Layered Colors: Alternate between silver, gold, and bronze paints to create a rich, dimensional patina.
- Clear Windows: Use painter’s tape on parts of the ornament before spraying, then peel it off to reveal “window” sections for a unique design.
- Mixed Shapes: Try making teardrop or finial-shaped mercury glass ornaments for variety on your tree.
Display Ideas
Once your DIY mercury glass ornaments are ready, you can:
- Hang them on your Christmas tree for a sparkling vintage-inspired look.
- Place them in a decorative bowl or tray with greenery for a stunning centerpiece.
- Attach them to wreaths or garlands for added texture.
- Gift them to friends and family—handmade holiday ornaments always feel extra special.
DIY mercury glass ornaments are quick to make (just a few minutes per ornament once you get the hang of it) and can easily rival expensive store-bought versions. The best part? Each piece will have its own unique character, making your holiday décor truly one of a kind.
DIY Mercury Glass Ornaments Quick Guide
| Step | Action | Details & Tips |
|---|---|---|
| 1. Prep | Remove caps & clean ornaments | Use clear glass or plastic; ensure dust-free interior |
| 2. Paint Base | Spray 4–5 bursts of looking glass paint inside | Quickly rotate ornament to coat evenly |
| 3. Distress | Mist with 2–3 sprays of vinegar-water solution | Swirl gently—don’t rinse out paint |
| 4. Dry | Use hairdryer (low/medium heat) | Rotate as you dry for even coverage |
| 5. Repeat | Add another light coat + vinegar if needed | Build layers for richer, antique finish |
| 6. Accents (Optional) | Add a squirt of acrylic paint (gold, black, etc.) | Swirl inside & dry for custom effects |
| 7. Finish | Reattach or repaint metal cap | Spray topper with metallic paint for vintage look |
Troubleshooting & Tips for DIY Mercury Glass Ornaments
- Paint isn’t sticking well
- Make sure the inside of the ornament is completely clean and dry before spraying. A quick wipe with rubbing alcohol helps remove residue.
- Finish looks too faint or see-through
- Apply another thin coat of looking glass paint, then repeat the vinegar mist and drying step. Building up layers creates a deeper mirrored effect.
- Coverage looks uneven or blotchy
- Don’t panic—this is actually part of the charm! But if you prefer a smoother look, gently roll the ornament as soon as you spray to distribute paint more evenly.
- Too much vinegar pooled inside
- Tilt the ornament and tap out excess liquid onto a paper towel before drying. Too much solution can wash away too much paint.
- Want a more antique look
- Add a tiny squirt of gold or black acrylic paint after the silver coat. Swirl it around, then dry. This creates a warm, time-worn finish.
- Cap doesn’t match the vintage look
- Spray the ornament’s metal topper with a darker metallic or matte paint for a more authentic old-world vibe.
- Ornament cracked during process
- This happens more with thin glass. If you’re worried about breakage, start with clear plastic ornaments. They’re safer, especially if kids are involved.
Caring for Mercury Glass Ornaments
Because they are delicate, vintage and antique mercury glass ornaments require special care.
- Storage: Wrap each ornament individually in acid-free tissue paper and store in a sturdy container. Avoid stacking heavy items on top.
- Cleaning: Never use glass cleaner, ammonia, or water on the silvered surfaces—they can strip the finish. Instead, dust gently with a microfiber cloth.
- Display: If displaying outside the holiday season, keep them away from direct sunlight to prevent fading.
Blending Old and New for Holiday Charm
One of the best parts of decorating with mercury glass ornaments is mixing styles. A Christmas tree adorned with both antique figural pieces and modern reproductions feels personal and timeless. Add DIY creations for a custom touch, and you’ll have a tree that reflects both history and creativity.
Final Thoughts
Mercury glass ornaments are more than just holiday decorations—they are storytellers of craftsmanship, tradition, and family history. Whether you’re hunting for antiques at flea markets, crafting your own DIY set, or picking up reproductions at your local store, these ornaments bring sparkle and nostalgia to any home. This holiday season, let your tree shine with the beauty of mercury glass ornaments, and carry on a tradition that has delighted generations.


")
