A pea gravel patio is one of the easiest, most affordable, and most flexible ways to create a beautiful outdoor living space. Whether you’re envisioning a cozy fire pit lounge, a relaxed dining nook, or a minimalist Zen garden, pea gravel offers a natural texture and casual charm that fits nearly any style. Plus, it’s simple to install even for DIY beginners and can be completed in a weekend with the right preparation.
This guide walks you through every stage of the process from planning and materials to edging, installation, and maintenance. By the end, you’ll have a durable, well-draining patio that feels like a natural extension of your home.
Understanding Pea Gravel
Pea gravel consists of small, rounded stones about ⅛ to ⅜ inch in diameter roughly the size of a green pea. Its smooth surface and range of earthy tones (tan, gray, white, and brown) make it a natural fit for outdoor areas. Because the stones are rounded rather than sharp, they’re comfortable underfoot, perfect for patios, walkways, and lounging zones.
From a geological standpoint, pea gravel is classified as a coarse aggregate essentially fragments of rock worn smooth by water over time. According to the U.S. Geological Survey (USGS), these materials play a major role in drainage and groundwater infiltration because their rounded shape allows water to pass through freely rather than pool on the surface (USGS Ground Water Concepts). This permeability is one of the reasons pea gravel is favored in landscaping and stormwater management projects.
Key Benefits:
- Affordable: Usually $30–$60 per cubic yard—significantly cheaper than pavers or poured concrete.
- Low maintenance: No staining, sealing, or mowing required.
- Excellent drainage: Water seeps through easily, reducing runoff and puddles.
- Customizable: Blends beautifully with wood, metal, or stone edging and fits both rustic and modern designs.
Step 1: Plan Your Patio Design
Before you start digging, take time to visualize your patio’s purpose and layout. Will it serve as a dining area, a fire pit zone, or a garden retreat? How much room will you need for furniture and circulation? Sketch your plan on paper or outline the shape in your yard using stakes and string.
A 10 × 10-foot patio is a good starting size for a small gathering space. Curved or irregular shapes often look more natural with pea gravel than strict rectangles. If your yard is sloped, choose a slightly elevated or gently graded area to encourage runoff and prevent washouts.
Step 2: Gather Tools and Materials
Materials
- Pea gravel (2–3 inches deep)
- Crushed rock or paver base
- Landscape fabric or weed barrier
- Edging (metal, stone, plastic, or wood)
- Sand (optional for leveling)
- Landscape staples or pins
Tools
- Shovel
- Rake
- Wheelbarrow
- Hand tamper or plate compactor
- Measuring tape
- Garden hose (for curves)
- Utility knife
Step 3: Measure and Calculate Gravel Quantity
To estimate how much pea gravel you need:
- Multiply the length × width of your patio area for total square footage.
- Convert your desired depth into feet (3 inches = 0.25 ft).
- Multiply the square footage by depth, then divide by 27 (cubic ft per cubic yard).
Example:
10 ft × 10 ft = 100 sq ft × 0.25 = 25 cu ft ÷ 27 ≈ 1 cubic yard.
Always buy about 10 percent more for leveling and future top-offs.
Step 4: Clear and Excavate the Area
Remove grass, roots, and debris from your marked area using a shovel or sod cutter. Dig down 4–6 inches to make space for both the base layer and gravel.
Your excavation depth should include:
- 2–3 inches of compacted base (crushed rock or road base)
- 2–3 inches of pea gravel
Keep a slight slope—about 1–2 percent—away from structures for proper drainage.
Step 5: Install Edging
Edging keeps gravel from migrating and defines the patio’s shape. Choose an edging that suits your design style:
- Metal edging for modern lines
- Plastic edging for curved, flexible borders
- Stone or brick for traditional garden appeal
- Timber for rustic settings
Install the edging securely using stakes or anchoring spikes. This small detail makes a big difference in long-term maintenance.
Step 6: Lay the Base Layer

Spread 2–3 inches of crushed rock or paver base across the excavated area. This layer acts as a stable foundation and helps distribute weight evenly. Level it with a rake, then compact it with a tamper or plate compactor.
The U.S. Geological Survey’s report on natural and recycled aggregates notes that properly compacted base layers of gravel and crushed stone are crucial for structural stability and load distribution in outdoor hardscapes (USGS Aggregates Report, Circular 1176). Applying this same principle ensures your pea gravel patio won’t sink or develop ruts over time.
For extra leveling, add a thin ½-inch layer of coarse sand on top and tamp again.
Step 7: Add Landscape Fabric
Roll out landscape fabric over the compacted base. This prevents weed growth while still allowing water to filter through. Overlap seams by 6 inches and pin them down with staples or landscape spikes.
Avoid plastic sheeting—it can trap moisture, leading to odor or algae buildup.
Step 8: Spread the Pea Gravel
Transport the pea gravel with a wheelbarrow and dump it evenly across the surface. Target a final depth of 2–3 inches. Use a metal rake to level the surface, filling corners and smoothing transitions.
The small size of pea gravel allows it to settle naturally into an even, cushioned layer that remains firm underfoot while promoting excellent drainage.
Step 9: Compact and Settle the Gravel
Mist the area lightly with a garden hose to help the gravel settle. Then walk over the surface or use a plate compactor to create a firmer footing. Add more gravel where low spots appear and rake again for uniformity.
A well-compacted patio resists displacement while retaining a pleasant “crunch” when walked on.
Step 10: Add Finishing Touches
Once level and compact, your patio is ready for décor:
- Add stepping stones in high-traffic paths for stable footing.
- String solar lights or hang café lighting for evening ambiance.
- Border with plants or mulch beds for a blended natural look.
- Include a fire pit, planters, or benches for comfort and personality.
Maintenance for Longevity
Pea gravel patios are extremely low maintenance, but routine attention keeps them beautiful year-round.
Rake Regularly: Smooth footprints and redistribute stones.
Top Up Gravel: Add a half-inch layer annually as needed.
Weed Control: Remove the occasional weed manually or with organic spray.
Drainage Check: Watch for pooling and add gravel or re-level if needed.
Furniture Pads: Use paver stones under legs of tables or chairs for stability.
Inspiring Design Ideas
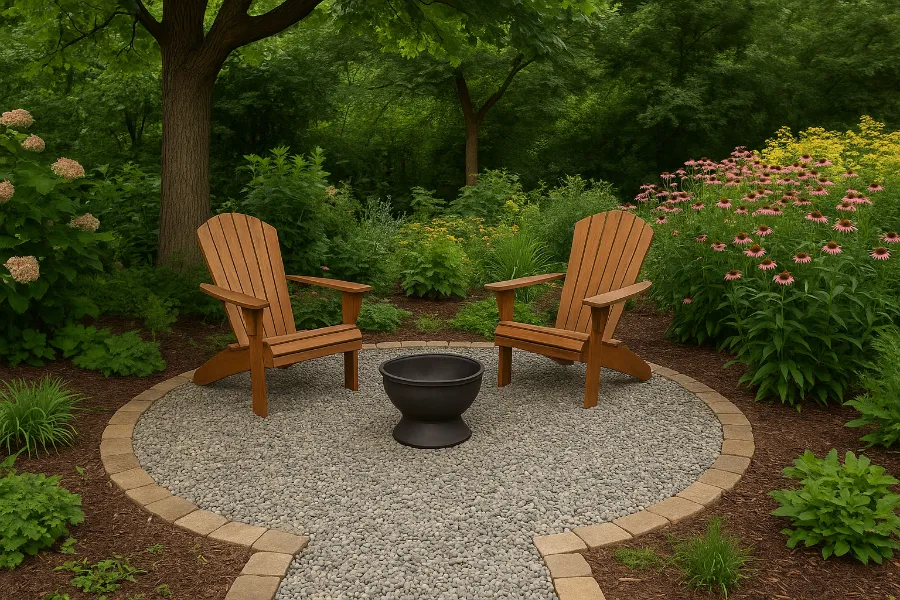
1. Fire Pit Lounge:
Circle your fire feature with low chairs and let the gravel double as a heat-resistant surface.
2. Outdoor Dining:
Pair pea gravel with a pergola, string lights, and a concrete or teak dining table.
3. Garden Nook:
Tuck your patio among flowering beds or under a shade tree.
4. Minimalist Retreat:
Use gray gravel with sleek planters and black steel edging for a modern look.
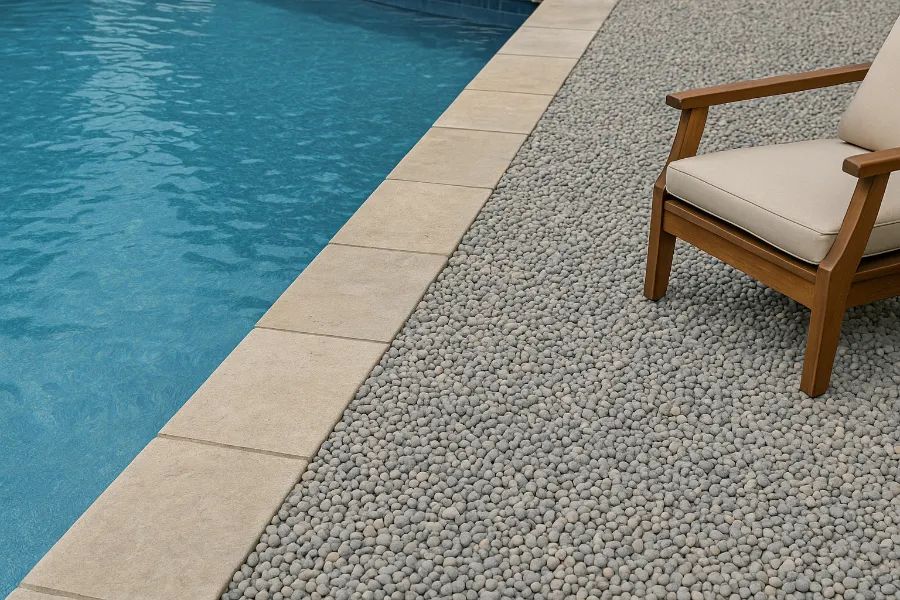
5. Poolside Extension:
Because it drains quickly, pea gravel is ideal near pools and hot tubs—no puddles, no mess.
Pros and Cons
Pros
- Budget-friendly
- Quick DIY installation
- Superior drainage and permeability
- Natural, informal texture
- Easy to modify or expand later
Cons
- Can shift under heavy furniture
- Requires edging to prevent scattering
- Occasional topping off
- Not ideal for rolling furniture
Cost and Time Estimate
A 10 × 10-ft pea gravel patio typically costs $300–$700 depending on gravel quality and edging type. Renting a plate compactor adds about $60 per day.
Most DIYers complete the project over a weekend:
- Day 1: Digging, base layer, and edging
- Day 2: Fabric, gravel, and finishing
Sustainable and Eco-Friendly Advantages
Pea gravel patios are environmentally smart choices. The surface is permeable, meaning rainwater seeps naturally into the soil, helping recharge groundwater and reduce stormwater runoff. According to USGS hydrologic studies, coarse materials like gravel and sand promote infiltration, mimicking how natural streambeds absorb rainfall.
To boost sustainability:
- Source gravel locally to cut transportation emissions.
- Surround with native or drought-tolerant plants.
- Integrate rain gardens or bioswales for extra water management.
Final Thoughts
Installing a pea gravel patio is one of the most satisfying weekend projects for homeowners. It’s cost-effective, versatile, and visually appealing proving that luxury doesn’t require concrete or stone pavers.
With the right preparation, quality base material, and proper edging, your pea gravel patio will stay stable and beautiful for years. More importantly, its natural permeability supports healthy drainage and soil ecosystems, aligning with best practices highlighted by the U.S. Geological Survey for sustainable ground management.
So grab your shovel, mark out your design, and start building a space that invites both comfort and connection with nature one smooth stone at a time.
FAQs
A pea gravel patio should be about 4–6 inches deep, with 2–3 inches for the base layer and 2–3 inches for the gravel itself.
Yes. A compacted base of crushed stone or paver base helps prevent sinking and improves drainage.
Using landscape fabric is recommended—it keeps weeds from growing while allowing water to drain through.
Install solid edging such as metal, stone, or wood to contain the gravel and maintain clean patio lines.
Yes, but place flat paver stones under chair and table legs to prevent them from sinking into the gravel.
A 10×10 ft patio at 3 inches deep requires about 1 cubic yard of pea gravel, plus a little extra for leveling.
Absolutely. Its permeable structure allows water to filter through easily, preventing puddles and runoff.
Rake the surface regularly, top up gravel every year or two, and remove occasional weeds manually.
Yes, pea gravel works great around fire pits because it resists heat and provides a natural fire-safe base.
With proper installation and occasional top-offs, a pea gravel patio can last 10–15 years or more with minimal upkeep.


