Imagine scraping ice off your windshield just to get to the driving range, only to find all the bays are full. Now, picture taking those same practice swings in climate-controlled comfort, any time you like, without ever leaving your house. That is the incredible promise of a DIY basement golf simulator.
This guide is for handy golfers who know their way around a toolbelt. We will walk you through overcoming the classic basement challenge of low ceilings, planning your room layout, and selecting the right technology. By the end, you’ll have the confidence and knowledge to outline your very own basement simulator project.
Why Build a Basement Golf Simulator?
Beyond the simple cool factor, a home simulator offers tangible benefits that can transform your game and home life. The primary advantage is unparalleled convenience. Whether it’s 10 p.m. on a Tuesday or 6 a.m. on a Sunday, your personal driving range is always open, regardless of weather. This accessibility translates into thousands of extra swings per year.
Modern simulators provide data-driven improvement. Sophisticated launch monitors track critical metrics, from ball speed and carry distance to spin rates and shot dispersion. This feedback allows for targeted practice sessions that address specific weaknesses in your game, leading to a measurably lower handicap.
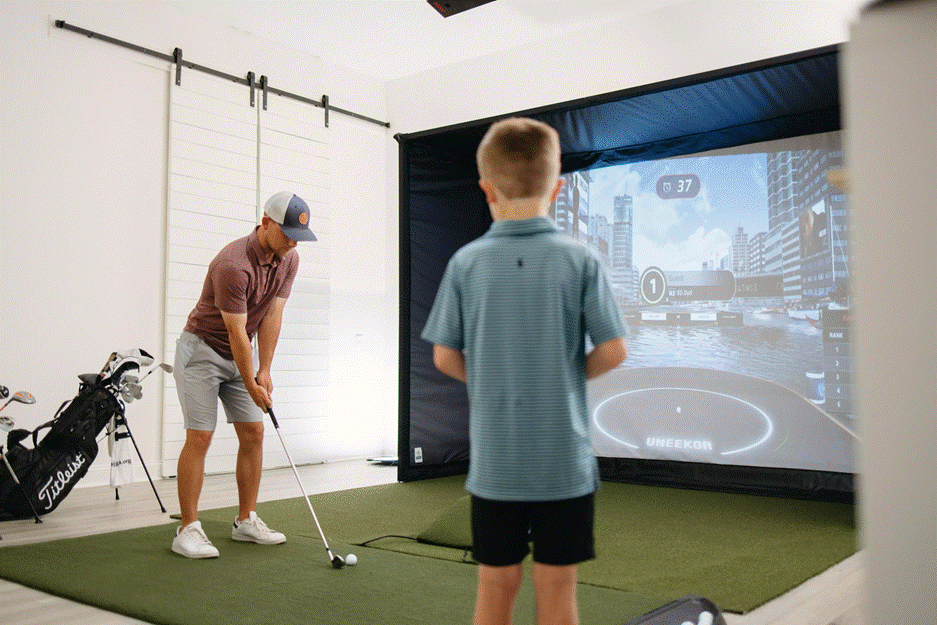
Furthermore, a simulator is a fantastic hub for family and social fun. It can transform into a home theater for movie nights or a virtual course for multiplayer rounds with friends. The more your household uses it, the better the return on your investment. When you compare the cost against regular range fees, the initial investment in gear can often break even in just two to three years.
Space Requirements & Room Planning
The first and most critical step is to measure your space accurately. A comfortable simulator setup typically requires a room that is at least 10 feet wide, 15 feet long, and 9 feet high. This allows for a full, unrestricted swing and a safe buffer around the hitting area. For a professional-grade studio experience, you would aim for a space of 12 feet wide, 18 feet long, and 10 feet or more in height.
Low ceilings are a common obstacle in basements, but there are several effective solutions. One advanced option is to excavate a “swing pit” where you stand, lowering the floor in that section to create the necessary vertical clearance. A simpler fix is to offset your hitting position to maximize backswing room. You can also consider using slightly shortened clubs for this purpose.
Excavating a Low-Ceiling Basement
If you determine that digging down is the only way to achieve the required ceiling height, approach this task with caution. Before renting a jackhammer, contact your local building department. Structural modifications, especially those involving the foundation, almost always require permits and a professional assessment.
Safety is paramount. Always call your regional utility locating service before you dig or cut into concrete to avoid damaging hidden lines. The process often involves underpinning, where you work in small, manageable panels to maintain the foundation’s integrity. This is a job that often requires professional expertise, so factor in a realistic timeline and budget for professional work.
Understanding Technical Components
The technology is the heart of your golf simulator. The core component is the launch monitor, a device that measures ball and club data to replicate your shot in the virtual world. Radar-based units perform best with higher ceilings, while photometric, camera-based units are ideal for lower 8-foot ceilings as they sit beside the ball. Next, you’ll need a projector, impact screen, and a hitting mat. A good starting point is a 1080p projector with at least 3,000 lumens for a bright image. The impact screen safely stops your ball and acts as a projection surface. Finally, a quality hitting mat is essential for protecting your joints. Navigating all these options can be complex; looking at complete home golf simulation solutions can help you visualize how different components work together.
Budgeting Your Golf Simulator
A home golf simulator can be built to fit a wide range of budgets. An entry-level setup might cost around $1,800 if you have adequate ceiling height and can use an existing computer. A mid-tier build typically falls in the $4,000 to $10,000 range. A high-end, custom-built studio can easily exceed $30,000, featuring professional-grade components and luxury finishes. There are several ways to save money without sacrificing performance. Consider buying a certified used launch monitor from the previous model year. You can also DIY your screen enclosure using inexpensive materials instead of a pre-fabricated frame. A phased approach is also smart: start with a net and a launch monitor, then add the projector and screen later.
Step-by-Step Installation Guide
Once you have your components, the installation process can be broken down into manageable steps. First, run the necessary electrical and data wiring, installing GFCI-protected outlets behind the screen area. Next, mount your impact screen or net, ensuring you leave a gap of 12-18 inches from the wall to absorb ball impact. When installing the projector, use a ceiling mount and a laser level for perfect alignment. After that, lay down your hitting mat and any surrounding turf, using a utility knife for clean cuts and double-sided tape to secure the edges. Finally, set up and calibrate your launch monitor and software to ensure the carry distances match your real-world performance.
Customizing & Upgrading
Once your basic setup is functional, you can add features to enhance the experience. Upgrading to a 4K projector will provide stunningly sharp and immersive visuals. Adding high-speed swing cameras offers invaluable slow-motion feedback for analyzing your mechanics. Simple additions like LED accent lighting can create a cool atmosphere, while a surround sound system makes the on-course audio feel incredibly realistic.
Maintenance & Care Checklist
To protect your investment, a regular maintenance routine is essential. On a weekly basis, vacuum the hitting mat and inspect the impact screen for any signs of wear. Monthly, you should clean your projector’s air filter to prevent overheating and check the tension on your screen bungees. Seasonally, check your launch monitor’s firmware and test all GFCI outlets and safety alarms.
Safety & Legal Must-Haves
Safety should be your top priority throughout the build and during use. Ensure all outlets near the hitting area are GFCI-protected and use fire-retardant fabric for your enclosure. Establish a clear “spectator buffer” of at least 18 inches behind the hitting zone where no one is allowed to stand.
If your basement uses a gas heater, ensure there is proper ventilation and install a carbon monoxide detector. Finally, if you performed any structural work, schedule a final inspection with your local building department to ensure everything is up to code.
Conclusion – Time to Measure Up
Transforming an underutilized basement into a personal golf sanctuary is an achievable project with thorough planning and a realistic budget.The journey begins with a simple tape measure. Map out your space, confirm your ceiling height, and start listing the core components you’ll need for your dream setup.
Grab your measuring tape; your forever tee time is waiting just downstairs.
FAQs
Most setups require at least 10 feet in width, 15 feet in length, and 9 feet in height. If you want a pro-level studio, aim for 12 feet wide, 18 feet long, and at least 10 feet high.
You can offset your hitting position, use shortened clubs, or create a “swing pit” by lowering the floor in that section. Always confirm structural safety and permits before excavating.
A basic setup starts around $1,800, while mid-range builds cost $4,000–$10,000. High-end studios with 4K visuals and premium launch monitors can exceed $30,000.
Yes. If your project involves digging or foundation work, hire a licensed contractor. You’ll also need permits and inspections to ensure your structure remains safe and up to code.
Photometric (camera-based) launch monitors are ideal because they sit beside the ball. Radar-based systems work better in larger spaces with higher ceilings.
Choose a 1080p projector with at least 3,000 lumens for a clear, bright image. If budget allows, a 4K projector creates a more immersive and realistic experience.
Absolutely. Start with a hitting net and launch monitor, then upgrade to a screen and projector later. You can also build your own frame or buy used equipment to save money.
Vacuum the hitting mat weekly, clean the projector’s air filter monthly, and inspect your impact screen regularly. Seasonally, update your launch monitor’s firmware and check all safety devices.
Yes, but ensure proper ventilation and install a carbon monoxide detector. Always use fire-retardant materials and maintain a clear area behind the hitting zone.
Definitely. Many homeowners use their simulator space as a home theater, gaming zone, or entertainment area. With the right setup, it can serve as a year-round family recreation hub.


