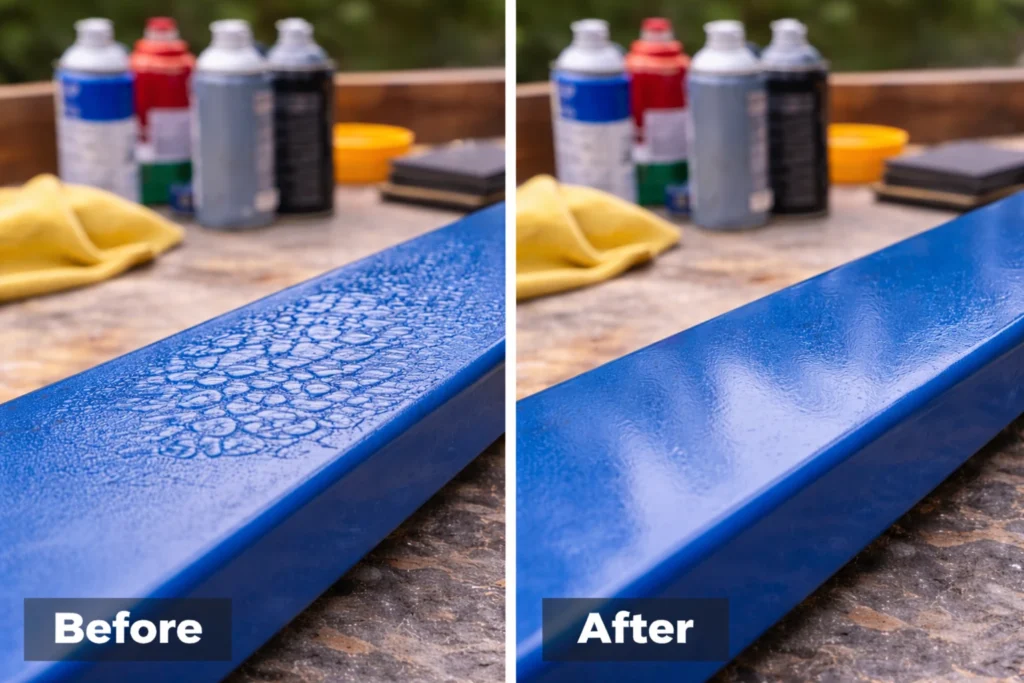
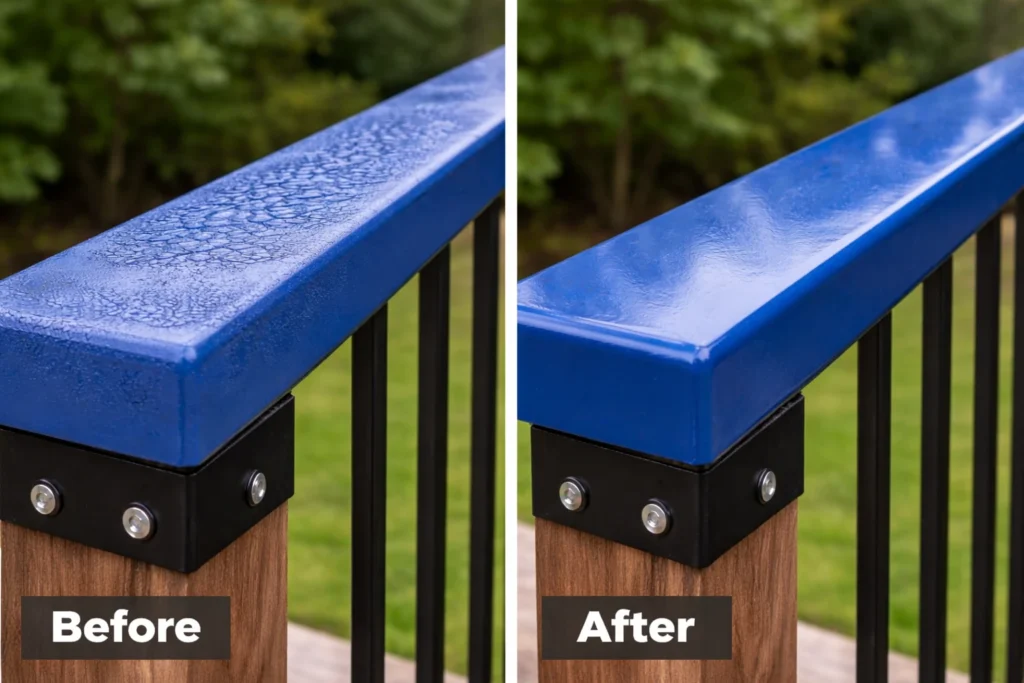
You step back to admire your work and instead of a smooth finish, you see ridges, ripples, and ugly wrinkles across the surface. It’s frustrating. Spray paint promises a sleek, even coat, but when it wrinkles, it can look worse than before you started. The big question is simple: can you sand and repaint wrinkled spray paint?
Yes, you can. In most cases, sanding and repainting is not only possible it’s the best solution. But success depends on timing, technique, and understanding why the wrinkling happened in the first place. If you rush the repair or skip key steps, the problem will come right back. And if you’re also wondering how to prevent spray paint wrinkling in humid weather, that’s part of the solution too because preventing a repeat is just as important as fixing the current issue.
What Causes Spray Paint to Wrinkle?
Before you fix wrinkled spray paint, you need to understand why it happened. Wrinkling is usually the result of trapped solvents. Spray paint dries from the top down. If the top layer dries quickly while the layer underneath is still wet, the trapped solvents try to escape. The result? The surface buckles and wrinkles.
The most common causes include:
Applying coats too thick. Heavy passes or holding the can too close creates a thick film that traps solvents underneath. Recoating at the wrong time. Spray paints have a recoat window. You’re often instructed to apply a second coat within an hour or wait 24–48 hours. Spraying in between those windows reactivates partially cured paint, leading to wrinkling.
High humidity. Moisture in the air slows proper curing and increases solvent retention. Excessive heat. If the surface is hot, the top layer skins over too fast. Incompatible products. Applying lacquer over enamel, or mixing brands with different solvent systems, can cause chemical reactions that wrinkle the surface.
Contamination. Oil, silicone, wax, or dust can interfere with proper adhesion and curing.
If you don’t address the cause, sanding alone won’t solve the issue. You’ll simply repeat the mistake.
Can You Sand Wrinkled Spray Paint?
In most situations, yes. Sanding is effective when:
The paint has fully cured.
The wrinkles are surface-level.
The substrate underneath is still sound.
The paint is firmly adhered and not peeling.
However, sanding will not work well if:
The paint remains soft or rubbery.
Multiple thick coats are heavily distorted.
The underlying layer is still chemically unstable.
There is widespread lifting or bubbling.
In those cases, stripping may be necessary. But don’t jump to that conclusion immediately. Many wrinkled finishes can be leveled successfully with careful sanding.
Wait Until the Paint Fully Cures
This step is critical. Do not sand wrinkled spray paint while it is still soft. You will gum up your sandpaper, tear the surface, and potentially make the damage worse. Dry-to-touch does not mean fully cured. Spray paint can feel dry within an hour, but full curing may take 24 to 72 hours or longer in humid conditions.
A simple test: press your fingernail into an inconspicuous area. If it leaves a mark, it is not ready. The surface should feel hard and resist indentation.
Patience here saves time later.
Tools and Materials You’ll Need
You don’t need a massive tool kit, but you do need the right abrasives.
Sandpaper grits:
120–180 grit for heavy leveling
220–320 grit for smoothing and feathering
400–600 grit for final prep before repainting
Additional tools:
Sanding block for flat surfaces
Orbital sander for large projects
Scuff pads for curved areas
Cleaning supplies:
Tack cloth
Lint-free rags
Isopropyl alcohol or surface degreaser
Safety equipment:
Respirator
Gloves
Eye protection
Spray paint contains volatile compounds. Sanding creates fine dust. Protect yourself.
Step-by-Step: How to Sand Wrinkled Spray Paint
Step 1: Assess the Damage
Look closely. Are the wrinkles shallow ripples or deep folds? If the damage is isolated to a small section, you may only need to spot sand. If the entire surface is affected, you’ll likely need to sand everything for uniformity.
Step 2: Start with Medium Grit
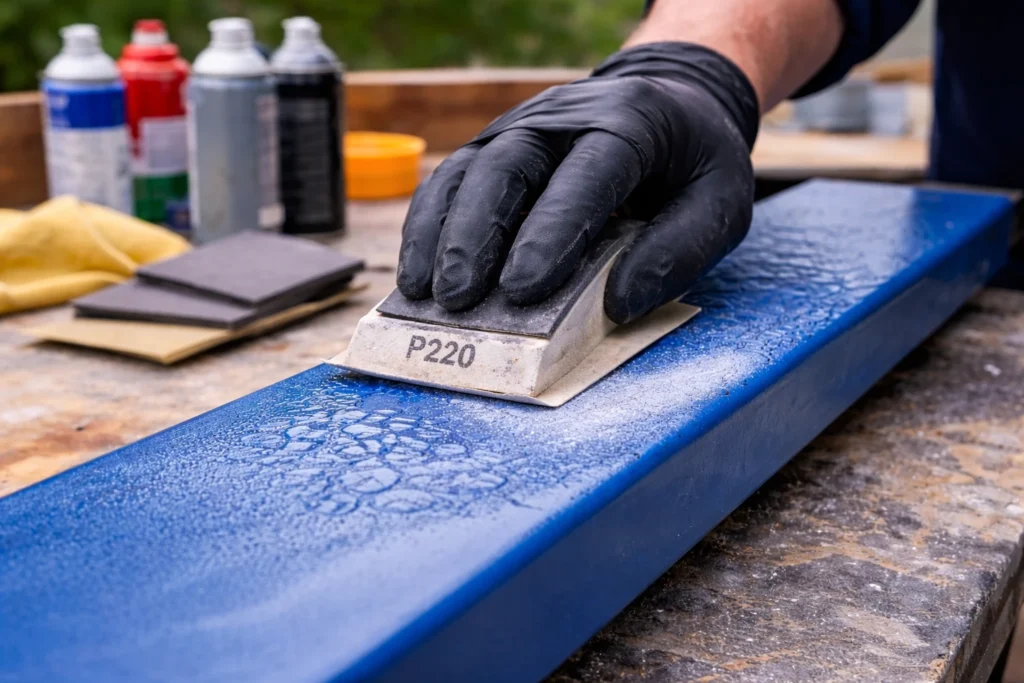
Begin with 180 or 220 grit sandpaper. Sand gently but firmly. Your goal is to level the peaks of the wrinkles, not grind aggressively into the base material. Use even pressure. If you press too hard, you risk creating low spots.
Step 3: Feather the Edges
Once the wrinkles are flattened, feather the surrounding area with 220–320 grit. Feathering prevents visible transitions between sanded and unsanded areas. This is especially important on glossy finishes. Uneven sanding lines will show through the new coat.
Step 4: Smooth the Surface
Move to 400 grit sandpaper. This step refines the surface and prepares it for repainting. The finish should feel smooth and consistent to the touch. If you still see visible wrinkles after sanding with 220 grit, go back and level them again before proceeding.
Step 5: Clean Thoroughly
Dust is the enemy of a smooth repaint. Wipe the surface with a tack cloth. Then use isopropyl alcohol or a degreaser to remove any sanding residue. Let it dry completely before spraying again.
Should You Prime Again?
If you sanded down to bare material especially metal or wood you should reapply primer. Primer restores adhesion and ensures uniform color. If you only leveled the topcoat and did not expose the substrate, you can usually repaint directly after proper cleaning.
When You Should Strip Instead of Sand
Sometimes sanding is not enough.
If the paint remains soft after several days, solvents may still be trapped. If the surface feels rubbery or sticky, stripping is safer. If there are multiple layers of wrinkled paint stacked on top of each other, sanding may become uneven and time-consuming. Chemical strippers or sanding down to bare material may be necessary in severe cases. It takes longer, but it creates a stable foundation.
How to Repaint Without Causing Wrinkles Again
Fixing the surface is only half the battle. Preventing a repeat is just as important. Apply light coats. Hold the can 8–12 inches from the surface. Use smooth, even passes. Overlap slightly. Respect recoat windows. Read the manufacturer’s instructions. Either apply the second coat within the specified short window or wait the full cure time before recoating.
Control your environment. Ideal spray painting conditions are typically between 60°F and 85°F with low humidity. Avoid spraying in direct sunlight. Hot surfaces accelerate top-layer drying and trap solvents underneath. Shake the can thoroughly. Insufficient mixing can alter drying behavior. Test on scrap material first. This small step can save an entire project.
Special Considerations by Surface Type
Metal
Metal surfaces require proper priming. If rust is present, remove it fully before repainting. Any corrosion under the paint will compromise adhesion.
Wood
Wood grain can raise after sanding. Consider applying a sanding sealer or primer before repainting. Make sure moisture content is low, especially in humid climates.
Plastic
Plastic requires adhesion-promoting primers. Without them, paint may wrinkle due to poor bonding. Use products specifically labeled for plastic surfaces.
Is It Worth Fixing?
Most of the time, yes. Sanding and repainting wrinkled spray paint is far cheaper and faster than replacing the item. Whether it’s furniture, a railing, décor, or automotive trim, leveling the surface restores appearance without starting from scratch. However, if the project is small and inexpensive, sometimes stripping completely and starting fresh is simpler. Consider your time, materials, and the value of the object.
Final Thoughts
So, can you sand and repaint wrinkled spray paint? Absolutely. In most cases, sanding is the practical and effective solution. The key is allowing full cure time, using the proper grit progression, cleaning thoroughly, and repainting with thin, controlled coats under proper conditions.
Wrinkling happens. Even experienced DIYers run into it. What matters is knowing how to correct it properly and avoid repeating the mistake. Take your time. Let it cure. Sand methodically. Spray lightly. Do that, and your once-wrinkled surface can look smooth, professional, and completely redeemed.
FAQs
No, you should wait until the paint is fully cured; sanding too early will smear or tear the surface.
Typically 24–72 hours, but humidity and temperature can extend curing time.
Start with 180–220 grit to level wrinkles, then finish with 320–400 grit for smooth prep.
Not always; light to moderate wrinkling can usually be sanded smooth, but severe cases may require stripping.
No, applying more paint over wrinkles usually makes the problem worse.
It often happens when recoating outside the recommended recoat window, causing solvent reactivation.
Yes, high humidity slows curing and can trap solvents, leading to surface wrinkling.
If you sand down to bare material, applying primer again is recommended for proper adhesion.
Yes, but use light pressure and appropriate grit to avoid gouging the surface.
Apply thin coats, follow recoat times carefully, and spray in proper temperature and low-humidity conditions.


