Water is patient. It waits. It follows gravity. And when your yard grading is wrong, it always wins.
That’s why a backyard grading plan isn’t just a nice-to-have concept—it’s a practical framework for protecting your home, landscape, and sanity. I’ve seen too many backyards that looked great in dry weather but failed spectacularly after one heavy storm. Mud against foundations. Water trapped behind patios. Lawns that never fully recover.
The fix isn’t complicated. But it does require thinking like water.
In this guide, I’ll walk you through backyard grading plans step by step, using real-world logic instead of theory. You’ll learn how big your slopes should be, what soil mix actually drains and holds shape, and where water should go when storms exceed your “perfect plan.” Because they always do.
Let’s get into it.
Why Backyard Grading Matters More Than You Think
Grading is the quiet backbone of your yard. You don’t see it when it’s done right. You only notice it when it fails.
Proper grading moves surface water away from your home, prevents erosion, and protects everything built on top of it. Improper grading does the opposite. It funnels water toward foundations, under slabs, and into low points that turn into permanent mud zones.
I like to explain grading this way:
Landscaping is decoration. Grading is infrastructure.
Professionals in large-scale development understand this deeply. Firms like Pape-Dawson Orlando land development engineers spend enormous effort modeling slopes, soil behavior, and overflow paths long before a single building goes up. Residential yards are smaller, but the physics are identical.
Gravity doesn’t care if your yard is one acre or 5,000 square feet.
Understanding Backyard Grading Basics
What Proper Yard Grading Really Means
Grading is about intentional slope. Not flatness. Not perfection. Intentional movement of water.
A well-graded backyard:
- Slopes away from the home
- Moves water across the surface, not through soil alone
- Directs excess runoff to safe exit points
What grading is not:
- Installing drains to fix bad slope
- Making everything perfectly level
- Relying on grass to solve water problems
Slope comes first. Everything else supports it.
Signs Your Backyard Needs Regrading
If you’re unsure whether backyard grading plan applies to you, look for these red flags:
- Water pooling after rain
- Soil washing away near fences or patios
- Mulch drifting downhill
- Grass thinning in streaks
- Foundation walls showing water stains
If water sits longer than 24 hours, the grade is telling you something. Listen to it.
Planning the Right Size and Slope for Your Yard
Ideal Slope Percentages (Simple, Not Scary)
You don’t need engineering software to get this right.
General grading rules that work:
| Area | Recommended Slope |
| Near foundation | 5–6 inches drop over 10 feet |
| Lawn areas | 1–2% slope |
| Hardscapes | 1–2% slope away from structures |
| Swales | 2–4% slope |
Too flat? Water stalls.
Too steep? Soil erodes.
Balance matters.
Measuring Your Backyard Accurately
This is where most DIY projects go sideways. Guessing slope doesn’t work.
Use this simple method:
- Drive stakes at key points
- Run string lines between them
- Use a line level or laser level
- Measure vertical drop over distance
Write the numbers down. Sketch your yard. Mark high points and low points. This becomes your grading map.
It’s surprisingly empowering.
Zoning Different Yard Areas
Not every part of your yard should drain the same way.
Divide your space into zones:
- Lawn zones
- Patio and seating zones
- Garden beds
- Play or pet areas
Each zone should have a clear path for water to move through or around it, never stopping at edges.
This zoning approach is a core idea in backyard grading plan and prevents localized failures.
Soil Mix That Actually Drains (And Stays Put)
Why Native Soil Alone Usually Fails
Native soil is often:
- Too compacted
- Too clay-heavy
- Too inconsistent
Clay holds water. Sand drains too fast. Organic matter decomposes and settles.
On its own, native soil rarely provides long-term stability.
Ideal Soil Mix for Backyard Grading
A reliable grading soil blend looks like this:
| Component | Purpose |
| Screened topsoil | Structure and nutrients |
| Coarse sand | Drainage and stability |
| Organic matter | Root health (limited amount) |
Typical ratio:
- 60% topsoil
- 30% coarse sand
- 10% organic material
Avoid pure compost layers. They shrink. And shrinking breaks slope.
Compaction: The Step Everyone Skips
This is where grading succeeds or fails.
Soil must be compacted in layers:
- 3–4 inches per lift
- Light moisture (not muddy)
- Hand tamper or plate compactor
Skip compaction and your beautiful slope will flatten within months.
Ask me how I know!
Designing Overflow Routes That Work in Real Storms
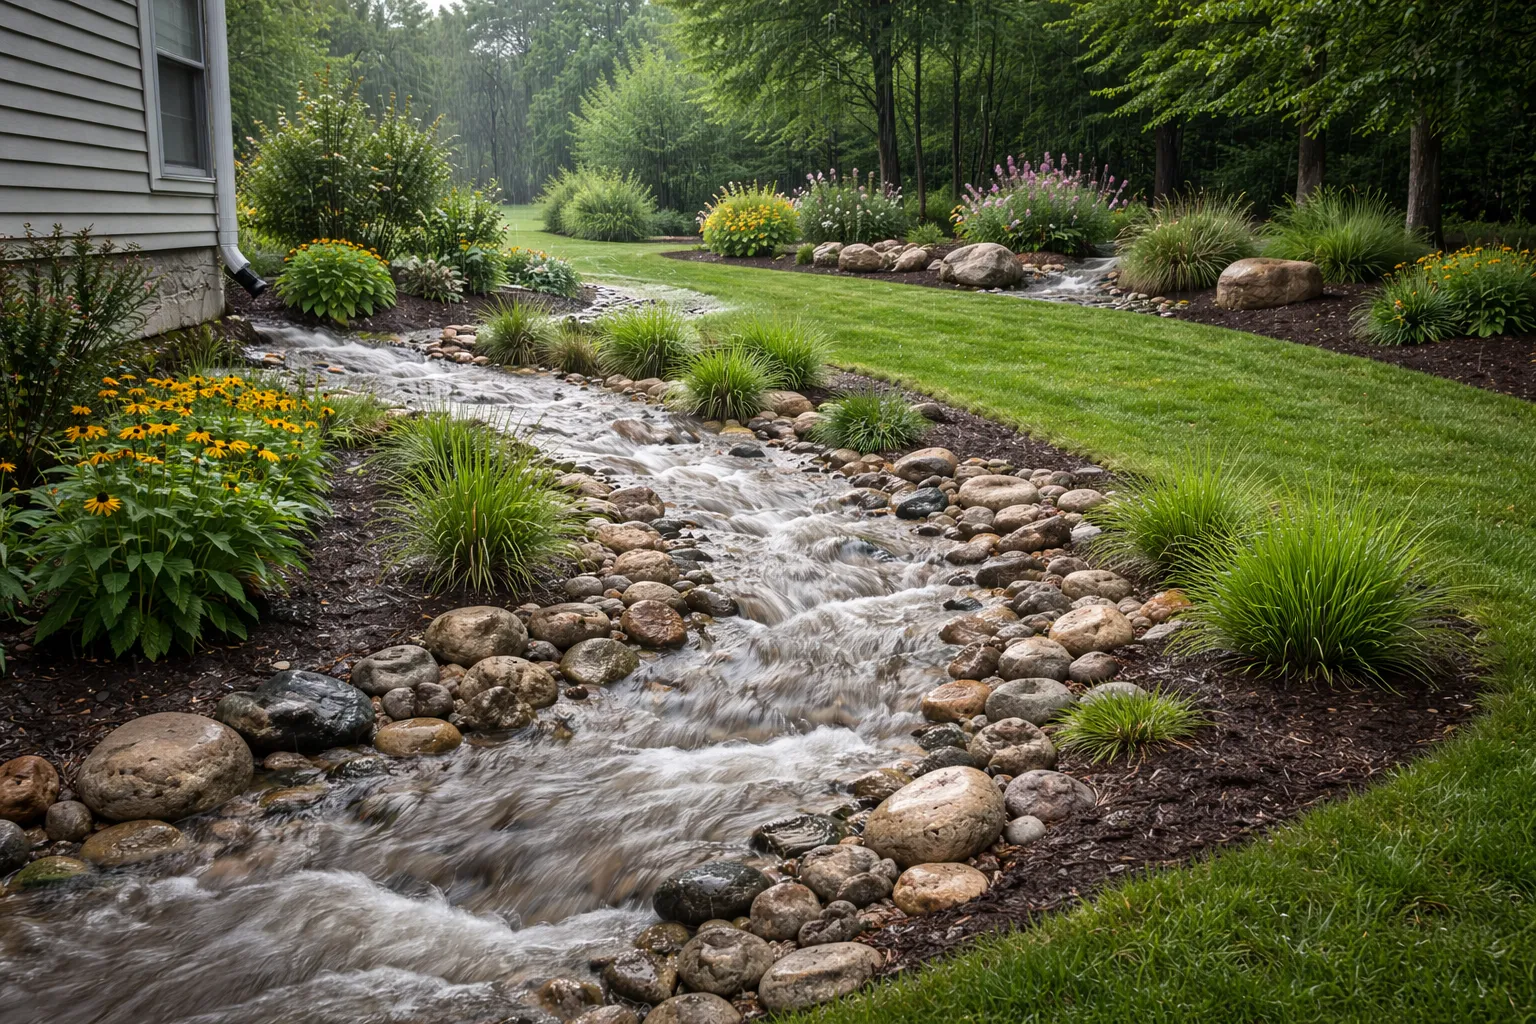
Why Every Yard Needs an Overflow Route
No grading plan handles every storm. And that’s okay.
Overflow routes are controlled escape paths for excess water. They prevent chaos by giving water somewhere safe to go.
This is a cornerstone of the backyard grading plan.
Think of overflow as your backup generator.
Common Overflow Route Options
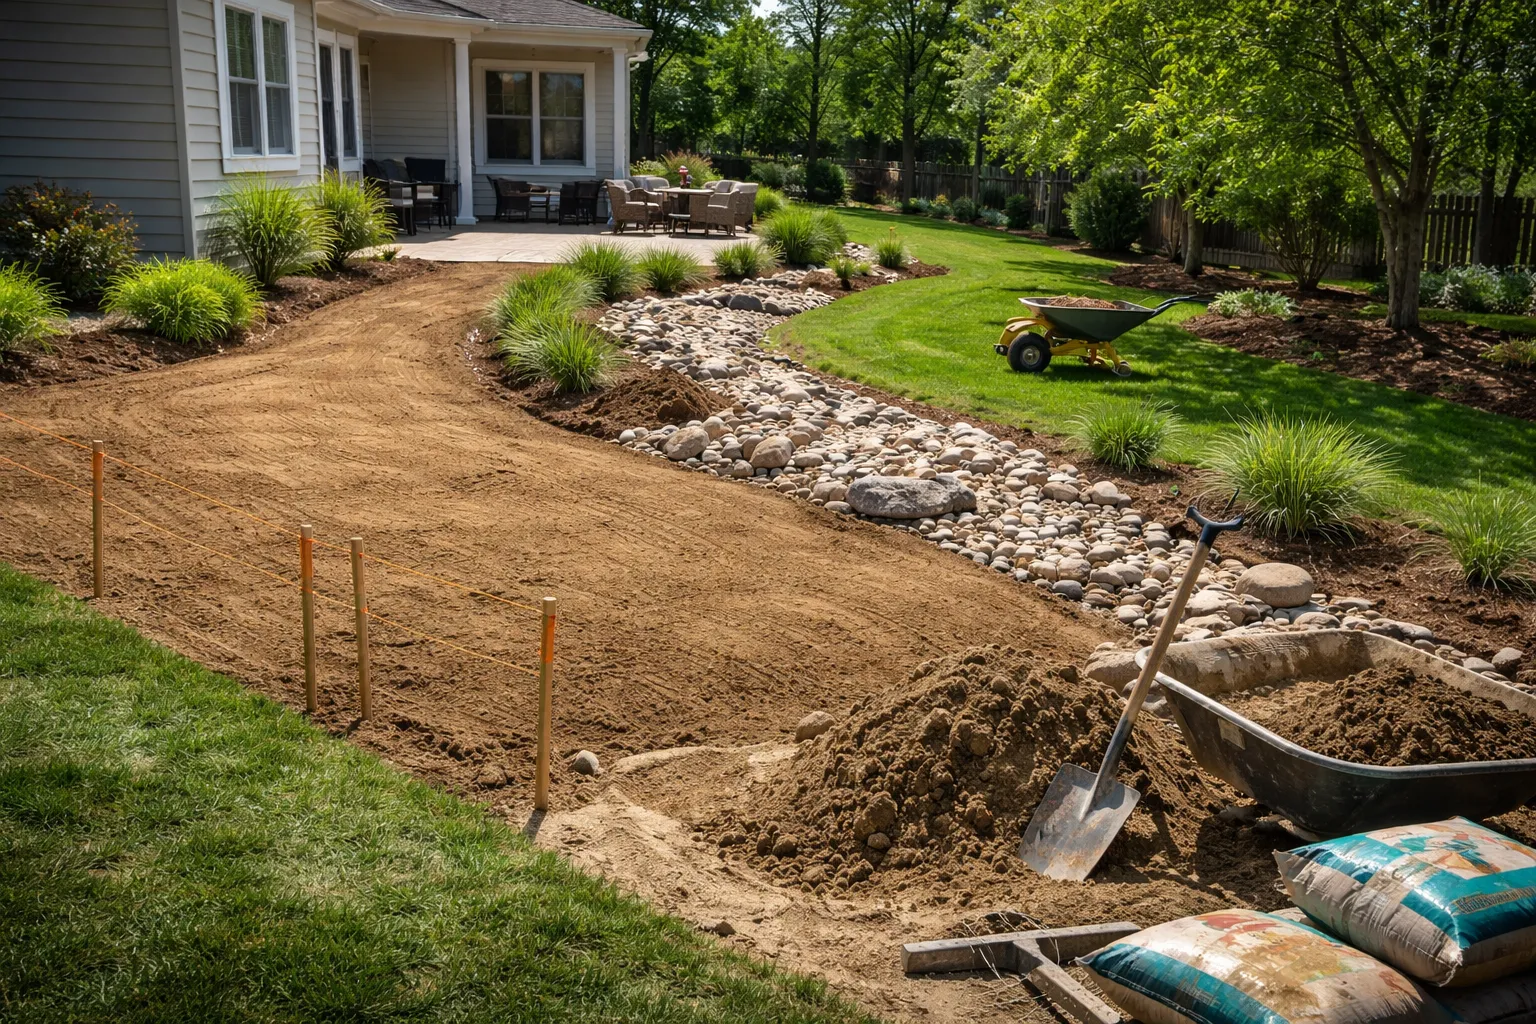
Swales
- Shallow, grassed channels
- Blend into the landscape
- Excellent for long yards
Dry creek beds
- Stone-lined surface channels
- Handle heavy flow
- Visually attractive
Gravel infiltration zones
- Slower release
- Best for smaller volumes
- Require proper soil beneath
Each option works when designed intentionally.
Where Overflow Routes Should Lead
Water must exit the yard safely:
- Street curb (where permitted)
- Natural drainage easements
- Rear yard drainage corridors
Never send water toward neighbors. Ever.
Local codes vary, but the physics don’t. Water finds conflict quickly.
Integrating Grading With Existing Features
Foundations and Slabs
Your foundation is sacred ground.
Maintain:
- Minimum 6 inches of exposed foundation
- Continuous slope away from walls
- No soil contact with siding
If water touches the foundation, the grade has already failed.
Patios, Decks, and Walkways
Hard surfaces need slope too. Flat concrete holds water just like flat soil.
Best practices:
- 1–2% slope away from structures
- Drain gaps at edges
- No trapped corners
This prevents freeze damage, algae, and long-term settling.
Fences, Sheds, and Landscape Structures
Posts rot when water pools. Period.
Grade around structures so water passes by, not through, post bases.
Small changes here add years of life.
DIY vs. Professional Backyard Grading
When DIY Makes Sense
DIY grading works when:
- Slopes are minor
- Yard size is manageable
- Equipment needs are light
Basic tools:
- Shovel
- Rake
- Level
- Tamper
Patience is the most important tool.
When to Call a Professional
Bring in help when:
- Major elevation changes exist
- Water affects foundations
- Drainage disputes are possible
- Heavy equipment is required
Civil engineers and grading contractors use the same principles outlined in the backyard grading plan, just at larger scale.
Cost and Time Expectations
| Approach | Typical Cost | Time |
| DIY minor grading | Low | Several weekends |
| Professional grading | Moderate–High | 2–5 days |
The right choice saves money long term.
Common Backyard Grading Mistakes to Avoid
Avoid these, always:
- Flat areas near foundations
- No overflow route
- Using pure topsoil without sand
- Skipping compaction
- Trusting drains to fix slope problems
Drains assist grading. They don’t replace it.
Maintenance Tips for Long-Term Success
Grading isn’t “set it and forget it.”
Check annually:
- After heavy storms
- After freeze-thaw cycles
- After landscaping changes
Top off settled areas. Repair erosion early. Adjust overflow paths as needed.
Small corrections prevent big repairs.
Final Thoughts: A Grading Plan That Lasts
Here’s the truth. Backyard grading plan isn’t about moving dirt. It’s about thinking ahead.
When size is right, soil is stable, and overflow routes are planned, water stops being a threat. It becomes predictable. Manageable. Boring.
And boring is exactly what you want from water around your home.
Plan first. Move dirt second. Sleep better every storm after that.
FAQs
Backyard grading is shaping the ground so water flows away from your home instead of pooling or causing erosion.
Most yards need a gentle 1–2% slope, with steeper grading near foundations to move water safely away.
Drains can help, but without proper slope, water problems usually return—grading is the foundation of drainage.
A blend of screened topsoil, coarse sand, and limited organic matter provides both drainage and stability.
Improper compaction or too much organic material causes soil to compress and lose its intended slope over time.
An overflow route is a planned path that safely directs excess water away during heavy rainstorms.
Swales handle surface water naturally, while drains assist subsurface flow—most yards benefit from slope first.
Maintain at least six inches of visible foundation to prevent moisture damage and pest issues.
Small grading corrections can be DIY, but large elevation changes usually require professional help.
Inspect grading annually and after major storms to catch settling or erosion early.


