Did you know that frozen pipes cause over $5 billion in damage each year in Canada? That’s a huge hit, mostly from simple bursts that could have been stopped. Winter plumbing prep means taking steps to shield your pipes from freezing temps so water doesn’t turn to ice and crack them open. It’s way cheaper to get ahead than to fix floods later. In this guide, we’ll cover spotting weak spots, adding insulation where it counts, and setting up plans for bad weather. You’ll walk away ready to tackle the cold without worry.
Identifying and Addressing High-Risk Plumbing Vulnerabilities
Pipes in the wrong spots can spell trouble when frost hits. Homeowners often overlook these areas until it’s too late. Let’s break down how to find and fix them fast.
Locating Exposed and Unheated Pipes
Exposed pipes hide in places you might not check often. Think crawl spaces under the house, dusty attics, or walls next to the outside. Garages and basements by doors get chilly drafts too. Water freezes at 32 degrees Fahrenheit, so any spot below that needs attention. To spot them, grab a flashlight and walk your home. Start in the basement—look along walls for any lines running to the outdoors. Head to the attic next; check near vents or eaves. Don’t forget the garage; pipes there might supply a sink or washer. In crawl spaces, wear old clothes and peek under the floor for anything metal or plastic carrying water. Mark spots with tape so you can insulate later. This quick hunt can save you headaches. It takes just 30 minutes but pays off big.
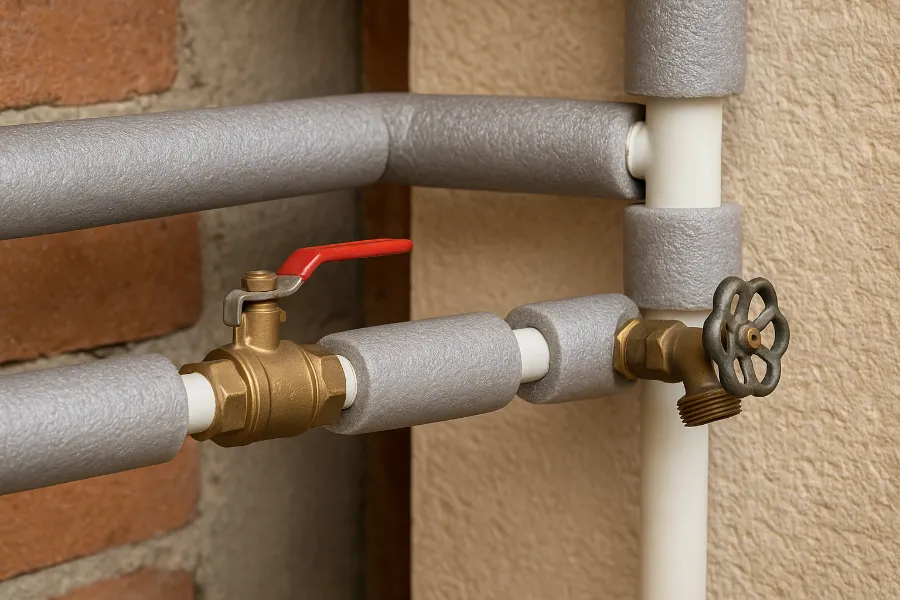
Insulating Pipes: Material Options and Best Practices
Insulation acts like a cozy blanket for your pipes. Foam sleeves slip on easy and cost little, great for straight runs on copper or PVC. They block cold well but might slip if not taped right. Fiberglass wraps offer more coverage for bends, though they itch during install. Electric heat tape plugs in and warms pipes actively—perfect for super cold zones—but watch for fire risks if old wiring’s involved. Pick based on your setup. Copper handles foam best since it conducts cold fast. PVC needs gentle wraps to avoid cracks. Pros of foam: cheap and simple. Cons: not as thick for harsh winters. Heat tape’s pro is reliability in freezes; con is the electric bill. Apply it right for real protection. Clean the pipe first, then slide on sleeves or wrap fiberglass tight. Cover every inch, including elbows and valves—gaps let ice sneak in. Use duct tape to secure ends. For heat tape, follow the manual: wrap in a spiral, plug into a grounded outlet, and set a thermostat. Test it on a mild day. Done this way, your pipes stay thawed even in single digits. A certified plumber notes, “Aim for at least R-3 insulation value in cold spots to keep pipes safe.” That’s solid advice for most homes.
Addressing Exterior Plumbing Fixtures
Outdoor spigots and sprinklers trap water that expands when frozen. Hose bibs on house walls are prime targets; one burst can flood your yard or worse. Irrigation lines buried shallow face the same risk if not drained. You can also hire a Rooter company for emergency plumbing, drain service, and sewer repairs.
Act before the first frost. Shut off the indoor valve feeding the outdoor faucet—usually in the basement or utility room. Open the spigot wide to let water drain. Disconnect hoses and store them inside; frozen ones crack too. For frost-proof sillcocks, they’re built to drain, but check the model. If you have sprinklers, blow out lines with an air compressor or hire a pro—water left in bends freezes first.
Here’s a step-by-step:
- Turn off the supply valve inside.
- Open all outdoor faucets fully.
- Disconnect and drain hoses.
- Cover spigots with insulated caps from hardware stores.
This routine keeps exterior plumbing winter-ready and leak-free.
Protecting Interior Water Systems During Extreme Cold Snaps
Inside lines seem safe, but drafts sneak in. Extreme cold can still bite if you’re not careful. Focus on these spots to keep water flowing.
Preparing Water Supply Lines in Unheated Areas
Utility rooms or basements without heat expose supply lines to chills. Beyond basic wraps, add heat sources if needed. Keep doors closed to block wind, and clear junk that blocks warm air flow. For extra prep, wrap lines twice in severe areas. Use foam over fiberglass for layers. If pipes run along cold floors, lift them slightly with blocks. Monitor temps with a cheap thermometer—stay above 40 degrees if possible. One plumber tip: “R-5 or higher insulation fights deep freezes best in unheated basements.” Follow that, and your interior systems hold up. Check for leaks now too. Tighten fittings gently; old ones might fail in the cold.
The Role of Crawl Space and Attic Ventilation Control
Vents let cold air rush in, dropping temps near pipes. In crawl spaces, open vents cool the ground; seal them when freezes loom. Attics work the same—loose hatches pull in frost.
Control it by weather-stripping doors and hatches first. Use foam seals from the store; they stick easy. For crawl vents, cover with plywood or foam boards held by bricks. Do this before a big chill hits, but reopen in spring to avoid moisture buildup. This simple tweak raises space temps by 10-15 degrees. It’s like closing windows on a windy day—keeps the cold out where it belongs. Test seals by feeling for drafts. Fix gaps quick.
Managing Well Systems and Pumps (If Applicable)
Well owners forget pump houses often sit exposed. Freezes hit pumps hard, stopping water flow entirely. Enclosures get drafty; water in lines or tanks ices up fast. Insulate the pump with foam boards around the base. Wrap lines leading inside with heat tape if power’s there. Drain the pressure tank if temps drop below freezing—follow your manual. Keep the small heater in the shed running on low.
For rural homes, this means checking the well cap for tight seals too. Snow piles block heat; shovel around it. If you’re on city water, skip this, but well users swear by monthly winter checks. One overlooked freeze can mean a $1,000 pump repair. Stay vigilant, and your well keeps pumping through winter.
Developing a Cold Weather Plumbing Emergency Plan
Plans turn panic into action. When pipes freeze, quick moves limit damage. Build yours now.
Knowing Where and How to Shut Off the Main Water Valve
Shutting off water stops floods from bursts. Find the main valve inside—often in the basement by the meter or in a utility closet. It’s a big wheel or lever; turn clockwise to close. Outside, the curb stop hides in a ground box near the street. Use a long wrench to twist it. Not all know this spot—call your water company for the exact place. Practice once: Turn it slowly, then back on. Feel the resistance so surprises don’t hit in a rush. This one skill saves homes daily. Label the valve with a tag for family members too.
Essential Supplies to Keep On Hand
Stock a kit for fast fixes. It beats running to the store mid-freeze.
- Pipe insulation scraps: Quick wraps for spots you missed.
- Pliers or adjustable wrench: For stubborn shutoff valves.
- Non-toxic RV antifreeze: Pour in drains to prevent freezing.
- Buckets and towels: Catch drips from thawing pipes.
Add duct tape and a hairdryer. Store in a basement bin labeled “Plumbing Emergency.” Check it yearly; replace old stuff. With these, you handle minor issues solo.
Recognizing the Warning Signs of Frozen Pipes
Spot trouble early to thaw before bursts. Frost on pipe surfaces shines like white fur—feel for ice bulges. Water pressure drops slow, then stops at faucets. No flow from a tap screams freeze. Bulging pipes mean ice buildup; don’t wait. A burst shows wet spots or hissing leaks—shut off water now. Frozen differs from burst: Ice blocks flow but holds; cracks let water spray. Thaw gently if caught soon. Act on signs, and damage stays small.
Active Defense Strategies During a Freeze Event
When cold snaps hit, fight back smart. These moves keep pipes liquid.
Utilizing Low-Level Heat Sources Safely
Drip faucets to ease pressure—hot and cold, a slow stream like a leaky pen. Moving water freezes slower; it stops ice from expanding cracks. Aim for one gallon per hour per faucet. For thawing, use a hairdryer on low heat. Wave it along the pipe from the faucet back; never near water. Space heaters work too, but keep them away from flammables.
One family thawed a kitchen line this way last winter—no plumber needed. Safe heat prevents worse woes.
Maintaining Consistent Indoor Temperatures
Set your thermostat to 55 degrees minimum, even in empty rooms. Drops below that let cold creep to pipes. During blackouts, layers of blankets on windows help trap warmth. If traveling short-term, don’t crank it down fully—pipes thank you. Consistent heat mimics a steady guard against frost. It’s simple: Warmer inside means safer plumbing. Monitor with a room thermometer; adjust as needed.
Protecting Pipes in Vacant Homes (Winterizing for Travel)
Empty houses freeze fast without heat. Drain all systems: Shut off main water, open faucets, flush toilets till dry. Pour antifreeze in drains and bowls. Hire a service for full winterizing—they use compressed air to blow lines clear. Leave heat at 50 degrees with a timer. Ask neighbors to check weekly.
Checklist for trips:
- Drain lines completely.
- Set thermostat low but on.
- Unplug water-using appliances.
- Board up or seal any open spots.
This setup lets you relax; no flood calls home.
Conclusion: Beyond Preparation—The Value of Peace of Mind
Winter plumbing prep boils down to three keys: Insulate vulnerable pipes, know your shutoff valve, and drip faucets in freezes. These steps dodge thousands in repairs from bursts. Proactive work brings calm imagine sleeping through a storm without worry. Start your check today. With the first hard freeze nearing, inspect now. Your home will thank you all season long.
FAQs
Because frozen pipes can burst and cause thousands of dollars in damage, preparation helps prevent costly repairs and water loss.
Pipes start freezing when temperatures drop to around 32°F (0°C), especially in unheated or poorly insulated areas.
Crawl spaces, attics, garages, basements, and exterior walls with minimal insulation are the most vulnerable.
Use foam pipe sleeves or fiberglass wraps — both are affordable and simple to install without tools.
Yes. Always disconnect hoses, open the spigot to release trapped water, and install an insulated faucet cover.
Keep it at no lower than 55°F (13°C) to ensure interior pipes stay above freezing temperatures.
Look for frost on the pipe surface, reduced water pressure, or no flow at faucets — these are key warning signs.
Turn off the main water valve immediately and warm the pipe gently with a hairdryer or heating pad—never use an open flame.
Insulate the well pump enclosure, apply heat tape to exposed lines, and keep a small heater running on low in extreme cold.
Keep pipe insulation, duct tape, a wrench, non-toxic antifreeze, towels, and a portable heater for quick response.


