The first time “centimeter-level” positioning fails you, it rarely does so with fireworks. It fails quietly: a point that looks plausible, a line that “should be fine,” a height that’s off by just enough to become someone else’s problem after the pour. Field precision isn’t mainly about heroics—it’s about building a workflow that remains credible when the site is inconvenient.
If you’re selecting an rtk receiver, the smartest approach is to think like the person who will have to defend the output later. Not just to a colleague, but to the superintendent who wants speed, the designer who wants consistency, and the inevitable moment when two datasets disagree and everyone suddenly becomes very interested in your coordinate system.
Start by Defining the Outcome, Not the Tool
Most buying decisions go sideways because “high precision” is treated as the outcome. It’s not. The outcome is a deliverable that others can use without reinterpretation.
Write down, in plain terms, what success looks like for your projects:
- What are you producing? Stake points, as-built checks, asset inventories, topo surfaces, control networks, or a mix?
- What must be tight? Anchors and sleeves, structural edges, boundary work, critical elevations—each has different consequences when wrong.
- Where do you work? Open-sky sites, dense urban blocks, tree cover, steel-heavy environments, shoreline corridors—these aren’t minor details; they are the operating conditions.
- How much time do you get per point? A careful occupation and a quick capture are different disciplines with different failure modes.
Once you can describe the job, the selection becomes less mysterious. You’re matching a system to a set of pressures.
Choose a Correction Strategy That Won’t Collapse on Your Worst Site
High-precision positioning is rarely “just hardware.” The correction source is part of the system, and it has a personality. You should meet that personality before committing.
Common approaches, in practical terms:
- Local base on site: You control it. You also inherit responsibility for setup, monitoring, and troubleshooting. Great when you need autonomy; annoying when you’re already short on time and people.
- Network-based corrections: Convenient when coverage is consistent. Less convenient when the site has poor connectivity, complex terrain, or the project moves into areas that aren’t well served.
- Post-processed workflows: Useful when you want an audit trail or you can’t rely on continuous corrections. Not ideal when your daily work depends on immediate stakeout decisions.
A sober rule: your plan should still function when the easiest option stops working. That might mean redundancy (two communications paths), a “base fallback,” or simply a documented procedure that doesn’t live only in one operator’s head.
Make the Coordinate Story Explicit and Boring
Most expensive “precision problems” are not measurement problems. They’re reference problems: the right point in the wrong grid, the right grid with the wrong vertical definition, the right design file loaded into the wrong project template.
Treat coordinate management like a safety checklist:
- Identify the horizontal reference used by the design and whether a project grid rotation/scale has been applied.
- Identify the vertical reference and how heights are intended to be interpreted.
- Store transformation parameters in one agreed location with version control.
- Validate the setup using independent check points before you commit to critical staking.
When this is done well, the field day becomes pleasantly uneventful. When it isn’t, the field day becomes a detective story with deadlines.
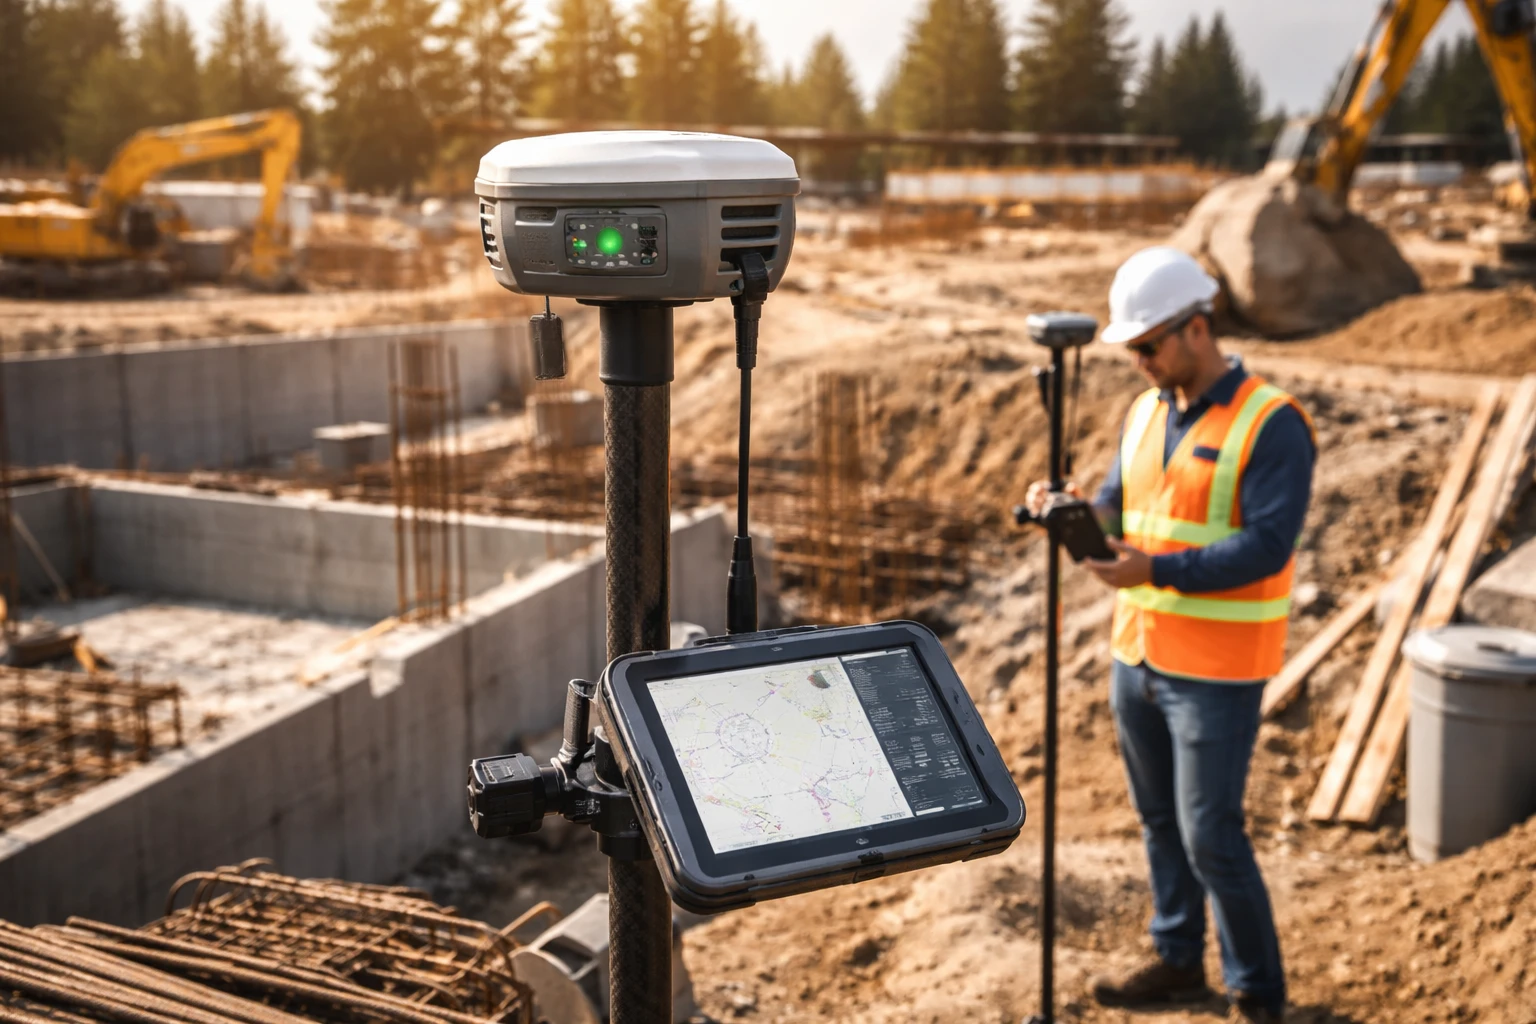
What to Evaluate in Hardware Without Falling in Love With Specs
Spec sheets are useful, but they’re not the job. In real work, you’re paying for how the system behaves when conditions are imperfect—which is most days.
Focus on questions that have consequences:
- How quickly does it stabilize in marginal conditions? Not in a demo, but near reflective surfaces or partial sky.
- How does it recover after brief interruptions? On busy sites, interruptions are a routine event, not a special case.
- Do the diagnostics help you make decisions? You want indicators that reveal uncertainty early, not indicators that simply reassure you.
- Is the field workflow ergonomic enough to reduce operator mistakes? Sunlight visibility, reliable power, robust connectors, stable mounting—these are accuracy features wearing practical clothing.
Some modern receivers also add visual tools—camera-assisted or AR stakeout, plus image-based point capture—which can speed up layout and reduce mistakes when access is limited or when you’re working in tight, cluttered spaces.
If you can, test under “bad but normal” conditions: near structures, near equipment, and in the working posture your crew actually uses. A device that is impressive only in ideal conditions is a device you’ll argue with on real projects.
The Setup Routine That Prevents Embarrassing Meetings
Precision doesn’t start at the point. It starts at the routine you repeat before points exist.
A disciplined session typically includes:
- Confirm the project file and design revision. “Latest” should not be a debate on site.
- Recover and verify control. Physically inspect it, then confirm it numerically.
- Document antenna height and method every time. This is where “tiny” mistakes grow teeth.
- Measure a known point before production work. Treat it like a pre-flight check.
- Repeat the known-point check at the end. If the system can’t tell the truth consistently, something shifted—environment, setup, or reference.
For high-consequence items (anchors, penetrations, critical elevations), add one more step: an independent re-check from a different setup or a different time window. If that feels slow, compare it to the speed of rework.
Learn to Read “Quality” Like a Skeptic
Field quality indicators are helpful only if you treat them as evidence, not decoration.
A few field-proven habits:
- Don’t confuse “stable” with “correct.” Reflections can produce stable-looking errors.
- Treat sudden jumps as prompts, not verdicts. Pause, check a known point, and evaluate environment changes.
- Be suspicious of perfection in hostile environments. If conditions are obviously difficult and everything looks flawless, verify rather than celebrate.
- Use geometry as a sanity check. If a staked point doesn’t make geometric sense relative to baselines, offsets, or adjacent features, the instrument may be correct—or the reference may be wrong. Either way, don’t proceed until the story aligns.
Experienced crews aren’t faster because they ignore uncertainty; they’re faster because they identify it early and handle it efficiently.
Workflow Playbooks: Stakeout, Topo, As-Built
Different tasks reward different discipline. Treating them all the same is a quiet way to invite confusion.
Stakeout and Layout Work
This is where mistakes turn into concrete. Build your sequence:
- Establish primary geometry first (baselines, gridlines, reference offsets).
- Stake critical points with context: labels that survive weather and offsets that survive excavation.
- Re-check what cannot be easily repaired later—especially anything that determines future drilling or installation.
Stakeout is not only about putting marks down. It’s about making marks that others can trust without asking you to stand beside them all day.
Topographic Capture
Topo work is a volume game: many points, many opportunities for small inconsistencies. The trap is collecting fast and cleaning later.
Good topo capture depends on:
- consistent feature coding,
- consistent breakline logic,
- consistent handling of transitions (curb returns, grade breaks, edges).
A topo dataset is “good” when it can be used without the office playing archeologist.
As-Built Verification
As-built work is often treated as paperwork until it saves a project. Capture what will be hidden soon and what drives downstream trades: sleeves, embeds, key elevations, interface points between scopes.
For defensibility, record the circumstances:
- what reference was used,
- how critical points were verified,
- and any anomalies observed during capture.
“We measured it” is not a strong statement. “We can show how we measured it” is.
Troubleshooting Without Making It Worse
When field results feel wrong, the worst move is changing five variables at once. You may fix the symptom and never learn the cause—which means it returns tomorrow.
A cleaner troubleshooting approach:
- Environment check: Move slightly, reassess sky view, and avoid obvious reflectors if possible.
- Reference check: Measure a known point. If that fails, the problem is fundamental—don’t keep “producing” data.
- Workflow check: Confirm project template, coordinate definitions, antenna height entry, and that the correct job file is loaded.
Troubleshooting is not about proving the tool is broken or perfect. It’s about restoring a chain of trust quickly and methodically.
Build a Continuity Plan, Not Just a Kit
Projects don’t pause because your equipment needs attention. Continuity—what happens when something stops working—belongs in your plan.
That can include:
- spare power and robust accessories,
- a fallback correction strategy,
- documented procedures that another operator can follow without improvisation,
- and a habit of recording key settings so work is transferable.
Reliability is often less about owning the “best” gear and more about eliminating single points of failure in daily operations.
From “It Works” to “It Holds Up”
The best high-precision workflows don’t feel dramatic. They feel repeatable. The receiver is an important piece, but the real performance comes from the system around it: reference discipline, correction reliability, verification routines, and outputs that hold up when handed to other teams.
If you want a practical benchmark, aim for this: results that remain consistent when you repeat them tomorrow, results that make geometric sense in the field, and results that you can defend without raising your voice. That’s when precision stops being a feature and becomes a habit.
FAQs
An RTK receiver is a GNSS device that uses real-time corrections to deliver centimeter-level positioning, making it essential for precise surveying and construction tasks.
Select a correction strategy based on your site conditions, connectivity, and need for reliability—many professionals use a mix of network and local base solutions for flexibility.
Most errors come from mismatched references or incorrect transformations, not measurement problems, which is why consistent coordinate management is critical.
Focus on reliability in tough conditions, fast recovery from signal loss, clear diagnostics, and a user-friendly workflow rather than just raw specifications.
Always check a known control point before and after your session to confirm that your system is producing consistent and accurate results.
Rushing without verification—failing to double-check critical points can lead to costly rework later in the project.
Adjust your position, minimize obstructions, and consider switching to a fallback correction method or post-processing workflow if needed.
Even small mistakes in antenna height can introduce significant errors, making accurate and consistent documentation essential.
Topo focuses on capturing large volumes of consistent data, while as-built work prioritizes accuracy, verification, and documentation for future reference.
Build redundancy into your process, document key settings, and create repeatable routines so results remain consistent across different days and operators.


