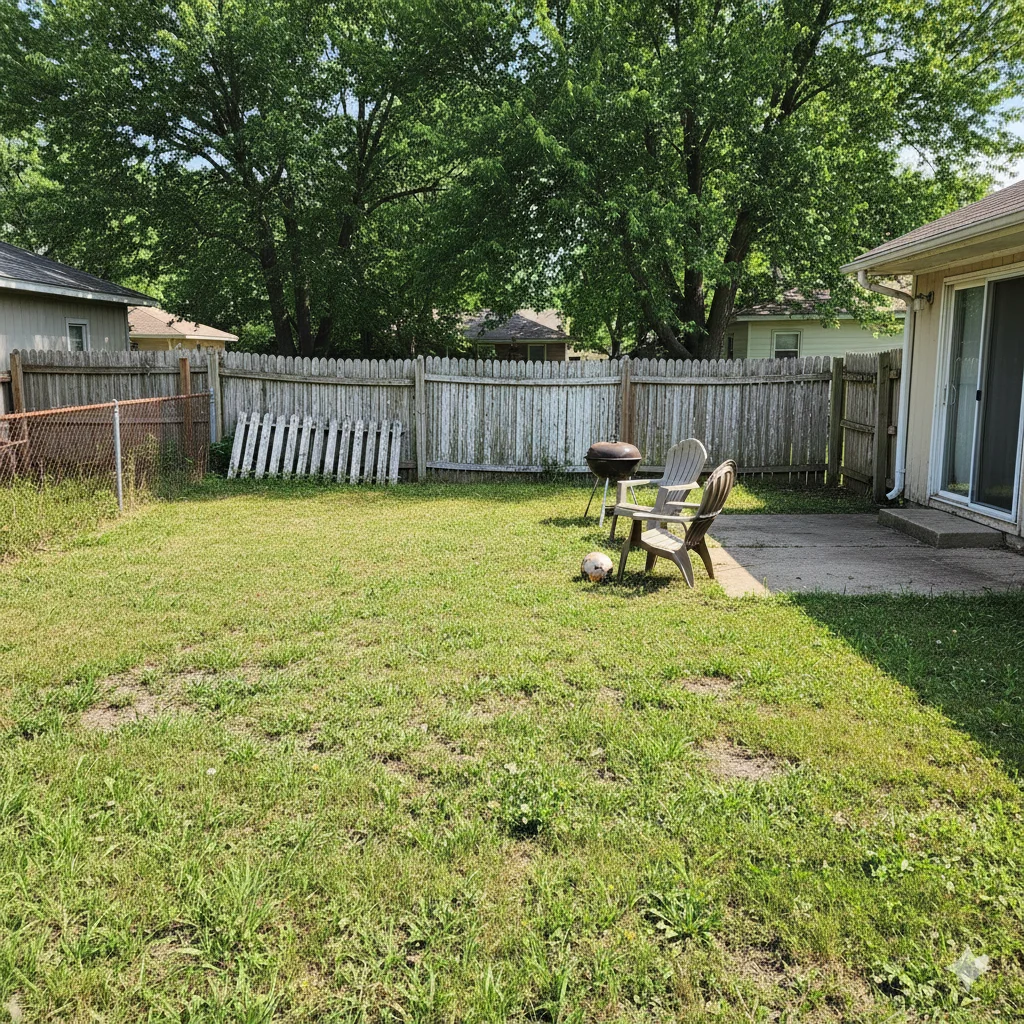
If you’ve ever looked out at your backyard and thought, “This could be so much better, but I don’t have time or budget for a full renovation,” you’re not alone.
Most of us don’t want a show garden that needs constant attention. We want an outdoor room that feels calm and private, that looks good from the kitchen sink, and that doesn’t turn into one more project on the weekend.
This guide walks through a realistic backyard makeover you can adapt to almost any suburban yard:
- A simple layout that functions like an outdoor room
- A low-maintenance “floor” using gravel, pavers, or a small deck
- A modern privacy fence that acts as a beautiful backdrop
- Easy-care plants, layered lighting, and comfortable seating
Think of it as a framework, not a rigid plan. You can scale it up or down depending on the size of your yard and your budget.
Step 1 – Decide How You Want the Backyard to Feel
Before you touch a shovel or shop for plants, pause and ask a straightforward question:
How do I want this space to feel when I step outside?
Some common answers:
- Calm and minimalist
- Cozy and cocooned
- Lush and green, but not high-maintenance
- Social and ready for friends in the evenings
Write that feeling down and keep it in front of you. It becomes the filter for every decision: furniture, colours, plants, and materials.
Next, sketch your yard (nothing fancy):
- Mark, where do you come out of the house?
- Decide where you’d like to sit (at the dining table, in the lounge chairs, or by the fire pit).
- Note where you need privacy most (neighbour’s windows, street, side yard).
- Draw a simple path from the door to the main seating area.
Even a quick, messy sketch will help you see the yard as a set of zones instead of one big rectangle of grass.
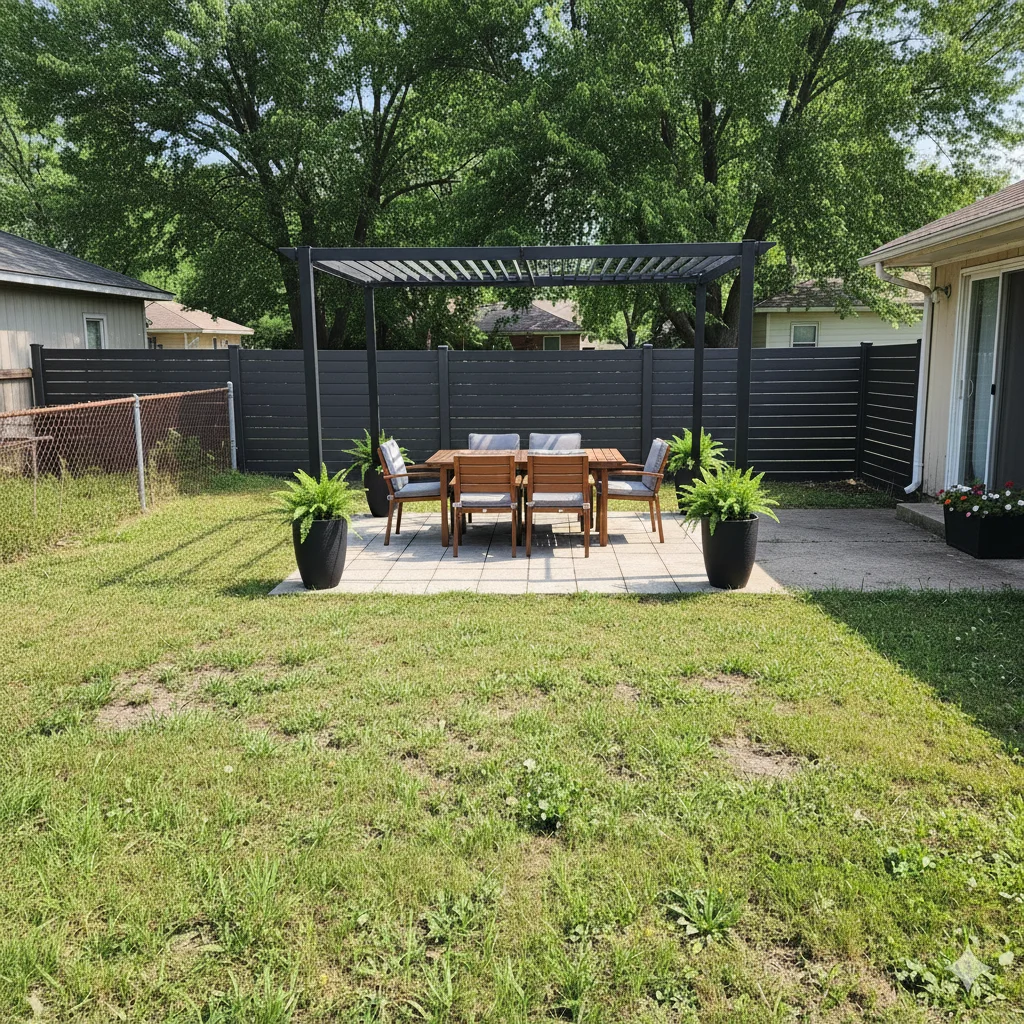
Step 2 – Build the Backbone: Floor, Wall, and Simple Structure
2.1 The “Floor”: Mixing Low-Maintenance Surfaces
Instead of one big patch of lawn to mow, think in layers of surfaces:
- A small deck or landing right off the back door (wood or composite)
- A gravel or paver patio where you’ll sit and entertain
- Stepping stones or large pavers set in gravel or mulch for paths
Gravel still earns its place as a budget-friendly, easy-draining “floor,” but it doesn’t have to be the only material. A strip of concrete or porcelain pavers inside the gravel reads more polished and keeps chair legs stable. A little deck or raised platform can make the transition from inside to outside feel intentional instead of “step down into the yard somewhere over here.”
Think of these surfaces as the equivalent of flooring inside your home. Once they’re down, everything else becomes much easier to place.
2.2 The “Wall”: A Modern Privacy Fence as a Backdrop
The other significant move is your backdrop: the fence.
If you’re starting from scratch or replacing an old one, it’s worth choosing something that works hard for you visually and practically.
A few things to look for:
- Clean, horizontal lines that visually widen the yard
- Warm, wood-look tones that feel inviting next to greenery
- Low maintenance, no annual staining or sealing
- Panels are designed to stay straight rather than warp or twist over time.
Instead of traditional boards, look for modern wood-look aluminum privacy fence panels that mimic the warmth of wood but are built on an aluminum structure. They still give you that cozy, plank-style look, but the boards don’t rot, peel, or cup, and the colour is baked into the finish rather than painted on.
Place your main seating area so this fence becomes the “feature wall” of your outdoor room. Later, you can layer in:
- A slim bench or built-in along the fence
- A narrow raised planter at the base
- Climbing plants, lanterns, or outdoor art to soften it
2.3 A Small Structure for Shade and Drama
If you want a bit of architecture in the mix, a pergola over the main seating area gives you:
- A spot to hang string lights
- A sense of enclosure without blocking sky views
- Optional shade depending on the design
If your climate is hot in summer or you love being outside on bright days, consider a maintenance-free aluminum sunroof pergola with adjustable louvres. You can tilt them open for sky and breeze or close them when the sun is harsh, without worrying about rot or peeling paint.
Even a compact pergola over part of the seating area makes the whole backyard feel more “finished,” especially when paired with that modern fence backdrop.
Step 3 – Add Plants That Don’t Take Over Your Weekends
A calm backyard full of chores isn’t very calming. When you’re choosing plants, aim for:
- Perennials that come back year after year
- A few evergreens for winter structure
- A limited palette, you repeat, not dozens of different varieties
Some ideas that work in many temperate zones (always check for your own climate and light conditions):
- Evergreen anchors
- Boxwood, dwarf conifers, or yew for low hedging
- Soft, movement plants
- Ornamental grasses, lavender, catmint, feather reed grass
- Seasonal color
- A couple of long-blooming perennials or flowering shrubs you really love
Design around your fence and “floor”:
- Create one or two simple beds along the fence to echo the lines of the patio.
- Place taller plants near the fence to soften the wall and add depth.
- Using a few larger containers on the patio for herbs or seasonal flowers is much easier than filling 15 small pots.
Keep maintenance realistic: plant in groups, mulch well, and, if budget allows, run a basic drip line or soaker hose through the beds so watering is more or less automatic.
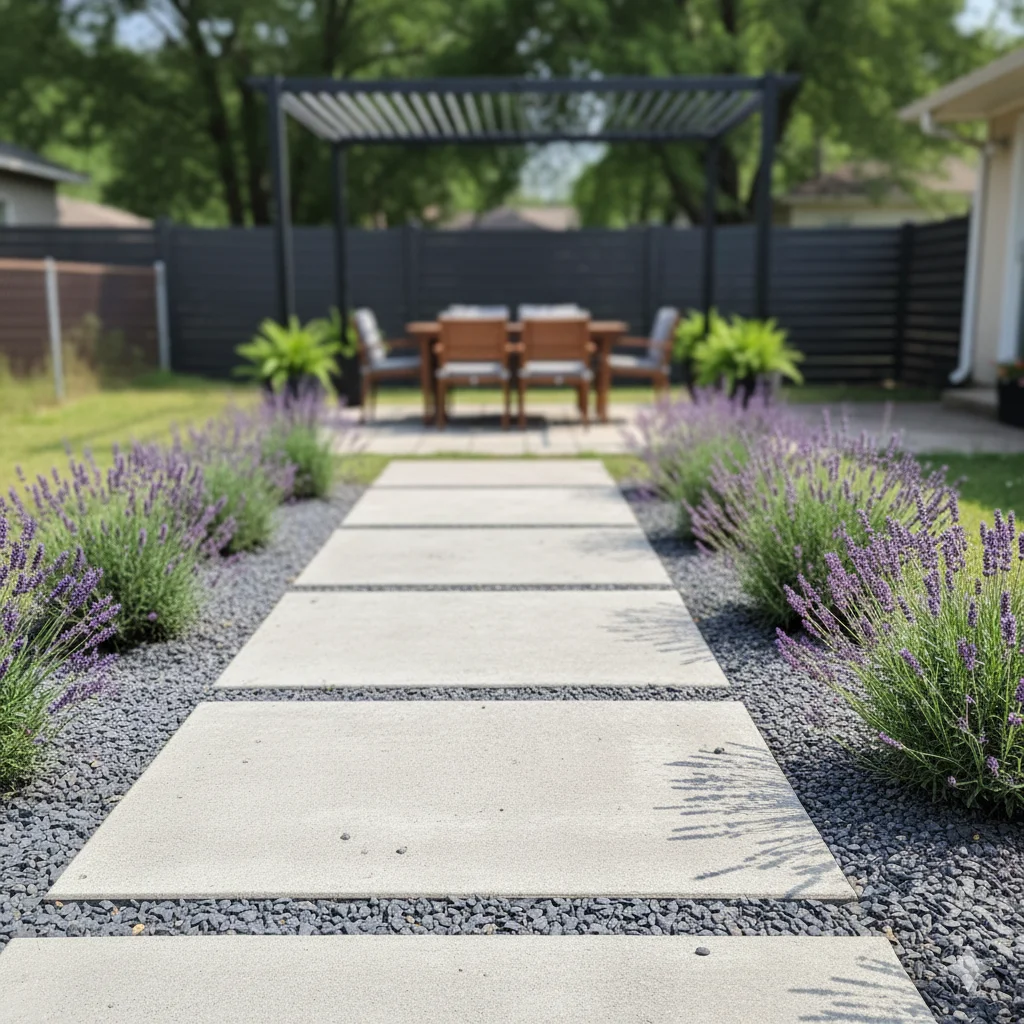
Step 4 – Create Pathways and Little “Moments”
Even in a small yard, a simple path makes the space feel intentional.
- A paver or stepping-stone path set in gravel or mulch from the house to the seating area keeps feet clean and guides the eye.
- A side path toward a gate, shed, or vegetable garden gives you another small “destination.”
- Between zones, leave pockets for a chair, a planter, or even a bird bath, tiny “moments” that make the yard feel explored, not just crossed.
If you want to go deeper on the nuts and bolts, digging the trench, adding a compacted base, weed fabric, and edging, this step-by-step gravel path tutorial walks you through the whole process.
Where the path edges meet planting beds, let plants spill slightly over the stones. That softens the lines and makes the space feel lived-in instead of rigid.
Step 5 – Layer in Lighting and Comfort
Nighttime is when many outdoor spaces really come alive.
5.1 Lighting
A simple lighting plan goes a long way:
- String lights hung from the house to the fence or between pergola posts
- Solar path lights along the edge of the patio or main path
- One or two wall lights near the back door, if you have a power source
Aim for a warm, gentle glow rather than bright, cool lighting. You want it to feel like an evening living room, not a parking lot.
5.2 Furniture and Textiles
Start with the primary function of the space:
- If you love eating outside, prioritize a dining table and comfortable chairs.
- If you’re more of a book-and-coffee person: a small outdoor sofa, loveseat, or a pair of loungers plus a low table.
- If you like fire pits, a circular arrangement of chairs around a low fire feature.
Then add a few texture layers:
- An outdoor rug to anchor the seating area
- Cushions and throws in colours you repeat from inside the house for a “connected” look.
- A couple of lanterns with battery candles for an instant mood
Placed in front of your privacy fence and, ideally, under a pergola or string lights, even modest furniture becomes part of a complete outdoor room.
Step 6 – A Weekend-by-Weekend Plan
To keep the project manageable, break it into chunks:
Weekend 1 – Plan & Clear
- Sketch your layout and mark future patio and path areas with a hose or spray paint.
- Clear out anything that’s obviously not staying (old planters, broken furniture, random clutter).
Weekend 2 – Build the “Floor”
- Remove grass where the patio and path will go.
- Install base material and lay gravel, pavers, or a combination of both, plus edging to keep everything contained.
Weekend 3 – Fence & Structure
- If you’re installing new fencing, it is often best to schedule it with pros, especially for precise systems like modern wood-look aluminum privacy fence panels.
- If you’re adding a pergola, anchor the posts and get the basic frame up.
Weekend 4 – Plants, Lighting, and Furniture
- Plant your beds and pots.
- Run basic lighting (string lights, path lights).
- Bring in the seating, rug, and small decor pieces.
By the end of a month of reasonable weekend work, the yard will feel dramatically different, even if you keep refining the details over time.
Step 7 – Why the Fence Choice Matters More Than You Think
Many backyard projects start with furniture or plants. In reality, the fence often does the quiet heavy lifting:
- It sets the mood with warm wood tones vs. stark gray panels.
- It defines your sense of privacy and enclosure.
- It’s the single largest vertical surface you see from inside the house.
If you live somewhere with harsh winters, intense sun, or big weather swings, paying attention to how the fence is built really pays off. Instead of a basic builder-grade panel, look for engineered aluminum fence systems built for harsh weather, the kind that are designed to stay straight, resist cracking or peeling, and handle wind better than simple boards nailed to posts.
When the structure behind your greenery is solid and low-maintenance, everything else in the yard becomes easier to enjoy. You’re not constantly thinking about what’s warping, leaning, or rotting; you’re just using the space.
Final Thoughts: A Backyard You’ll Actually Use
You don’t need a whole landscape crew or a huge budget to transform a plain yard into a place you genuinely love spending time in.
Focus on:
- A simple, low-maintenance floor of gravel, pavers, or a small deck
- A modern, durable privacy fence that feels like an outdoor feature wall
- A handful of reliable plants repeated for rhythm and calm
- Lighting and seating that make the yard usable on ordinary evenings
Done thoughtfully, those pieces turn a basic backyard into an outdoor room that works like your favourite space inside the house, just with more fresh air.
FAQs
It focuses on durable surfaces, fewer plant varieties, and materials that don’t need regular sealing, staining, or constant care.
Gravel drains well and costs less, while pavers add stability and polish; combining both often delivers the best balance.
Modern systems offer cleaner lines, better durability, and far less ongoing maintenance than standard wood panels.
Yes, many wood-look aluminum panels closely mimic real timber while avoiding rot, warping, and peeling.
Six to eight feet usually provides enough screening without making the space feel closed in.
Aluminum pergolas require very little upkeep compared to wood and won’t need repainting or sealing.
Evergreens, ornamental grasses, and hardy perennials offer structure and interest with minimal care.
Clear zones, simple paths, and a strong backdrop like a privacy fence help define the space.
Lighting extends usability into the evening and makes the space feel finished and welcoming.
Yes, breaking the project into weekend phases keeps costs manageable and progress realistic.


