Today I am excited to join a monthly DIY challenge along with tons of creative and talented bloggers to bring you all sorts of ideas through the year.
Each month we’ll tackle a different topic, from furniture builds to $20 DIY decor, and share tutorials (and at the end of the month I’ll share a few highlights). Today we’re kicking it off with “Build To Organize”!
Since we just started our kitchen renovation and have been tearing apart our whole first floor (our flooring is getting replaced and refinished along with the kitchen) I took liberties with the word “BUILD” in this challenge!! However, I DIYed something I have been meaning to do FOREVER, that is truly an easy and DO-able DIY that anyone can tackle, even if you don’t have a lot of tools. You can find the supply list at the end of this post. Affiliate links are included in this post for your convenience. Read more about affiliate links here.
DIY Necklace Hanger
I know you have seen 4 million jewelry hangers on Pinterest (like this one I made from an old frame when I first started blogging) but let me tell you – this version is SO simple and easy and QUICK that when your long necklaces are hanging nice and neat on the wall instead of in a tangled mess in your jewelry box or a drawer or strewn on top of your dresser, you will be SO GLAD you finally did this 20 minute DIY!
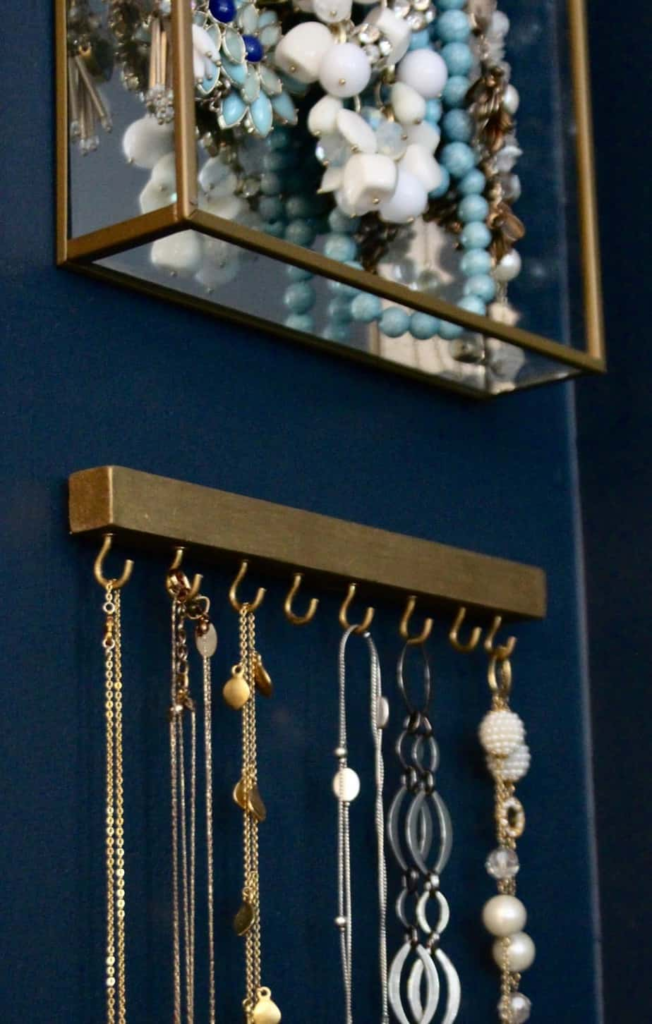
Recently I found two mirrored wall mounted jewelry boxes at Marshalls and LOVE them – I hung them next to my little vanity table, one with my gold necklaces and the other with silver based necklaces.
The only problem is that they are only about 12″ in length so my long necklaces didn’t fit in them. That’s were the tangled mess in my drawer came into play. So what’s a DIYer to do? Make a necklace hanger to suit my needs, that’s what. The beauty of making your own is that you can customize the size to fit on your bedroom wall, in your closet, wherever you have a little wall space.
Look how simple this DIY necklace hanger is!
1• Measure and mark trim
2• Cut to size with a saw. If you don’t have a chop saw a hand held sawworks just fine for this!
3• Sand edges of trim
4• Measure, mark and drill holes for hooks using a drill bit that is slightly smaller than the screw of the hooks
5• Apply Rub n’Buff with a paint brush and allow to dry for a minute or two, then brush off the excess. R&B can go right on the raw wood (alternatively you could spray paint the wood and hooks after assembling)
6• Screw in hooks
7• Brush hooks with Rub n’Buff, allow to dry for a couple minutes and brush off the excess
8• Trim 3M Hanging Strips* a little thinner than back of trim
9• Hang 2 strips on the wall and push the strips on your necklace hanger firmly into them. I used the side of my first to punch them onto the wall strips.
I initially cut the 3M strips to the exact width of the trim like this…..
but they were visible once hung, so I trimmed both the strips on the wall and on the back of the trim so they were recessed 1/8th of an inch from the edge, and now they are not visible at all once hung. *I like the 3M brand specifically because have you ever bought the cheap version of these? Yeah, not so much. The name brand is worth the money because they hold reliably.
If you have the materials on hand you truly can make this and untangle your long necklaces in 20 minutes!
SUPPLIES
Square poplar dowel
5/8″ brass cup hooks
Gold Leaf Rub n’Buff
3M Hanging Strips
Saw of some sort – I have an older model of this saw and love it; this saw and box is fine for beginner DIYs
Drill/driver
Drill Bits
Cheap Paint Brush – I like these sets for throw-away brushes (Rub n’Buff hardens on the brush)
This square poplar dowel can also be found in the trim aisle of Lowes under the long pieces – they usually stock “craft” wood in 36″ lengths. Super inexpensive and I like the shape for this project – it looks like a metal bar when Rub n’Buffed.
Don’t you love how jewelry can double as art? Hanging it on your wall is pretty and functional!
I hope you enjoyed this quick and DO-able DIY!!If you’re new here and want to see more of my actual build projects,
check out the wall of bookcases
or the fireplace remodel!
My DIY comrades have some great projects to deliver today – be sure to take a peek around at all these great blogs and see their smart ideas to organize your home!
1905 Farmhouse, Abbots at Home, Bitterroot DIY, By Brittany Goldwyn, Creative Ramblings, Cribbs Style, Delicious & DIY, DIY Beautify, DIY Danielle, Dukes and Duchesses, Girl, Just DIY, Happily Ever After, Etc, Health, Home & Heart, House by the Bay Design, House on Longwood Lane, Just Measuring Up, Kenya Rae, Little Bits of Home, Living Letter Home, My Kitchen My Craft, Pinspired to DIY, Red Cottage Chronicles, Refashionably Late, Renovating Mapleson Manor, Savvy Apron, Shine Your Light, Shrimp Salad Circus, Songbird Blog, Southern Revivals, T.Moore Home, The DIY Dreamer, The DIY Village, The Frugal Homemaker, The Handyman’s Daughter, Two Feet First, What Meegan Makes, Zucchini Sisters