There’s nothing quite like the feeling of transforming a room with a fresh coat of paint. It’s one of the most forgiving, affordable, and high-impact home improvement projects you can take on. But behind every perfectly smooth wall, crisp baseboard, or furniture makeover is a foundation of solid preparation. Paint alone can’t cover dents, grease, gloss, or damaged surfaces not for long, anyway. The truth is simple: if you want a flawless finish, the real work happens before the roller hits the wall.
Surface prep isn’t glamorous, but it’s responsible for about 80% of a successful paint job. When a surface is cleaned, repaired, sanded, and primed properly, the paint bonds more effectively, cures evenly, and lasts significantly longer. Poor prep leads to bubbling, peeling, cracking, uneven sheen, and that frustrating moment when you realize you’ll need to repaint much sooner than expected.
This article walks you through each step of prepping surfaces for painting at home walls, trim, cabinets, and furniture while explaining not just what to do but why each step matters. Two authoritative resources are included to support scientific and environmental points often overlooked in DIY painting.
Why Proper Surface Prep Is More Important Than You Think
Paint looks its best when the surface underneath is stable, clean, and uniform. Even the highest-end paint cannot compensate for a dirty, glossy, or damaged base.
Prep ensures:
- Cleanliness – so the paint can grip the actual surface
- Smoothness – so imperfections don’t telegraph through
- Texture or “tooth” – to improve adhesion
Skipping these steps doesn’t only affect appearance it shortens the life of the paint. When paint cannot bond well, environmental factors like humidity, sun exposure, and chemical breakdown accelerate deterioration. This is similar to the natural process of photodegradation, the light-driven breakdown of materials, which can be read about.
Understanding these factors reinforces why thorough prep work is essential for lasting results.
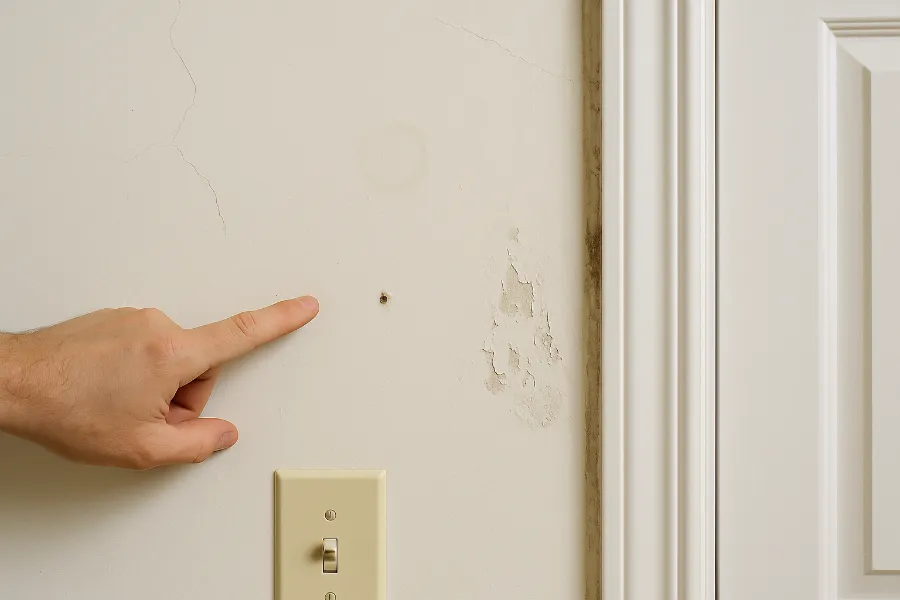
Step 1: Inspect the Surface Carefully
Before cleaning, patching, or sanding, take time to truly inspect the area you plan to paint. This is the most overlooked step among DIY painters, yet it sets the tone for the entire project.
Look for:
- Fine cracks or larger drywall fractures
- Nail pops
- Water stains
- Peeling paint
- Glossy finishes
- Grease or cooking residue
- Mold or mildew
- Holes from old hardware or décor
Each of these issues requires a specific remedy. A kitchen wall with oils from cooking needs a degreaser. A sun-exposed door with peeling paint needs scraping and sanding. A bathroom wall with minor mildew needs cleaning and priming. Understanding the surface before you start allows you to plan your approach instead of reacting mid-project.
Step 2: Clean the Surface Thoroughly
Every painting project no matter the surface begins with a proper cleaning. Even surfaces that look clean may have invisible residues that interfere with adhesion: oils from hands, airborne grease, dust, residues from cleaners, or even candle soot.
For walls:
Use warm water mixed with a few drops of dish soap or a TSP substitute. In kitchens and bathrooms, a stronger degreaser may be necessary because steam and cooking oils create stubborn films.
For trim and doors:
These areas collect lots of hand oils and dust. A mild degreaser breaks it down effectively. Avoid soaking the wood—damp cloths only.
For cabinets and furniture:
A mixture of warm water and degreaser or mineral spirits helps remove waxes and polishes that paint won’t bond to.
Rinse the surface afterward and allow it to dry completely. Cleaning is the step that determines whether the paint grips or simply coats the residue on top.
Step 3: Repair Imperfections
Once the surface is fully clean, it’s time to repair visible damage. Paint will highlight imperfections, not hide them.
Common repairs include:
- Small holes and dents: Use lightweight spackle or joint compound.
- Cracks in drywall: Use flexible crack repair caulk or tape and mud for bigger cracks.
- Peeling paint: Scrape loose areas with a putty knife and feather the edges.
- Water stains: After fixing the source of the moisture, seal the stain with a stain-blocking primer.
- Damaged wood trim: Fill dents or soft spots with wood filler.
Allow repairs to dry fully before sanding. Rushing this step leads to uneven surfaces and visible patch outlines under paint.
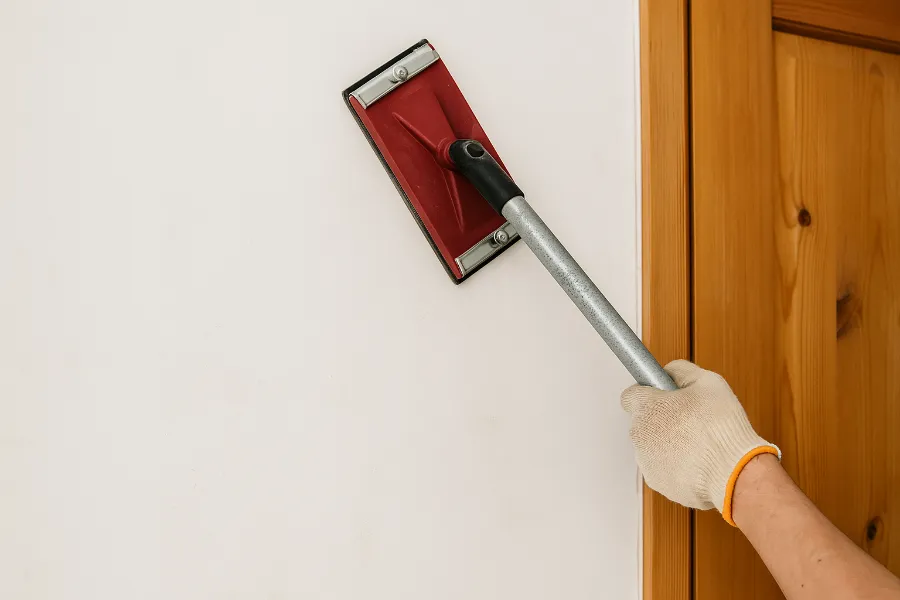
Step 4: Sanding — The Step That Makes or Breaks the Finish
Sanding is the backbone of surface prep. It smooths repairs, removes gloss, eliminates small bumps, and creates just enough roughness for paint to grip.
Walls:
Use 120–220 grit to lightly scuff the entire surface. A sanding pole makes this faster and more uniform.
Trim and doors:
Trim often has glossy enamel. Start with 120 grit to break the sheen, then move up to 180–220 grit.
Furniture and cabinets:
Start at 120 grit for removing gloss or old finish, then progress to 180–220 grit. For ultra-smooth finishes common with furniture finish with 320 grit.
Bare wood:
Always sand with the grain to avoid swirl marks.
After sanding, vacuum the dust and wipe the surface with a damp cloth or tack cloth. Dust left behind becomes bumps in your final paint job.
Step 5: Dealing With Glossy, Varnished, or Sealed Surfaces
Paint doesn’t bond to shiny surfaces. This includes varnish, polyurethane finishes, melamine, laminates, and certain factory coatings.
Your options:
- Sanding – the classic method to remove gloss
- Liquid deglosser – fast, effective on trim, cabinets, and doors
For laminate furniture or cabinets, sanding plus a bonding primer is mandatory.
Skipping this step almost guarantees peeling.
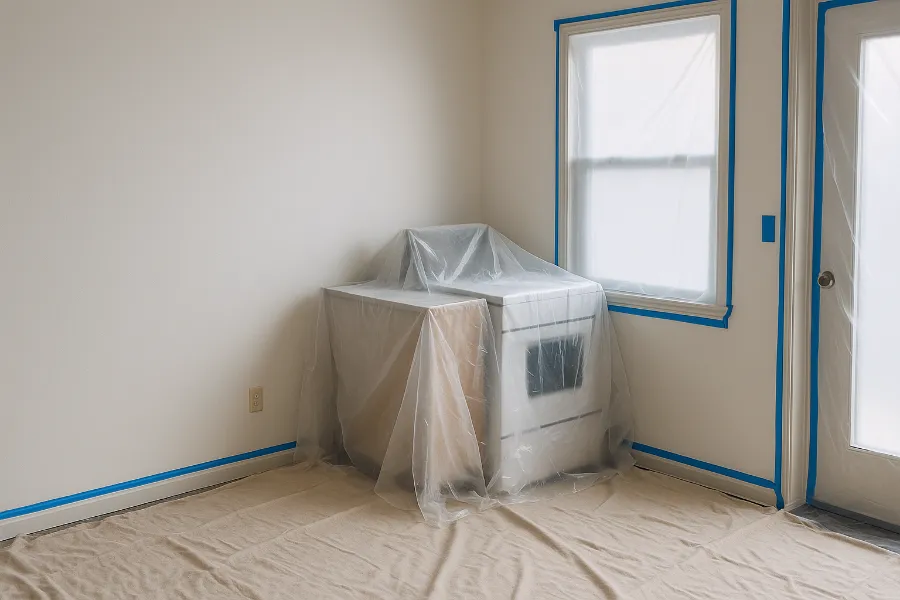
Step 6: Protect Surrounding Areas
A clean paint job is as much about protection as it is about technique.
- Use painter’s tape for crisp lines
- Lay drop cloths on floors
- Cover counters, windows, mirrors, and appliances
- Remove outlet covers and hardware instead of painting around them
Protecting your space makes the project smoother and reduces cleanup time dramatically.
Step 7: Prime the Surface Properly
Primer is the unsung hero behind every long-lasting paint job. Its purpose is to create a uniform, adhesive-friendly base.
You absolutely must use primer if:
- You’re painting over dark or bright colors
- You’re covering stains
- You’re painting bare wood
- You’re changing from oil-based to latex paint
- You’re painting cabinets, trim, or furniture
- The surface is glossy
Different primers serve different purposes:
- Latex primer: For drywall and general use
- Oil-based primer: Excellent adhesion for glossy surfaces
- Shellac primer: The best stain blocker (water, smoke, ink)
Primer seals in repairs, evens out porosity, and prevents paint from absorbing unevenly.
Step 8: Lightly Sand the Primer Coat
After primer dries, do a quick sanding with 220–320 grit. This removes minor texture and ensures your first coat of paint glides on smoothly.
Wipe away all dust afterward.
Step 9: Understand Environmental Conditions Before Painting
Temperature and humidity dramatically affect how paint cures. High humidity slows drying, traps moisture, and can cause bubbling or wrinkling. Low temperatures cause paint to thicken and cure unevenly.
Ideal conditions:
- 50°F–85°F (10°C–29°C)
- Humidity below 50%
Environmental awareness matters especially because many paints contain volatile organic compounds (VOCs), which interact with air quality. The U.S. Environmental Protection Agency provides clear guidance on VOCs. Understanding paint chemistry and environmental effects helps you make better decisions about timing and ventilation.
Step 10: Choose the Right Tools for Your Surface
Even perfect prep can be ruined with poor-quality tools.
Walls:
High-quality rollers prevent texture inconsistencies.
Trim and doors:
Angled brushes and foam rollers create smooth, professional results.
Furniture and cabinets:
A sprayer delivers the best finish, but dense foam rollers work well too.
Cheap tools leave streaks, bubbles, and drag marks issues that proper prep cannot fix later.
Step 11: Don’t Rush the Drying Process
Painting requires patience. Every layer cleaning, patching, sanding, priming, and painting needs full drying time.
Rushed drying leads to:
- Wrinkling
- Peeling
- Roller marks
- Soft, easily damaged surfaces
- Poor adhesion
Follow manufacturer drying times, and if in doubt, give it more time.
Step 12: Special Considerations for Different Projects
Kitchens and bathrooms:
Use mold-resistant primers and strong degreasers.
Exterior surfaces:
Often require scraping, power washing, mildew treatment, and temperature awareness.
Furniture:
May need stripping, sanding, deglossing, and specialized bonding primers.
Old trim:
Multiple paint layers might need heavy sanding or stripping.
Each project has nuances, but every successful paint job relies on the same core steps: clean, repair, sand, prime, and refine.
The Real Reward of Good Prep
Prep work may feel slow, but it gives you results that feel professional, durable, and beautiful. When you walk past a wall that’s perfectly smooth, a cabinet that looks brand new, or trim that looks like it came straight from a showroom, you’ll see why proper prep is worth every minute.
Clean surfaces create better adhesion. Smooth surfaces produce better finishes. Primed surfaces last longer. And well-prepped surfaces resist the everyday wear and tear that typically ages paint prematurely. The effort you put in washing, sanding, patching, priming translates directly into how satisfied you’ll be with the final outcome. When you prep well, the painting becomes the easy part. And the results? They speak for themselves.
FAQs
Proper prep ensures the paint adheres well, lasts longer, and looks smoother. Skipping prep often leads to peeling, uneven finishes, and early paint failure.
Yes. Dust, oils, and residues can prevent paint from bonding properly. Cleaning helps ensure better adhesion and a more even finish.
Use 120–220 grit for most interior walls. It removes minor bumps and provides a slight texture for primer and paint to grip.
Primer is needed when covering stains, painting over dark colors, working on bare wood, painting glossy surfaces, or switching from oil-based to latex paint.
Loose and flaking paint must be scraped off. The surface should be sanded smooth to prevent visible ridges or future peeling.
Yes, but it works best as a supplement not a full replacement. It’s ideal for cabinets, trim, and glossy surfaces that are difficult to sand.
Most spackles dry within 30 minutes to a few hours, but deeper repairs may require overnight drying. Always sand only when fully dry.
A light sanding with 220–320 grit helps smooth raised fibers or dust particles, creating an ultra-smooth surface for the topcoat.
High humidity slows drying, causes streaking, and may lead to bubbling or wrinkling. Aim for humidity below 50% for best results.
Furniture usually has varnish, wax, or old finishes. It requires thorough cleaning, sanding, possible deglossing, and a strong bonding primer before painting.


